Salesforce: Creating personalized fax campaigns in Sales Cloud and Fax Connection on MuleSoft
This tutorial explains sending personalized fax campaigns with Salesforce Sales Cloud and MuleSoft Anypoint Studio.
Developer: Customer/Partner
Category: Third-Party Integration for Cloud Fax
Prerequisites
Salesforce Sales Cloud is up and running.
Anypoint Platform’s desktop IDE is up and running.
API credentials (“Login-ID”) for Retarus Fax-for-Applications.
Each Retarus customer typically has a primary identifier for all booked services - the customer number. Multiple login IDs can be created for the same customer number (or tenant). This makes it possible to create different processing configurations to accommodate different people, departments, or purposes.
Overview
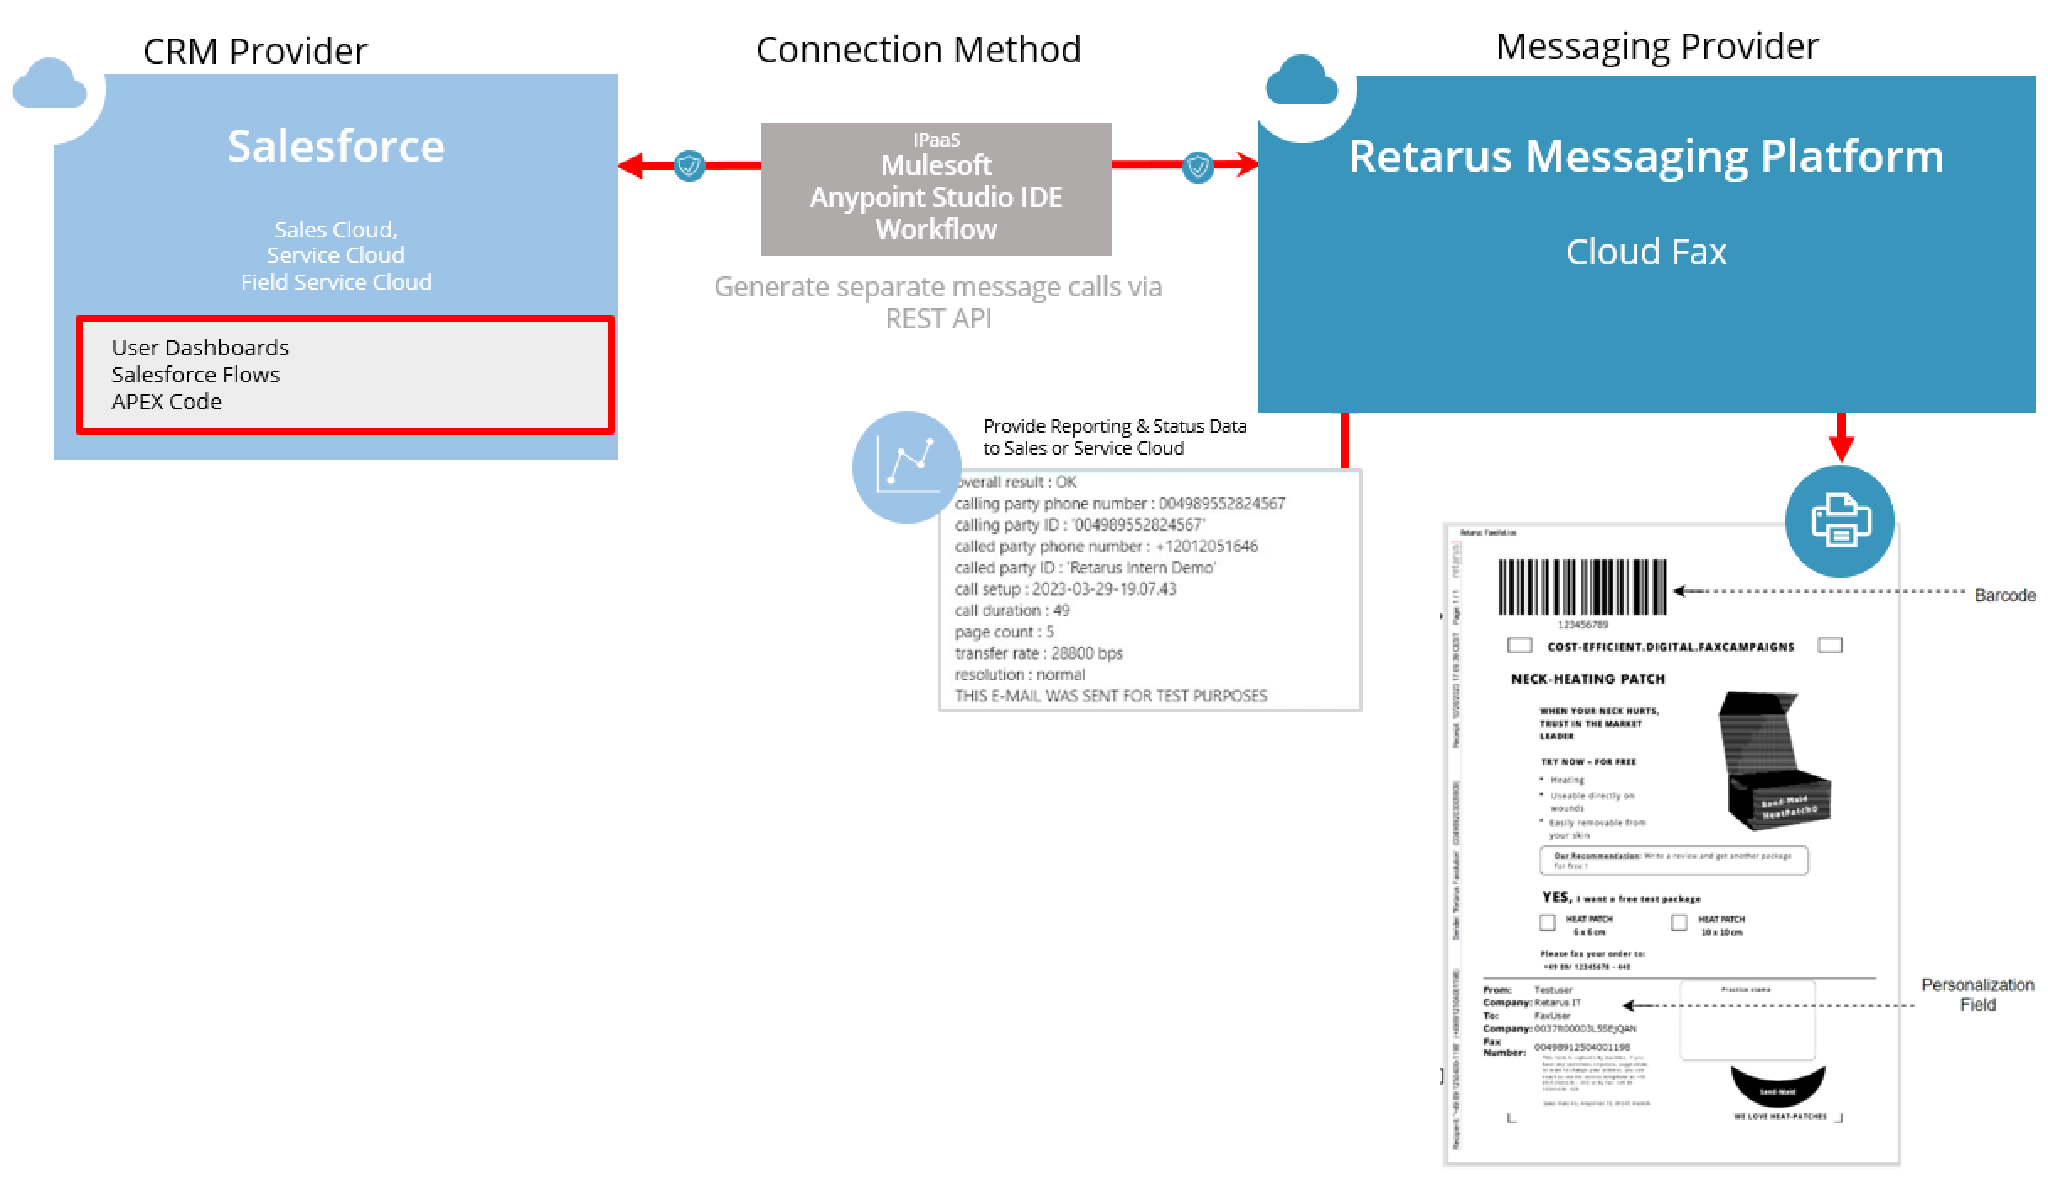
Creating personalized fax campaigns includes the following key steps:
Designing a user interface (UI) to select the recipients of a fax campaign in Salesforce Sales Cloud.
Transferring the campaign recipient data from the UI to an APEX class to process this data and send it to the MuleSoft platform (Anypoint Studio).
Processing data on the Mulesoft platform and dispatching faxes to the Retarus infrastructure via a REST API call.
The following diagram illustrates the flow of data through these steps:
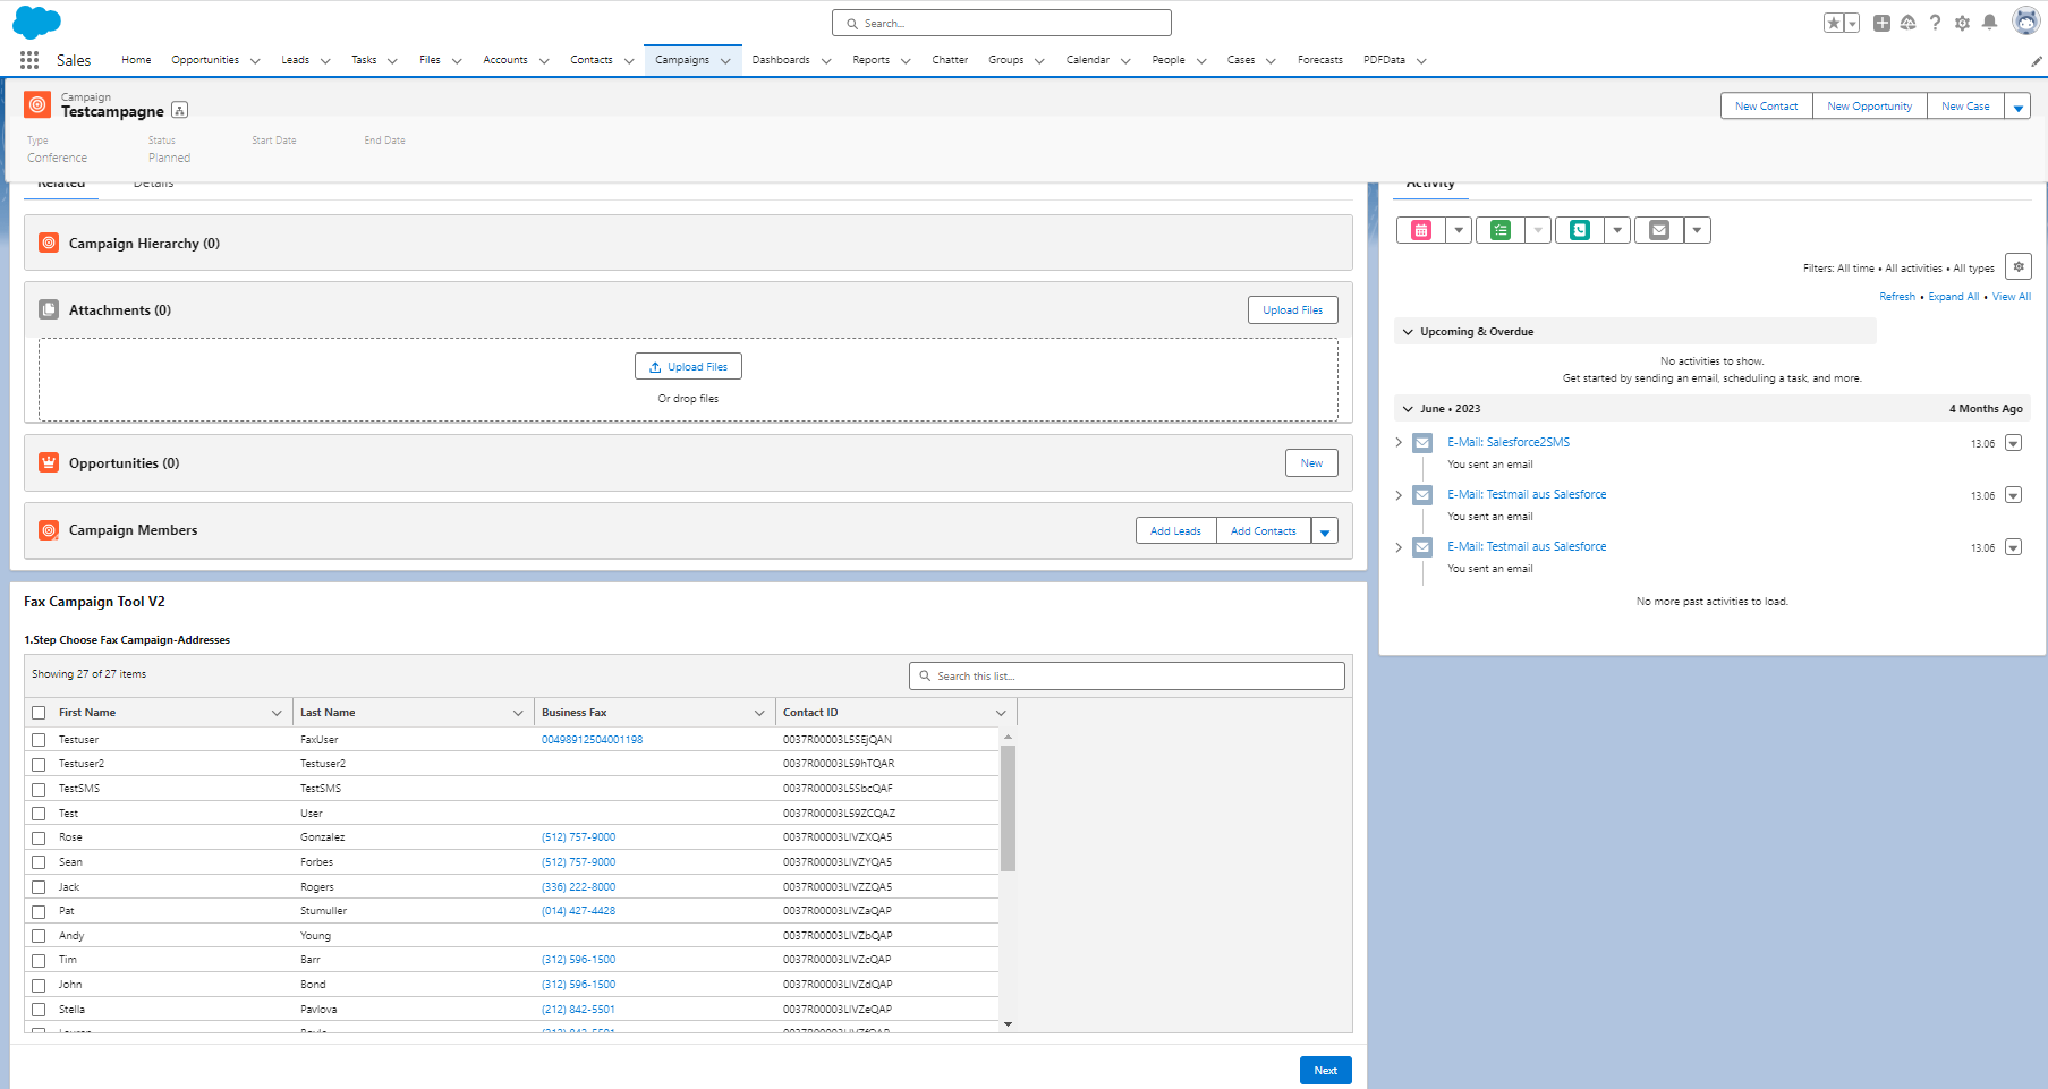
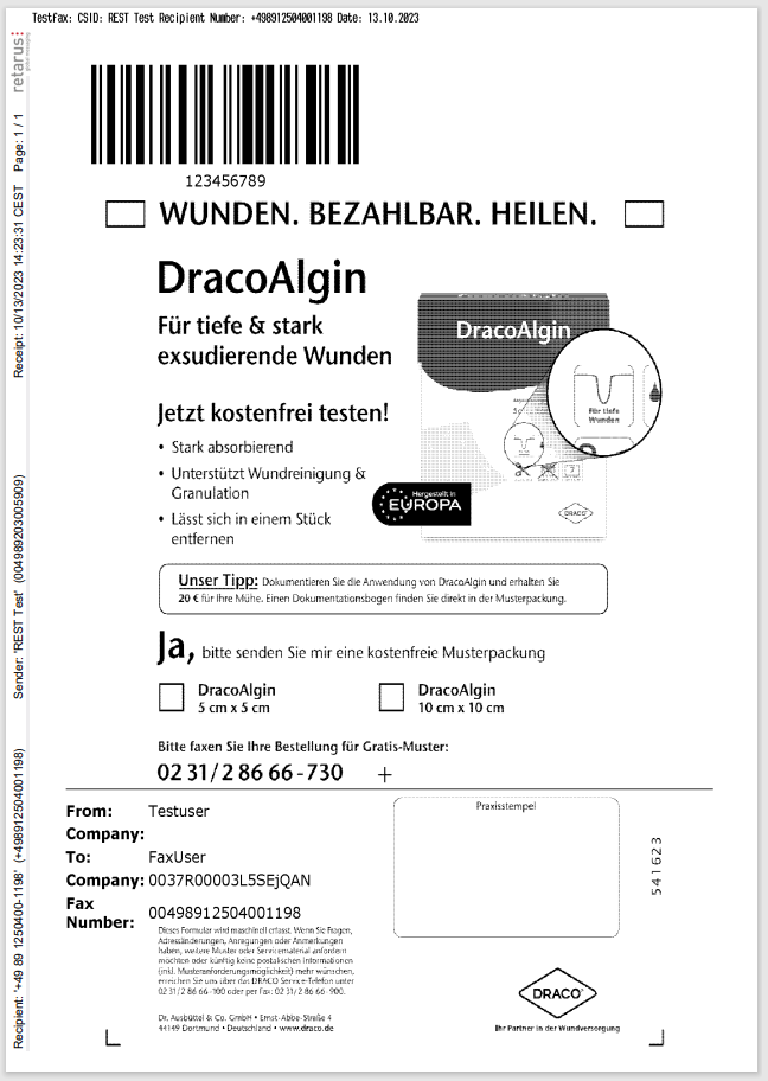
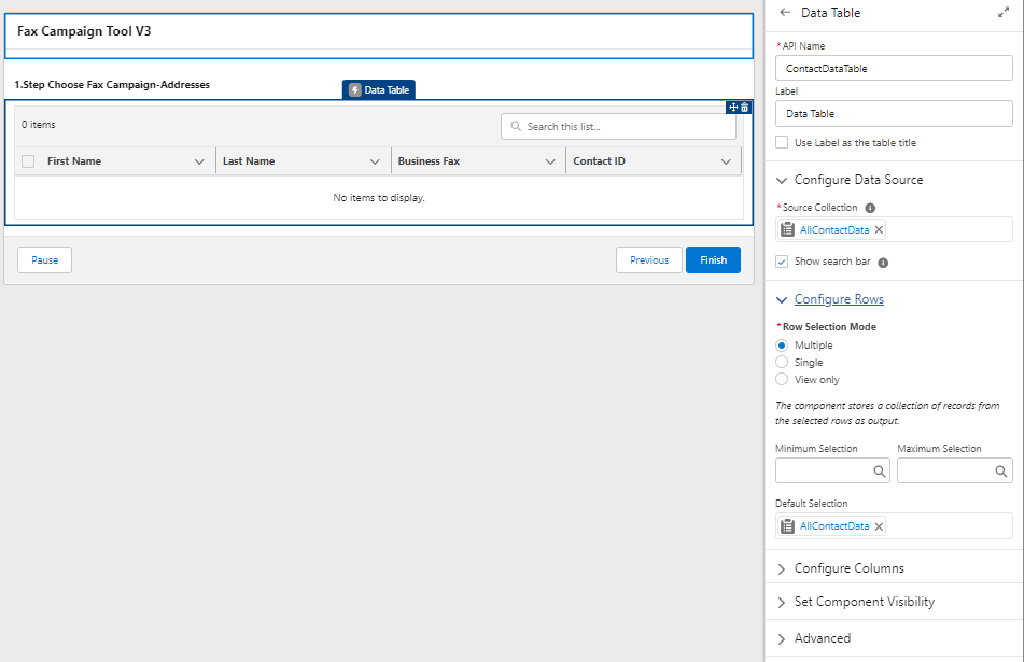
A designed Salesforce campaign page that is used as an example in this tutorial looks like this.
Steps for launching a new fax campaign
A new fax campaign can be launched by following these steps:
→ In the Campaigns tab, activate the checkboxes next to the desired fax campaign addresses and select Next.
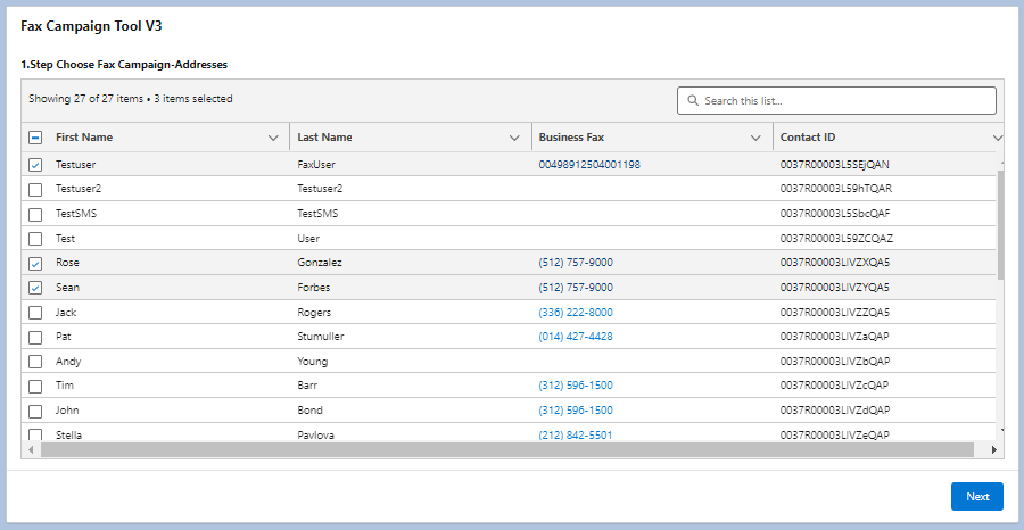
→ Review the chosen recipients and select Next.
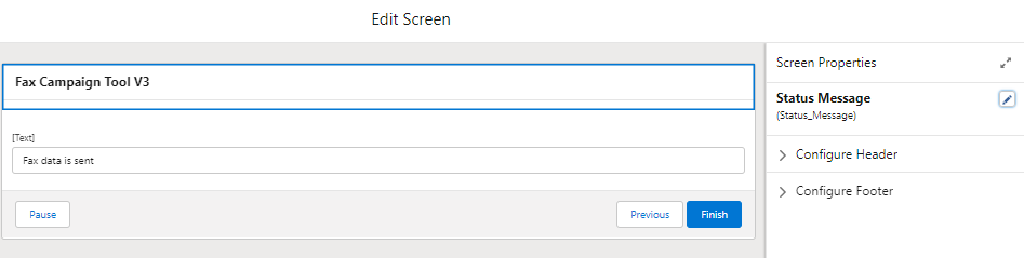
This starts the fax campaign and displays a message indicating that the fax data has been successfully sent.
The displayed message only indicates that data was sent to the Anypoint Studio IDE. It does not confirm the successful transmission of the fax.
A personalized fax campaign can be dispatched by combining an HTML Personalization Coversheet uploaded to the EAS portal with an overlay sheet in *.tif format.
Example
Designing a flow in Salesforce Sales Cloud
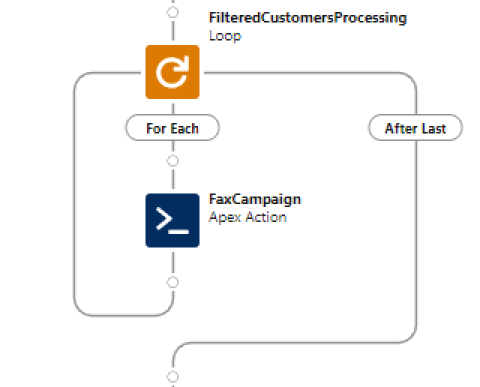
The basic flow in Salesforce Sales Cloud for sending fax campaigns is shown below:
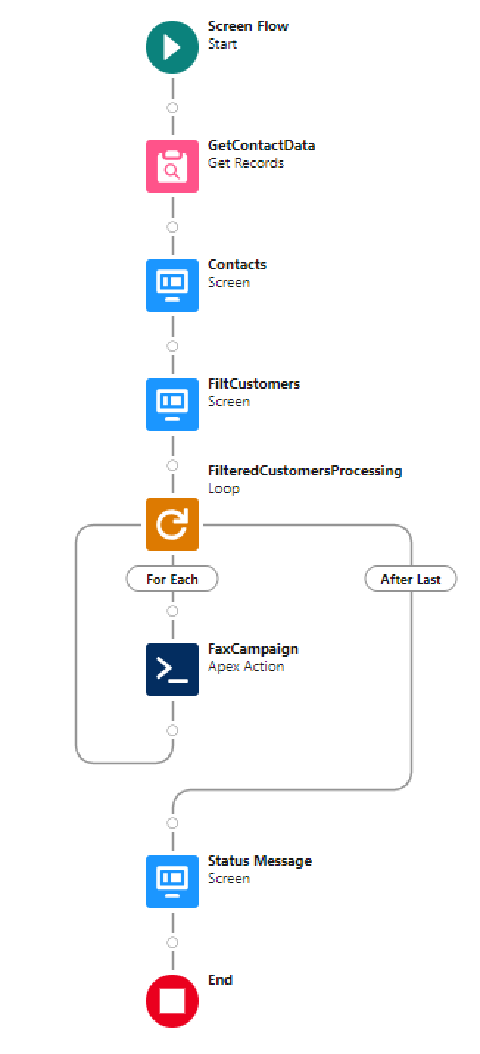
The following blocks are used to build the flow:
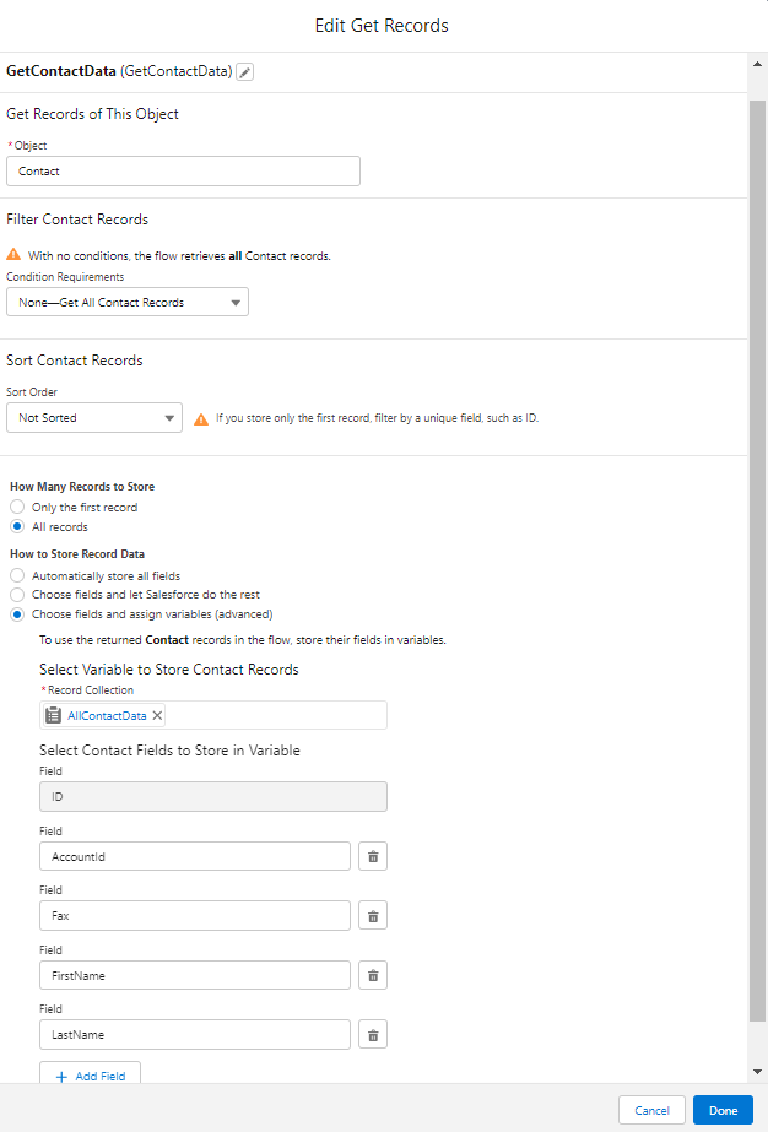
→ Get all contacts using the RecordCollection data structure.
→ Create a screen with a table for selecting recipients, including definitions for customizable columns.
→ Iterate over the recipients selected for the fax campaign, sending personalized faxes to each (using one REST call per recipient) via an APEX Action.
Note: For larger campaigns, consider combining all faxes into a single REST call to stay within the daily REST call limits set by the end customer’s Salesforce contracts.
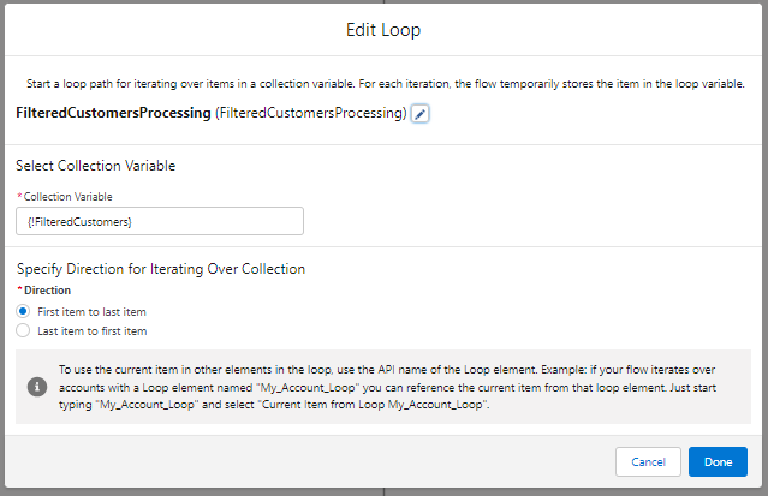
→ Edit the loop element.
→ Edit the Apex action.
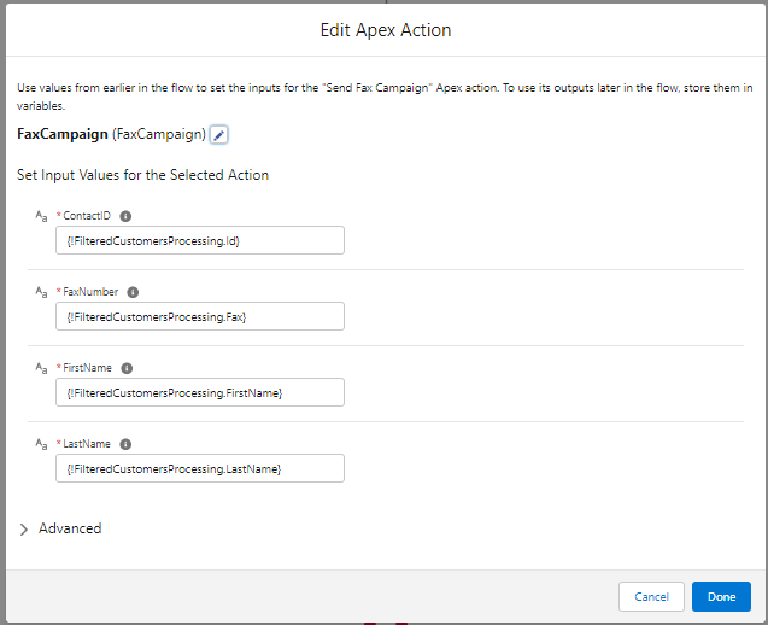
Below is the APEX code for this personalization. The personalization process is done on a per-document basis. A single REST API call is used to transfer a recipient’s personalization strings to the Mulesoft Anypoint Platform endpoint.
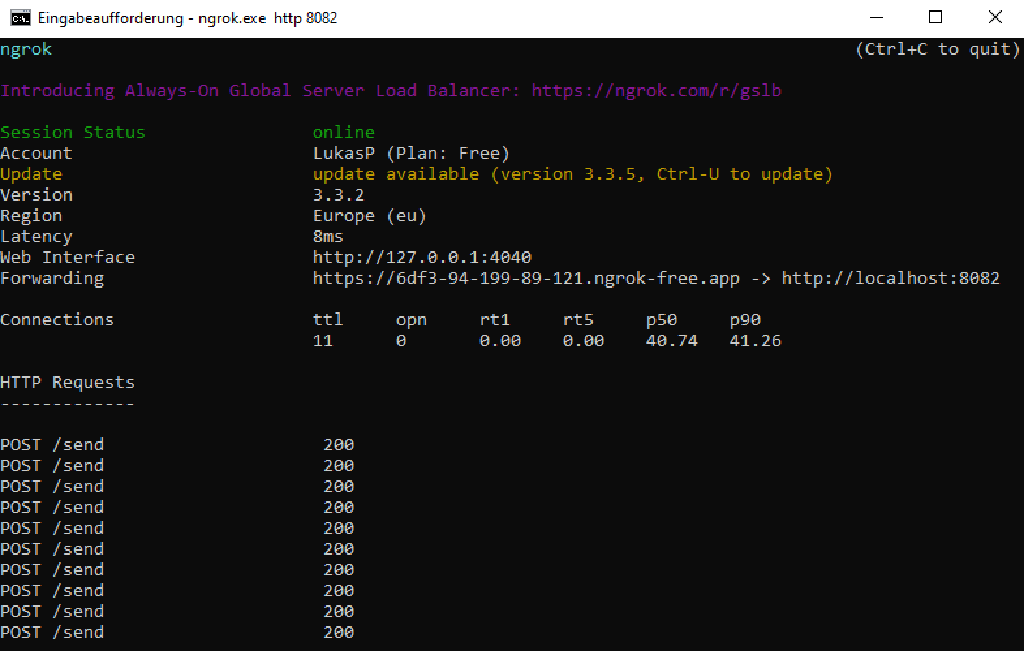
Alternatively, the Anypoint Platform or any other REST API call processing platform can be used instead of the local Anypoint Studio IDE. It is necessary to open a dedicated port to connect from Salesforce while using the Anypoint Studio IDE. NGROK can be used for testing purposes, but note that it involves opening the computer port to external entities (this should only be done for testing purposes or not at all).
The running interface of NGROX is shown below:
Apex code
global class RetarusFaxApi { @InvocableMethod(label = 'Send Fax Campaign' description='method description')
global static void callFaxApi_in(faxRequest[] requests){
for (faxRequest request: requests) {
Http http = new HTTP();
HttpRequest req = new HttpRequest();
HttpResponse res = new HttpResponse();
req.setEndpoint('https://6df3-94-199-89-121.ngrok-free.app/send');
String FirstName = request.FirstName;
String LastName = request.LastName;
String FaxNumber = request.FaxNumber;
String ContactId = request.ContactID;
JSONGenerator gen = JSON.createGenerator(true);
gen.writeStartObject();
gen.writeStringField('FirstName',FirstName);
gen.writeStringField('LastName',LastName);
gen.writeStringField('FaxNumber',FaxNumber);
gen.writeStringField('ContactID',ContactID);
gen.writeEndObject();
String jsonS = gen.getAsString();
System.debug(jsonS);
req.setBody(jsonS);
req.setHeader('Content-Type','application/json');
req.setMethod('POST');
res = http.send(req);
System.debug(res.getBody());
}
}
global class faxRequest {
@InvocableVariable(required=true)
global String FirstName;
@InvocableVariable(required=true)
global String LastName;
@InvocableVariable(required=true)
global String FaxNumber;
@InvocableVariable(required=true)
global String ContactID;
}
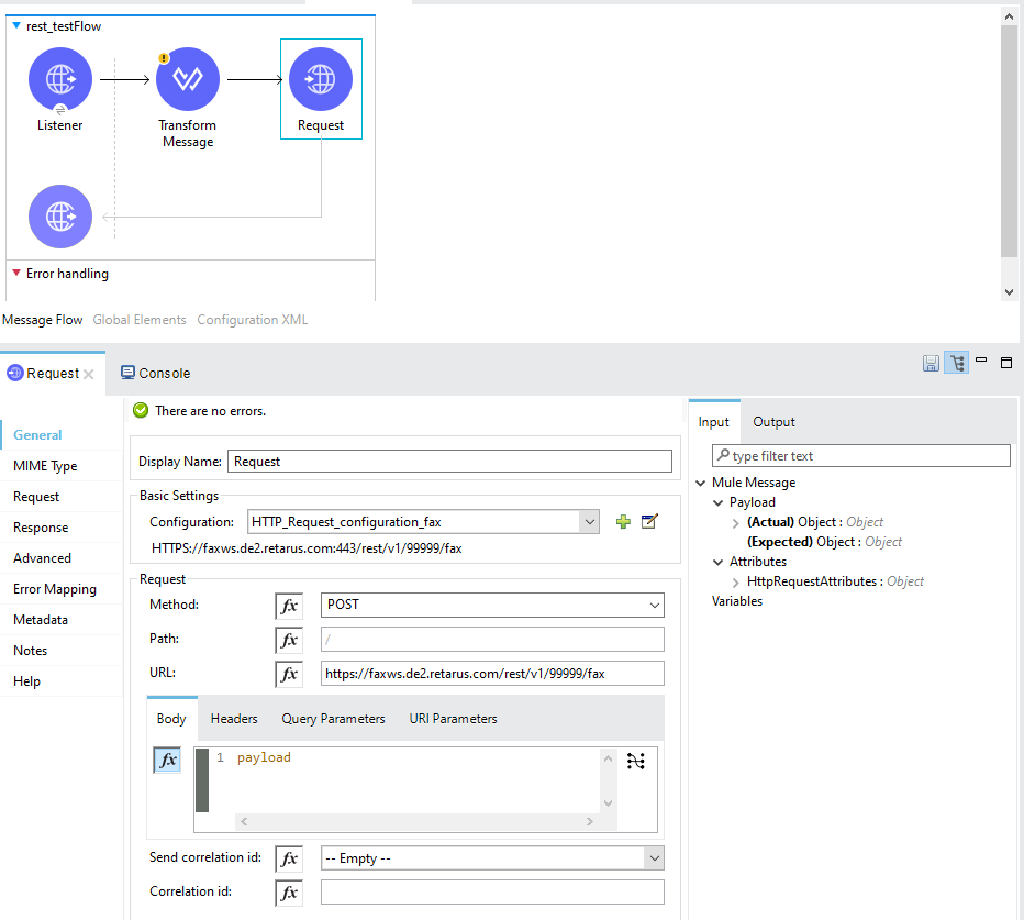
}Designing a flow in Anypoint Studio
Designing a flow in Anypoint Studio involves the following steps:
Personalized fax data is processed in the Transform Message block.

Below is the data output as a JSON snippet.
%dw 2.0
output application/json
---
{
    "reference": {
        "customerDefinedId": "Retarus DE",
        "billingCode": "99999",
        "billingInfo": "Testing Faxes"
    },
    "recipients": [
        {
            "number": payload.FaxNumber,
            "properties": [
                {
                    "key": "FromName",
                    "value": payload.FirstName
                },
                {
                    "key": "FromCopanyName",
                    "value": "Retarus IT"
                },
                {
                    "key": "ToName",
                    "value": payload.LastName
                },
                {
                    "key": "ToCompanyName",
                    "value": payload.ContactID
                },
                {
                    "key": "ToFaxNum",
                    "value": payload.FaxNumber
                },
                {
                    "key": "barcodeValue",
                    "value": "123456789"
                }

            ]
        }
    ],

"statusReportOptions" : {
"reportPurgeTs" : "2018-11-03T20:14:37.098+02:00",
"reportMail" : {
"successAddress" : "lukas.pfeiffer@o365test.retarus.com",
"failureAddress" : "lukas.pfeiffer@o365test.retarus.com",
"attachedFaxImageMode" : "SUCCESS_ONLY",
"attachedFaxImageFormat" : "TIFF"
},
"httpStatusPush" : {
"targetUrl" : "http://retarus.com/test-path/test-target",
"authMethod" : "NONE"
}
},
    "meta": {
        "customerReference": "66666",
        "jobValid": {
            "start": null,
            "end": null
        }
    },
    "renderingOptions": {
        "paperFormat": "A4",
        "resolution": "HIGH",
        "header": "%tz=CEST Testfax: CSID: %C Recipient Number: %# Date: %d.%m.%Y"
    },
    "transportOptions": {
        "csid": "REST Test"
    }
}The request block sends data to the Retarus infrastructure in the JSON format specified in the transform message block, as detailed in the configuration below.