
This maual explains how to configure Retarus Enterprise Email Archive as the destination for tamper-proof storage of your internal emails with the assistance of Microsoft Exchange’s journaling functions. It is limited solely to demonstrating the specific configurations that are required for Microsoft Exchange 2010. These configurations may vary in other versions of Microsoft Exchange.
Retarus is not responsible for the configuration, installation, or operation of any customer’s Microsoft Exchange Server. This manual is only a guideline, so you should also take note of the corresponding instructions from Microsoft.
Storage of internal emails
The Exchange journaling adapter as part of the Retarus Enterprise Email Archive is specifically designed to allow the storage of customer-internal emails in the Retarus Enterprise Email Archive, next to the inbound and outbound emails archived during the live processing of the email traffic. Internal emails are defined as emails with a valid sender and recipient address, where both fields include a domain belonging to the customer. This means that emails where the sender or the recipient address does NOT contain a customer domain are not archived by our journaling. This is important due to compliance and integrity reasons, but it also means that as a customer administrator, you have to make sure that all emails sent to Retarus via the journaling adapter contain a valid sender and recipient address with a domain registered at Retarus.
Saving email contacts for journaling destination addresses
Microsoft Exchange Journaling transfers emails that are pending archiving to a specified recipient. The first step in this process is to create a recipient address for the transfer.
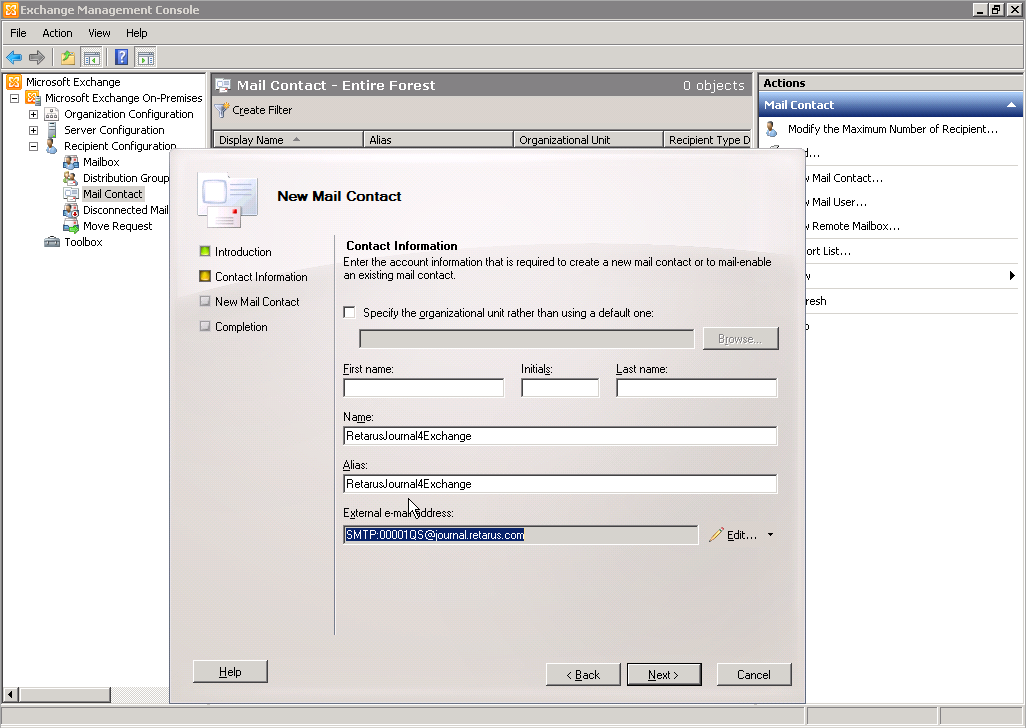
The next step is to create a new email contact as the journal destination. In the Exchange Administrative Console, click on Mail Contact under Recipient Configuration and then on New Mail Contact. Select New contact, then click on Next.

Enter the desired values for the journaling destination in the Name and Alias fields, then select Edit in the drop-down menu next to the External email address field and enter the destination address for Retarus Enterprise Email Archive, which must have the following format:
[Your Customer Number]@journal.retarus.com
Example
00001QS@journal.retarus.com
Click on Next.
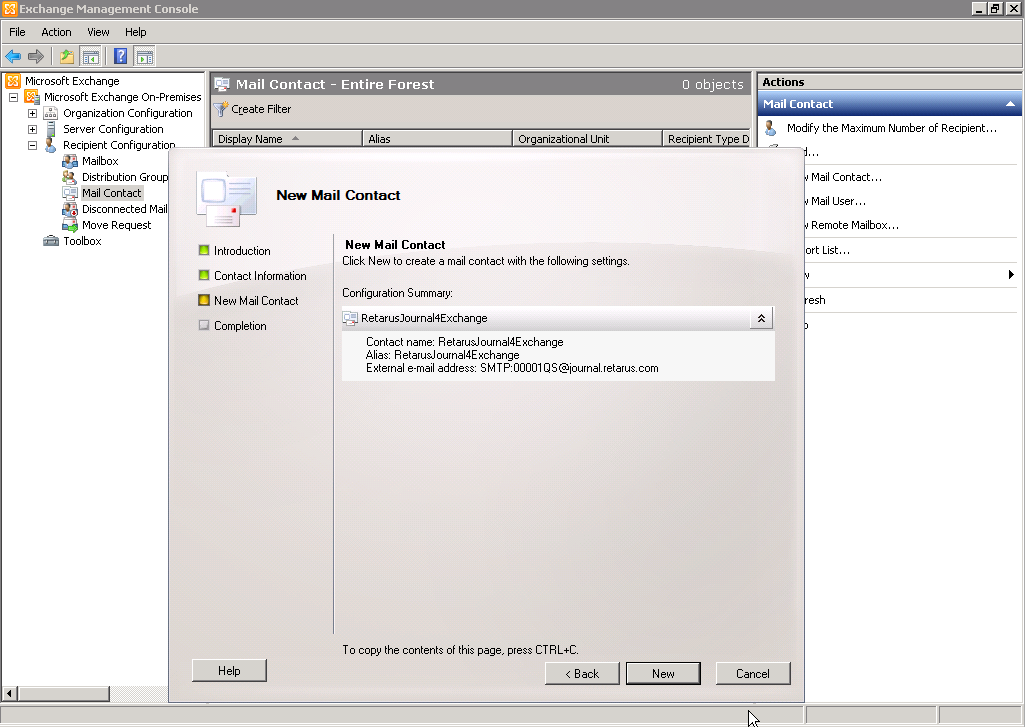
You can now review the data that you input in the configuration summary. Confirm the accuracy of the information by clicking on New. The contact has been created.
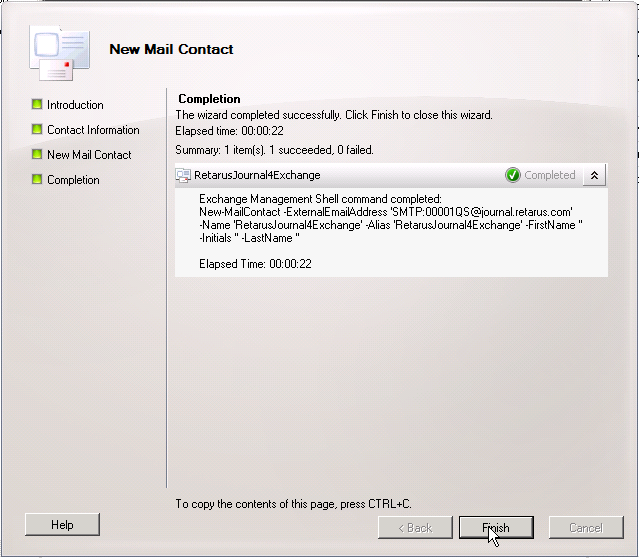
The next step is to close the window by clicking on Finish.
Alternative journaling mailbox (optional)
If the primary journaling destination cannot be reached (e.g., due to network problems, etc.), you can install an alternate journaling mailbox that will receive the journal reports instead. The following section contains instructions for creating and configuring the alternative mailbox.
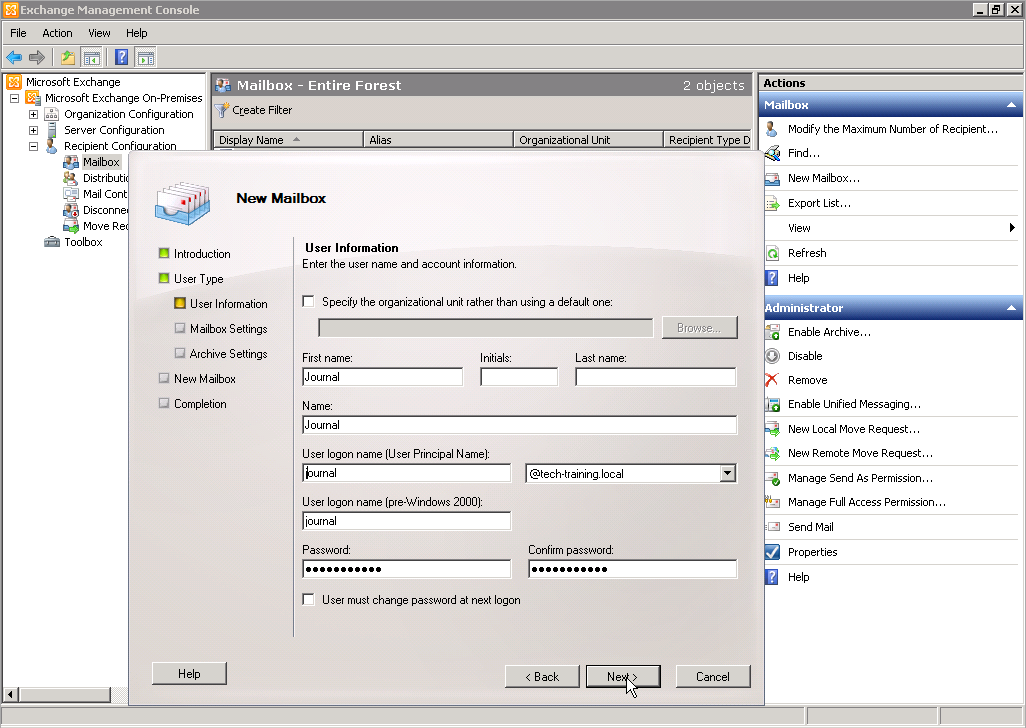
Mailbox setup
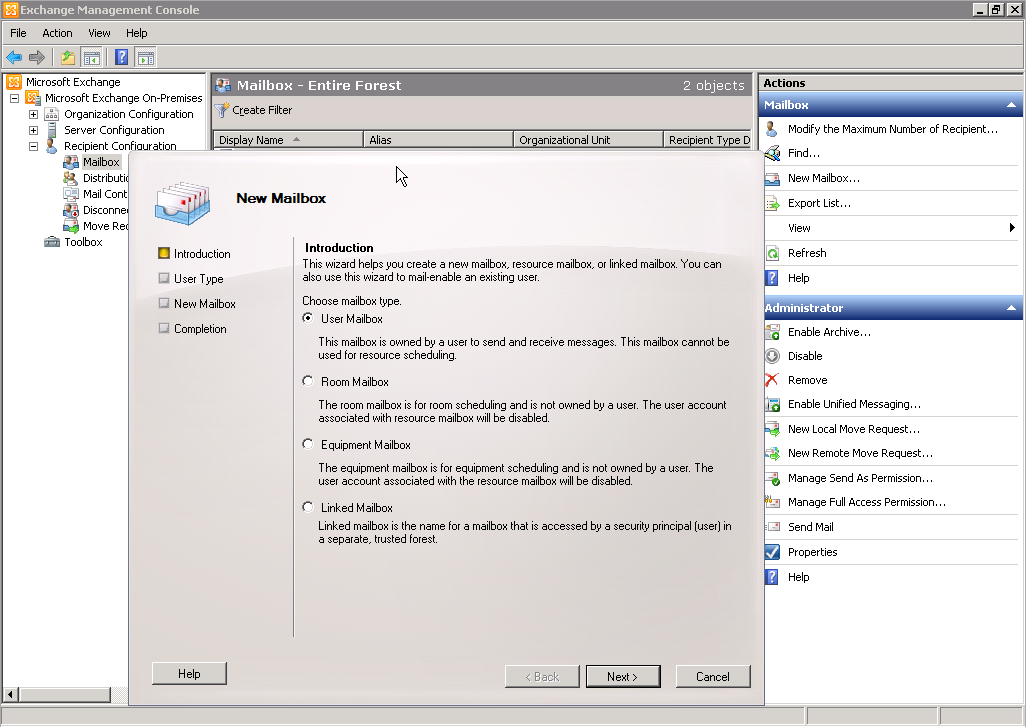
Click on Mailbox under Recipient Configuration and then select New Mailbox under Actions. In the New Mailbox window, select User Mailbox as the mailbox type, then click on Next.
The next step is to select the New User option and click on Next.
Under User Information, enter the name of the journal user as well as their user name and password. Ensure that the User must change their password at next logon box is left unchecked, then click on Next.
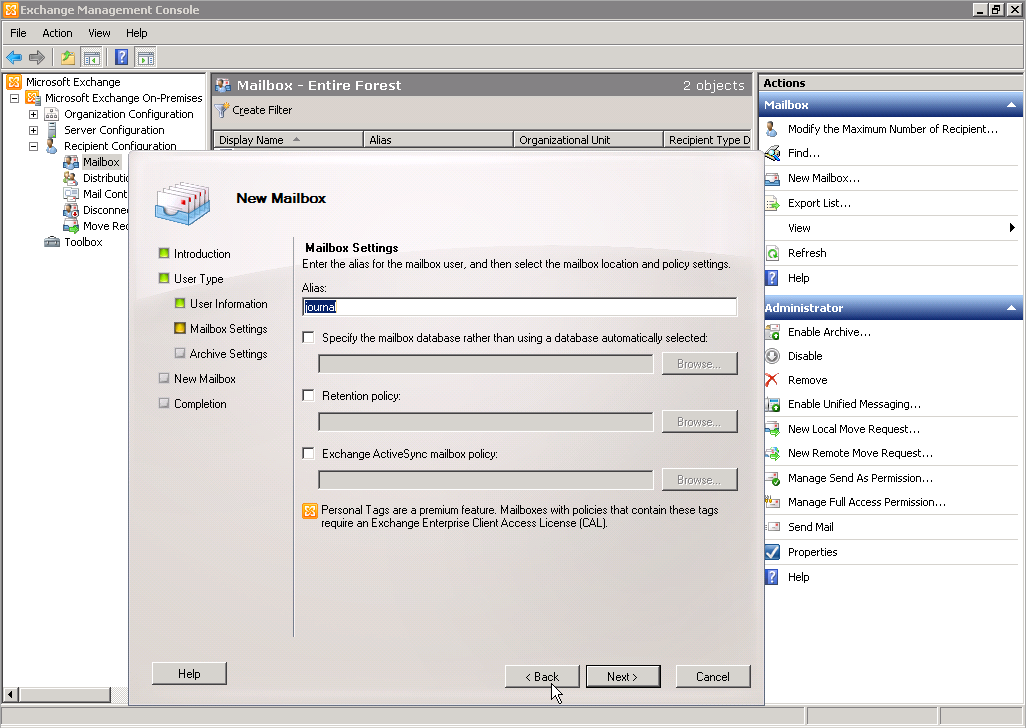
In the following step (Mailbox Settings), confirm the mailbox alias and then click on Next.
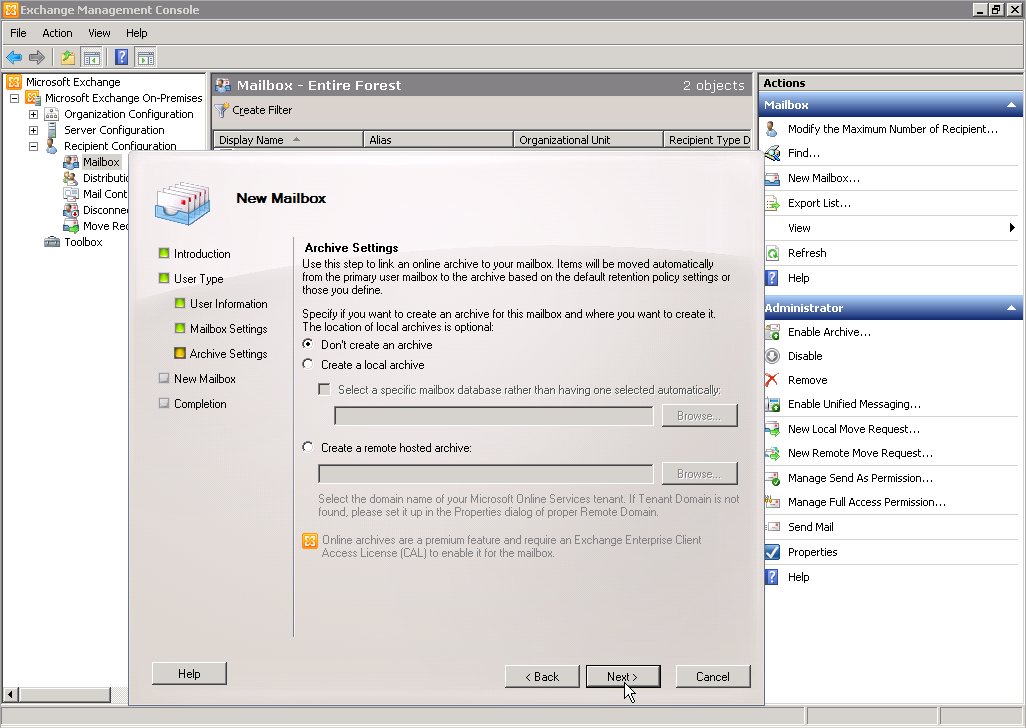
Exchange now prompts you if an archive should be linked to this mailbox. Select the Do not create an archive option and click Next.
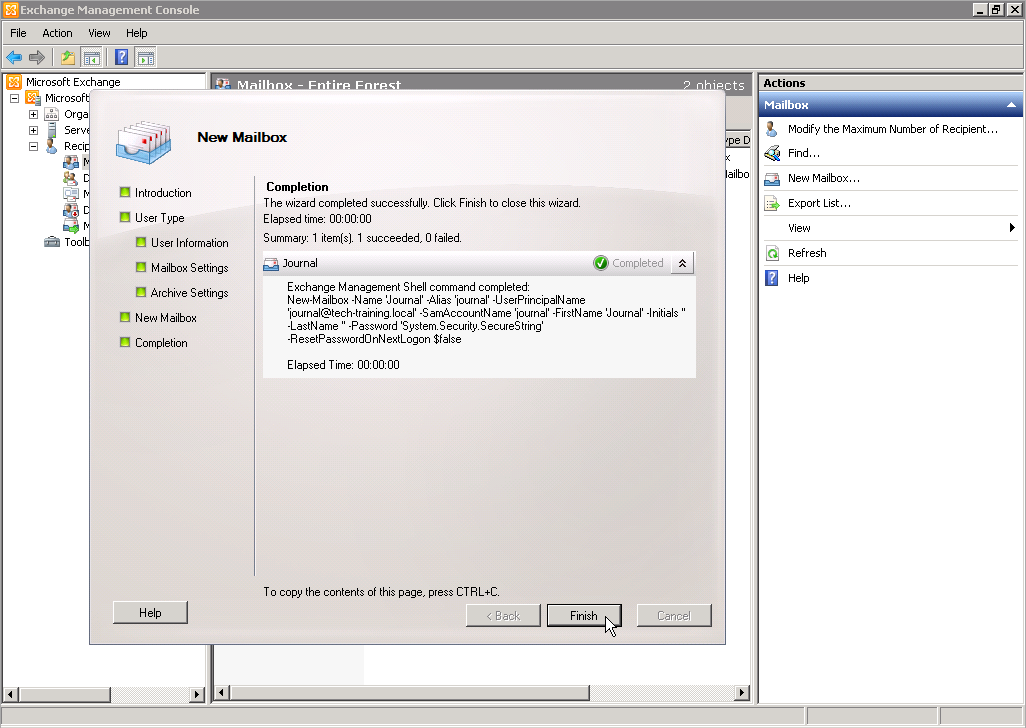
The process of creating a mailbox is complete when you click on Finish.
Configuration of the mailbox as a journaling mailbox
Accepting only journal reports
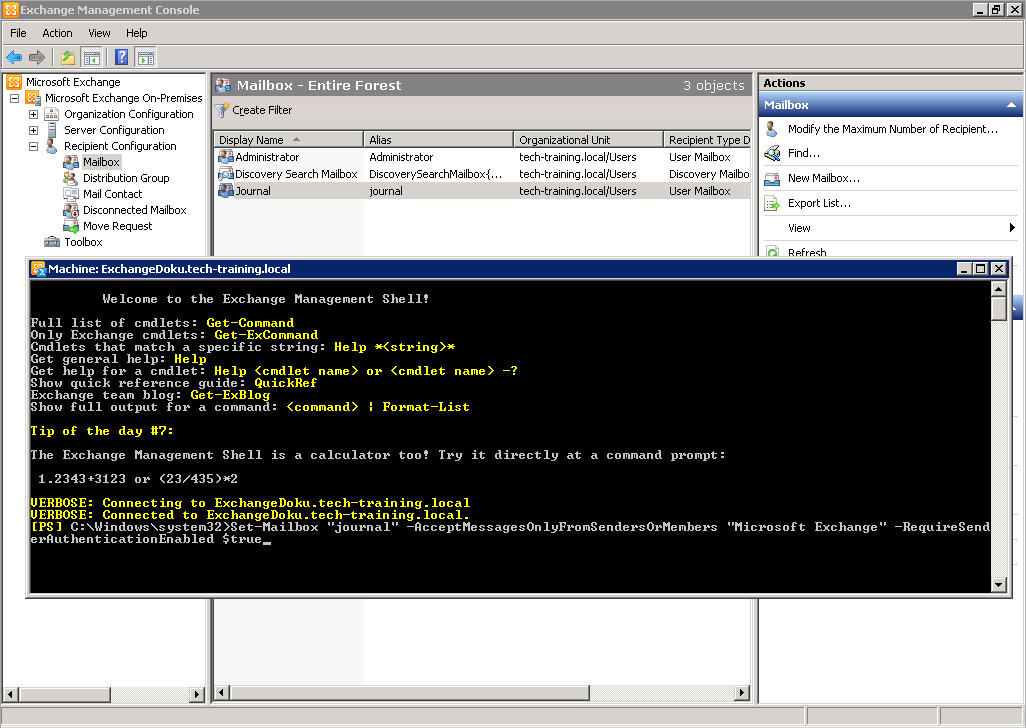
Microsoft recommends configuring the journaling mailbox to ensure that only emails from Exchange or internal senders/recipients are accepted. To configure this setting:
-
Open the Exchange Management Shell.
-
Enter the following command:
Set-Mailbox "[Name of the journaling mailbox that you created]" -AcceptMessagesOnlyFromSendersOrMembers "Microsoft Exchange" -RequireSenderAuthenticationEnabled $true
Deleting the storage quota
To prevent the problem of non-delivery of internal emails due to storage space limits being exceeded, you should delete the storage quota allocation.
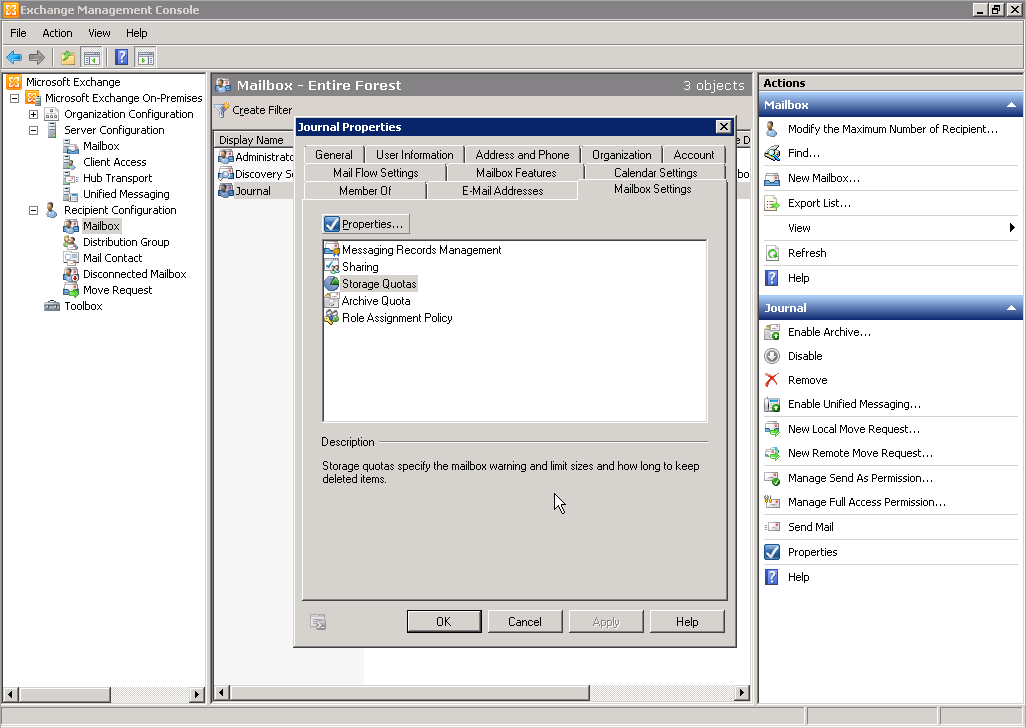
To do this:
-
Double-click on the mailbox you created under Recipient Configuration - Mailbox and then on the Mailbox Settings tab.
-
Select the Storage Quotas option from the list of properties and then click on Properties.
-
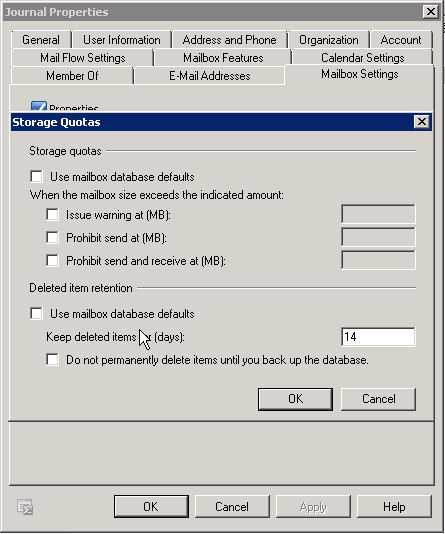
In the Storage Quotas window that appears, uncheck the Use mailbox data defaults option under both Storage quotas and Deleted item retention.
Activating an alternate journaling mailbox
To avoid having journal reports rejected when errors occur, which would potentially prevent them from being archived, you can activate an alternate journal mailbox as the journaling destination. The alternate journaling mailbox receives the journal reports until the main journaling destination is available. Activate the alternate journaling mailbox using the following steps:
-
Open the Exchange Management Shell.
-
Enter the following command:
Set-TransportConfig -JournalingReportNdrTo "[Name of the journaling mailbox that you created]"
Setup of journaling rules
Microsoft Exchange uses journaling to archive emails by applying specific rules. Because all external traffic is already automatically archived by Retarus Enterprise Email Services in the ARCHIVE step, only internal emails have to be archived within Exchange.
Creating a new journal rule using the Exchange Administration Console
The steps you should take to create a journal rule for archiving internal emails are explained below:

In the Exchange Administration Console, begin by clicking on Hub Transport under Organization Configuration. Click on the Journal rules tab and select the New Journal Rule option under Actions. Enter an appropriate name for the archiving rule in the New Journal Rule window, e.g., “Journal internal mails”, then click on Browse and select the email contact for the journaling destination address.
The following step is to select the Internal - internal messages only option under Scope. Activate the Enable Rule checkbox if the rule is supposed to be activated immediately, and ensure that it is deactivated if you are working with the rule and want the archiving process to be initiated at a later time.
Click on New to create the rule and then on Finish to close the window.
Creating new journal rules using the Exchange Management Shell
You can also create new journal rules using the Exchange Management Shell, remove an external contact, and then configure an external email address as the recipient for journal reports. This feature does not exist in Exchange 2007, where the transfer to an Exchange contact has to take place.
To increase transparency, Retarus recommends configuring a contact as the recipient of the journal reports.
To an internal mailbox
To create a journal rule, for sending journal reports to a created contact, enter the following command in the Exchange Management Shell (this is required in Exchange 2007):
New-JournalRule -Name "[Name of the journal rule]" -JournalEmailAddress [the journal contact's internal address] -Scope Internal -Enabled $True
To an external mailbox
To create a journal rule that directly sends the journal reports directly to an external address (this possible with Exchange 2010), enter the following command in the Exchange Management Shell:
New-JournalRule -Name "[Journal Rule Name]" -JournalEmailAddress [Your Customer Number]@journal.retarus.com -Scope Internal -Enabled $True
Installing the Send Connector with Smarthost
If you want to route targeted journal reports to Retarus, you have to use a Send Connector to specify a corresponding smart host. Make the following configurations to install this Send Connector:
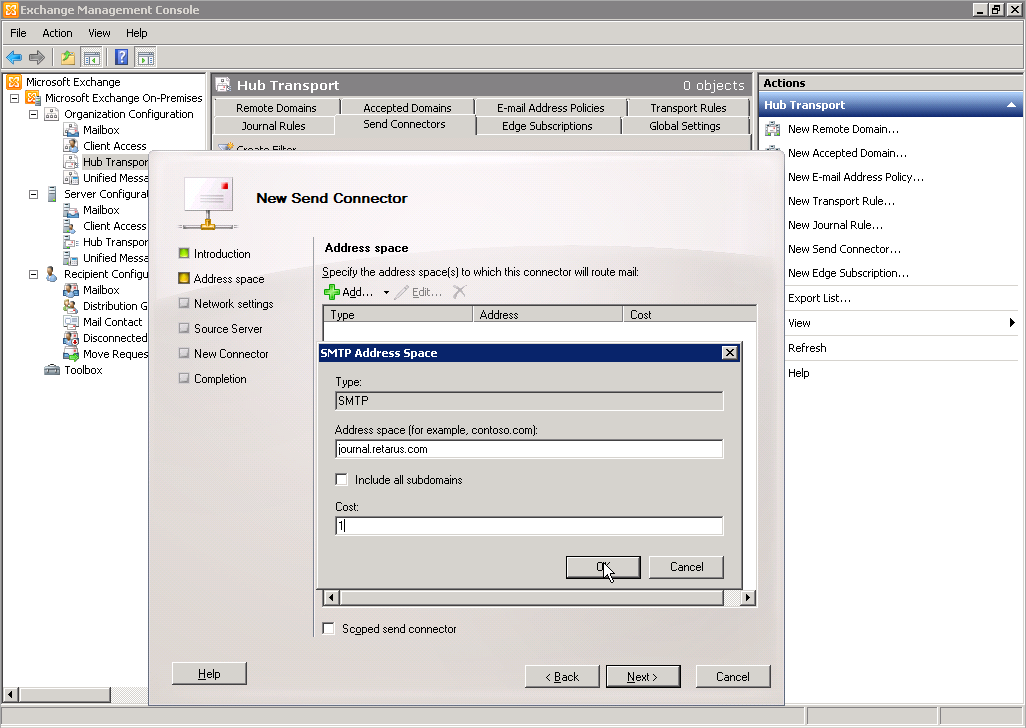
→ In the Exchange Administration Console, click on Hub Transport under Organization Configuration, then select the Send Connectors tab. On the right-hand side, under Actions, select New Send Connector.
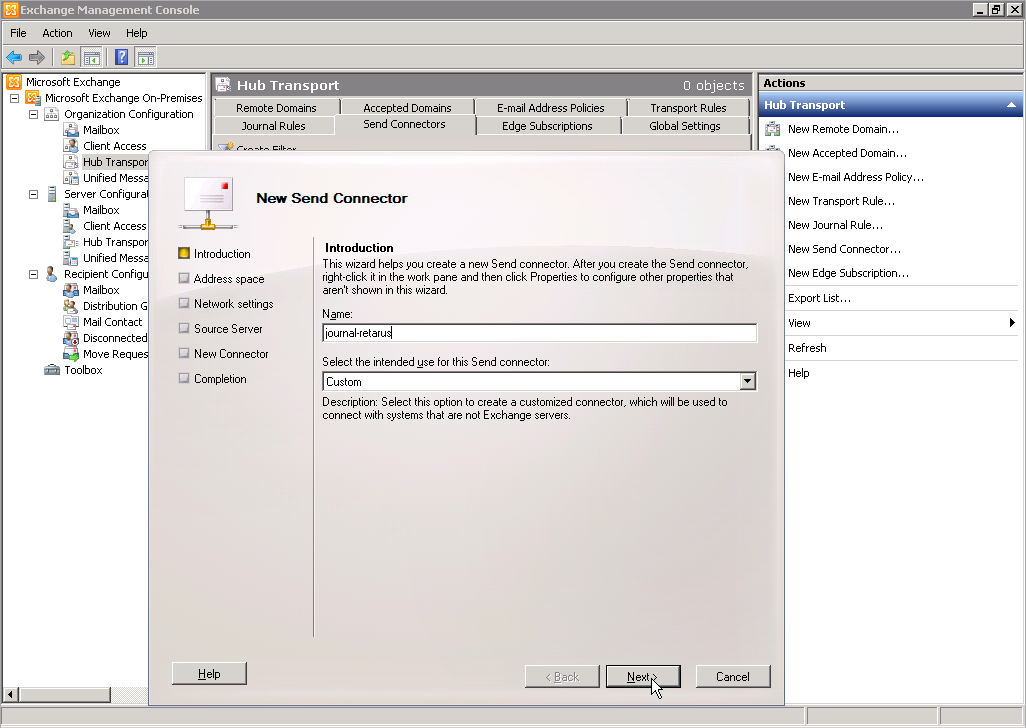
→ Enter an appropriate name for the new Send connector in the New Send Connector window and select the Custom option from the drop-down menu under Select the intended use for this Send connector.
→ Add SMTP as the address space type under SMTP Address Space. In the Address field, enter the domain for Retarus Enterprise Email Archive for Exchange:
journal.retarus.com
→ Deactivate the Include all subdomains option and enter 1 in the Cost field. Click on OK and then Next.
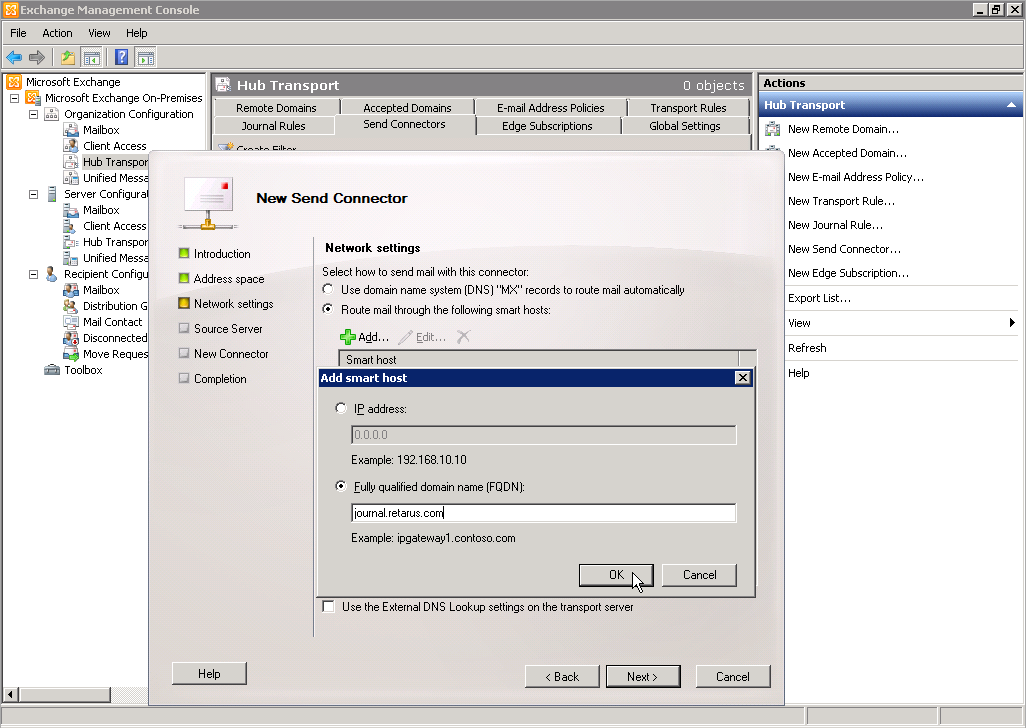
→ In the Network settings window that appears, select the Route mail through the following smart hosts option and click on Add. Enter the information that Retarus provided for setting up Retarus Enterprise Email Archive. Click on OK and then on Next.
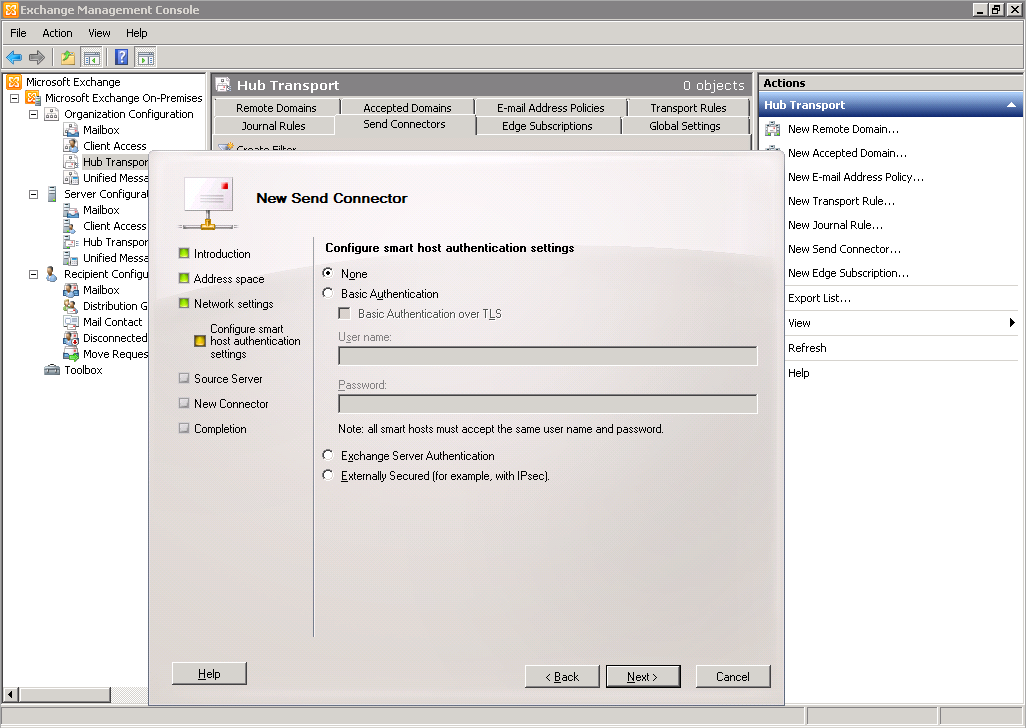
→ In the Configure smart host authentication settings window that opens, select None and click on Next.
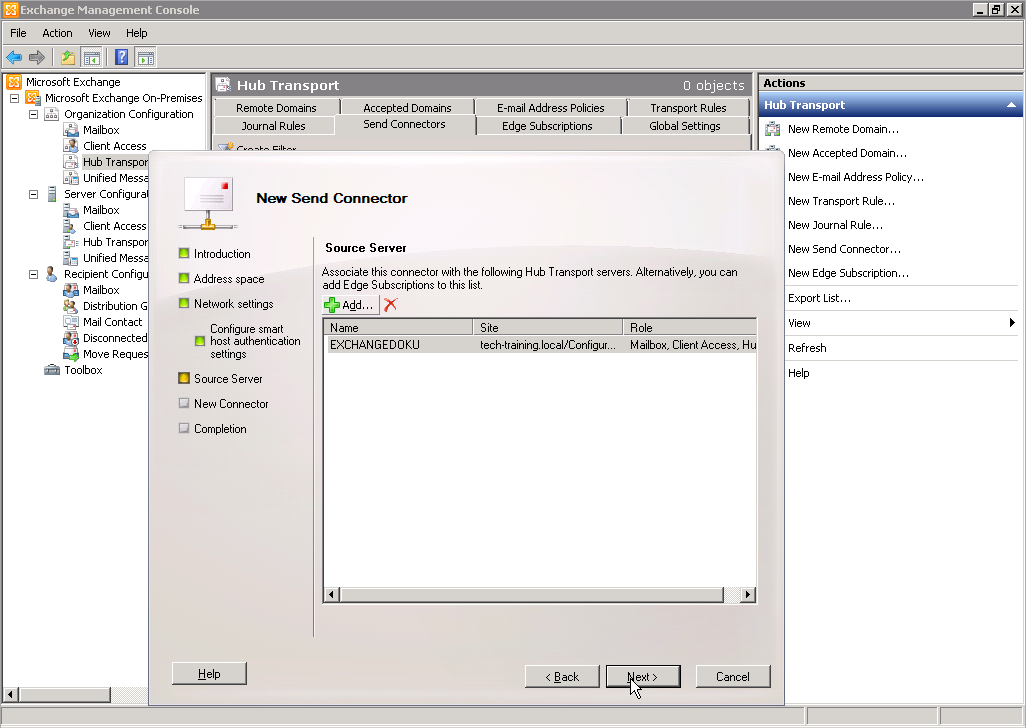
In the Source Server window, just retain the suggested settings and click on Next.
The Send Connector configuration process is complete once you have clicked on Next and then Finish.