Retarus Email Security can act as an outbound mail gateway, thoroughly scanning emails sent from your internal accounts. When configured, outbound messages flow through Exchange Online Protection (EOP) to Retarus for security scanning and then back to EOP for final delivery to external recipients.
Prerequisites
-
Access to the Microsoft 365 Exchange admin center.
-
Retarus Email Security subscription and access credentials.
-
Basic understanding of email flow and routing configurations.
Overview
The diagram below illustrates how an outbound message flows from an internal sender (Mailbox) through Exchange Online Protection (Microsoft 365), to Retarus Email Security, and back to EOP before reaching the external recipient (Internet).
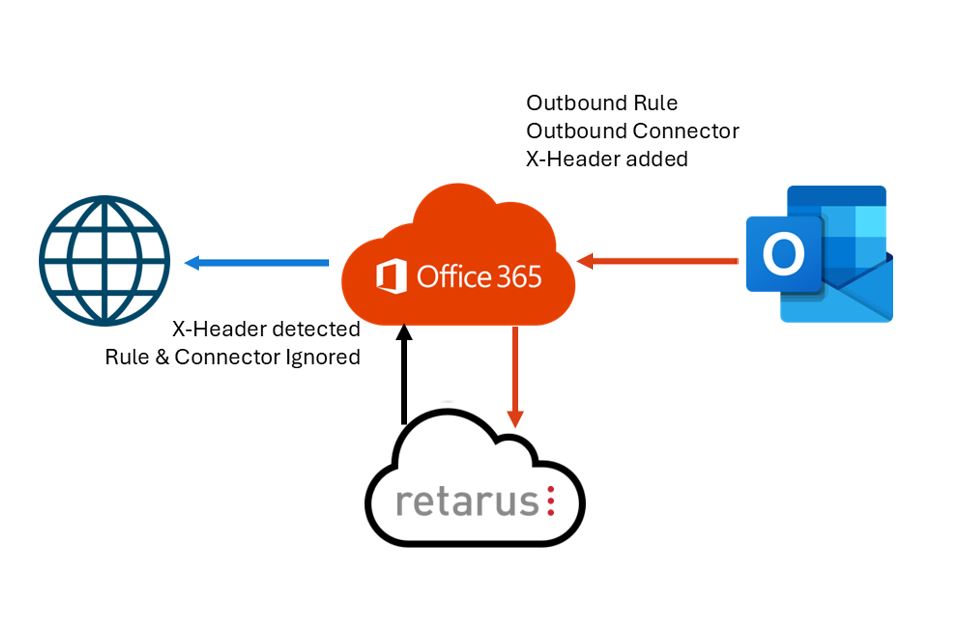
The Retarus product can also be configured to scan, encrypt, or archive emails before delivering them directly to external recipients, as it supports DKIM signing. If Retarus is used for final message delivery, you must update your SPF record accordingly.
How to get started
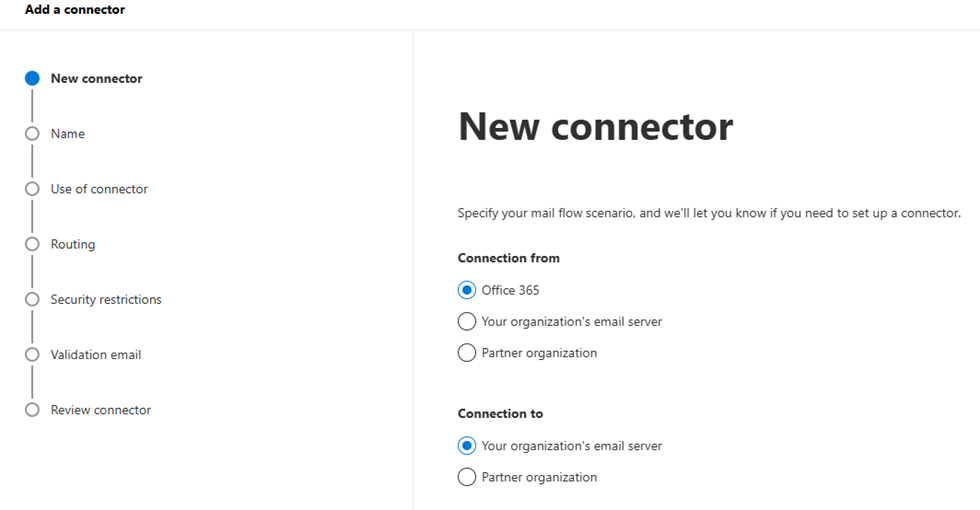
1. Set up an outbound connector
-
In the Exchange admin center, go to Mail Flow - Connectors.
-
Click Add a Connector to launch the New connector wizard.
-
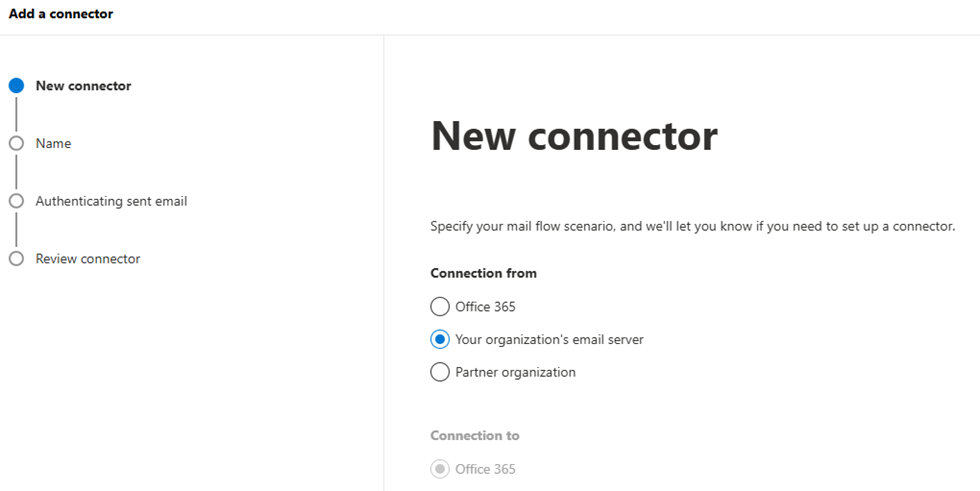
On the New connector page:
-
Ensure the Office 365 and Your organization’s email server options are selected.
-
Click Next.
-
-
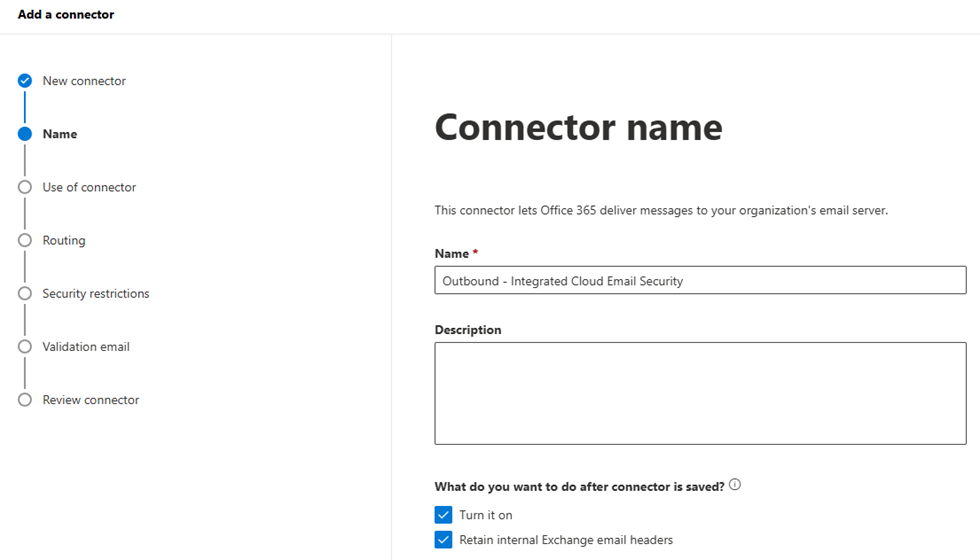
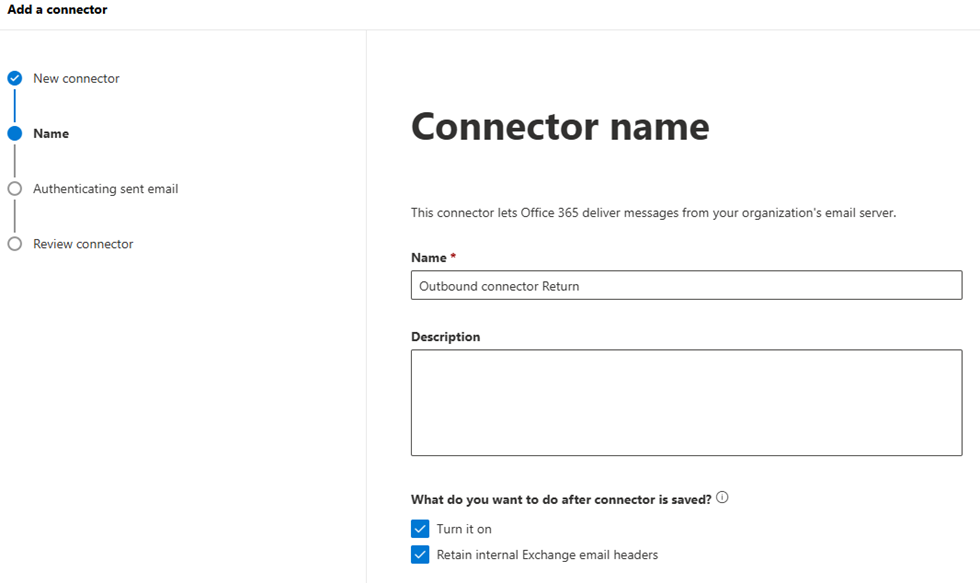
On the Connect name page:
-
Provide a meaningful name for the connector.
-
Add an optional description to clarify its purpose.
-
Click Next.
-
-
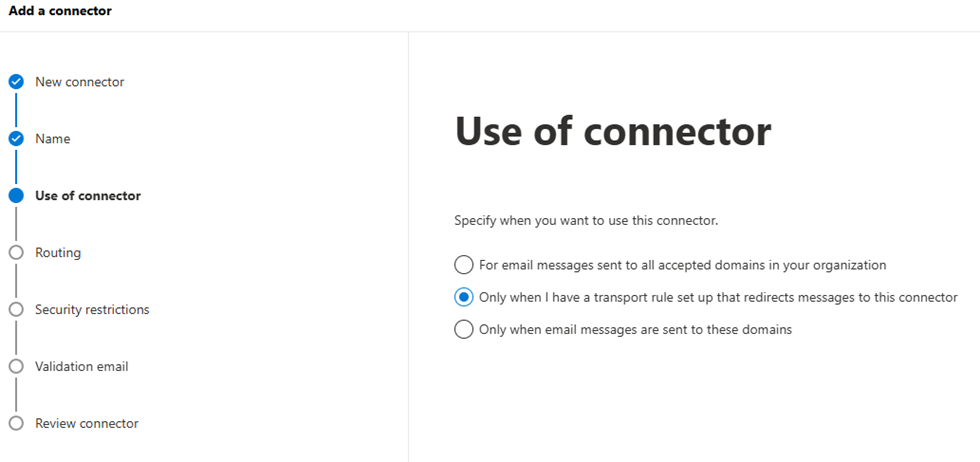
On the Use of connector page:
-
Select the Only when I have a transport rule setup… option.
-
Click Next.
-
-
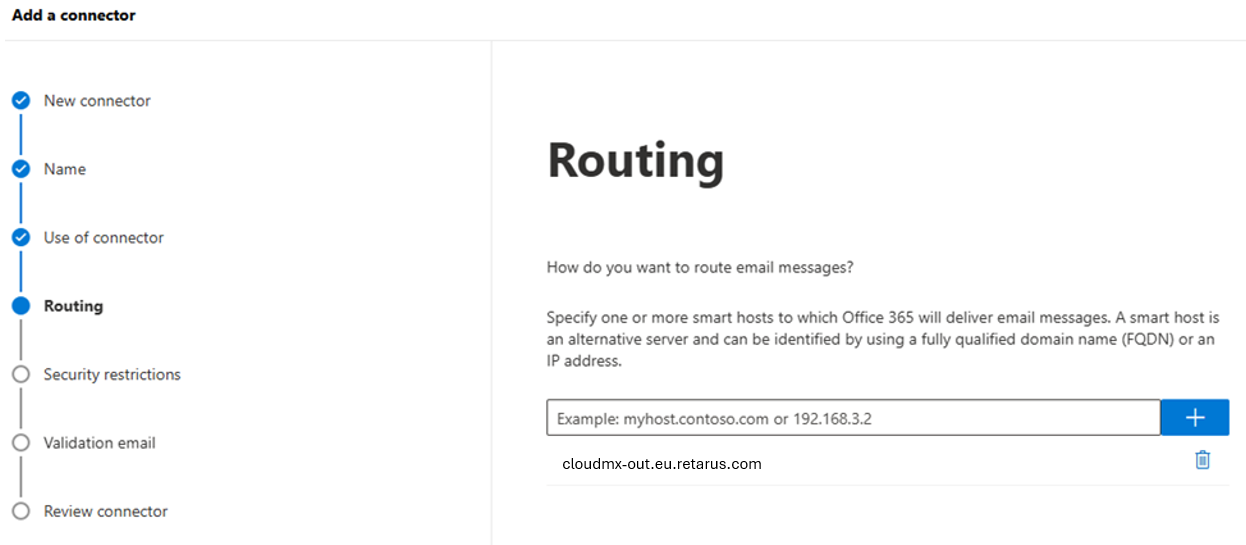
On the Routing page:
-
Add the following servers to the routing configuration:
cloudmx-out.eu.retarus.com -
Click Next.
-
-
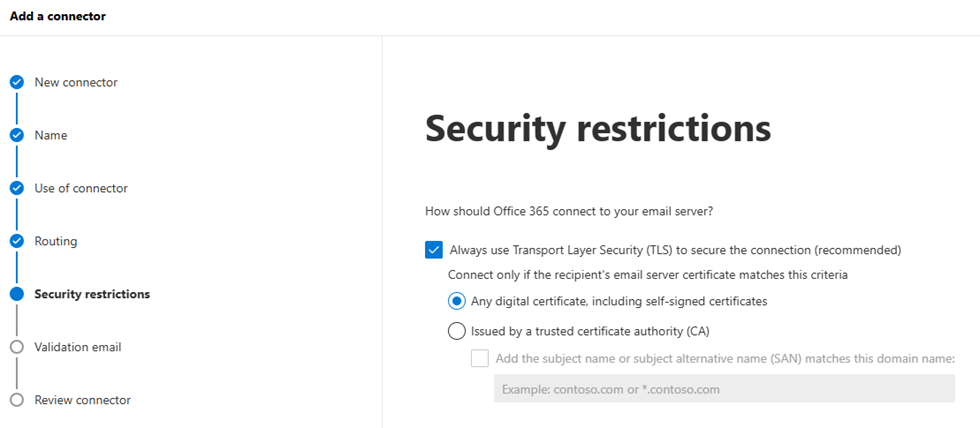
On the Security restrictions page:
-
Activate Transport Layer Security.
-
Click Next.
-
-
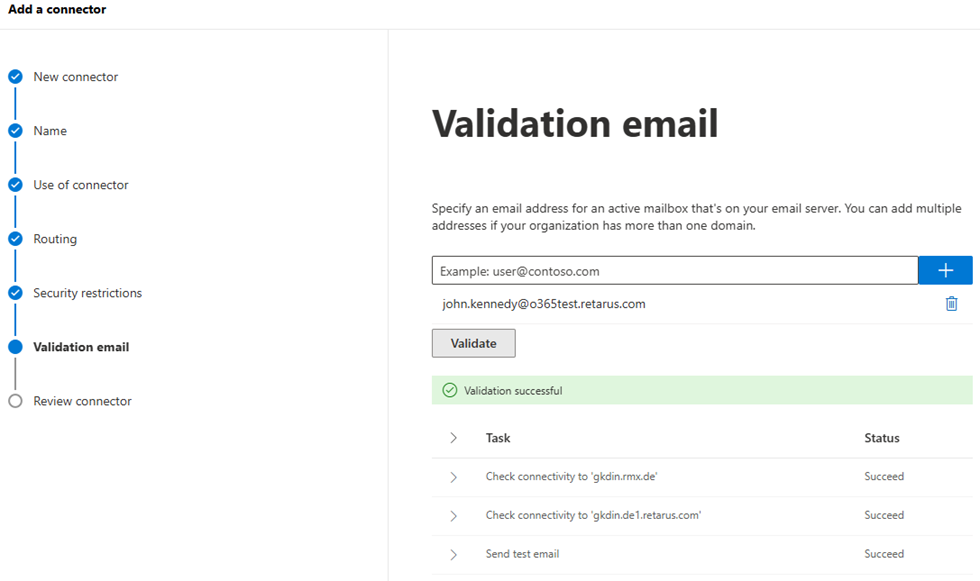
On the Validation email page:
-
Enter a valid email address to test and confirm that email routing is functioning correctly.
-
Click Next.
-
-
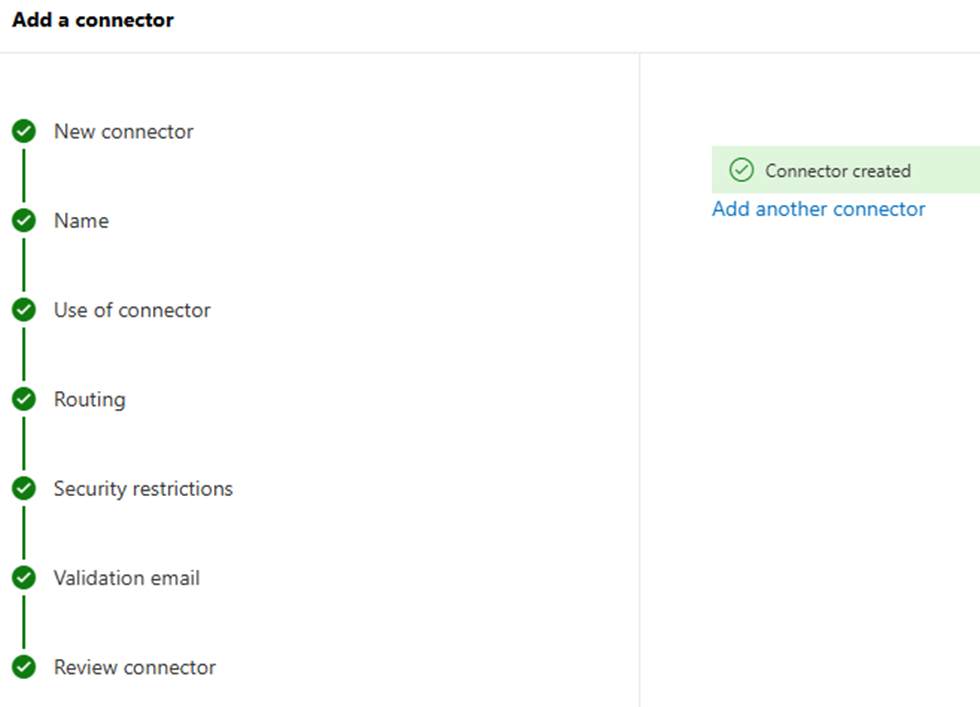
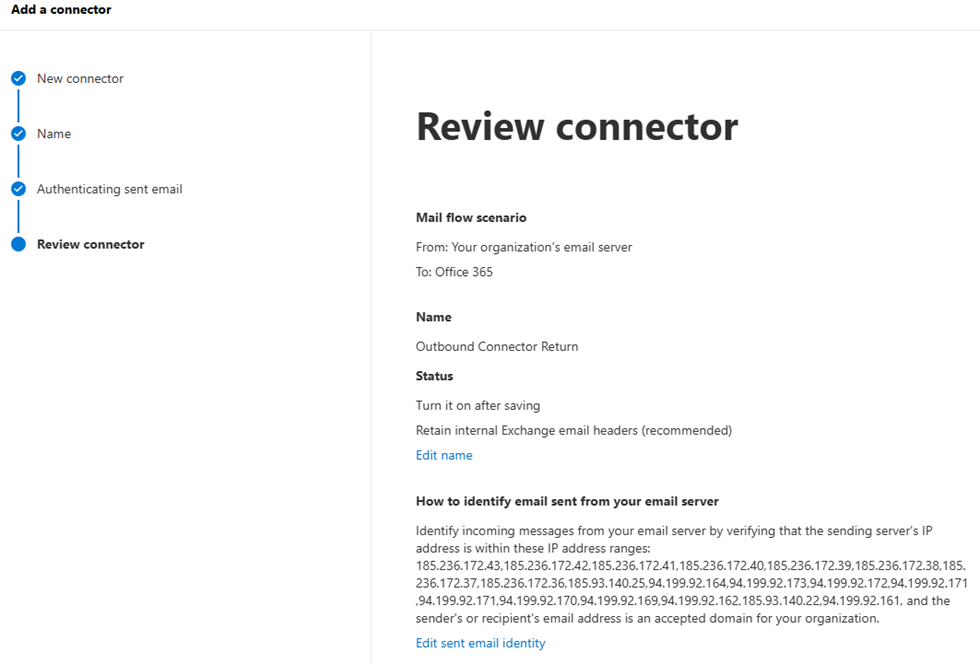
On the Review connector page:
-
Review all connector settings.
-
Click Create connector.
-

-
Confirm that the connector has been successfully created.
2. Set up a return outbound connector
To enable messages to flow back from Retarus to Microsoft 365, you'll need to create a second outbound connector:
-
In the Exchange admin center, go to Mail Flow - Connectors.
-
Click Add a Connector to launch the New connector wizard.
-
On the New connector page:
-
Under Configuration From, ensure the Your organization’s email server option is selected.
-
The Office 365 option should automatically appear under Connection to.
-
Click Next.
-
-
On the Connect name page:
-
Provide a meaningful name for the connector.
-
Add an optional description to clarify its purpose.
-
Click Next.
-
-
On the Authenticating sent email page:
-
Select By verifying that the IP Address of the sending server matches one of the following IP addresses…
-
Enter the following Retarus IP addresses:
185.236.172.36
185.236.172.37
185.236.172.38
185.236.172.39
185.236.172.40
185.236.172.41
185.236.172.42
185.236.172.43
185.236.172.44
185.236.172.45
94.199.92.161
94.199.92.162
94.199.92.169
94.199.92.170
94.199.92.171
94.199.92.172
94.199.92.173
94.199.92.164
185.93.140.5
185.93.140.6
185.93.140.22
185.93.140.25
-
Click Next.
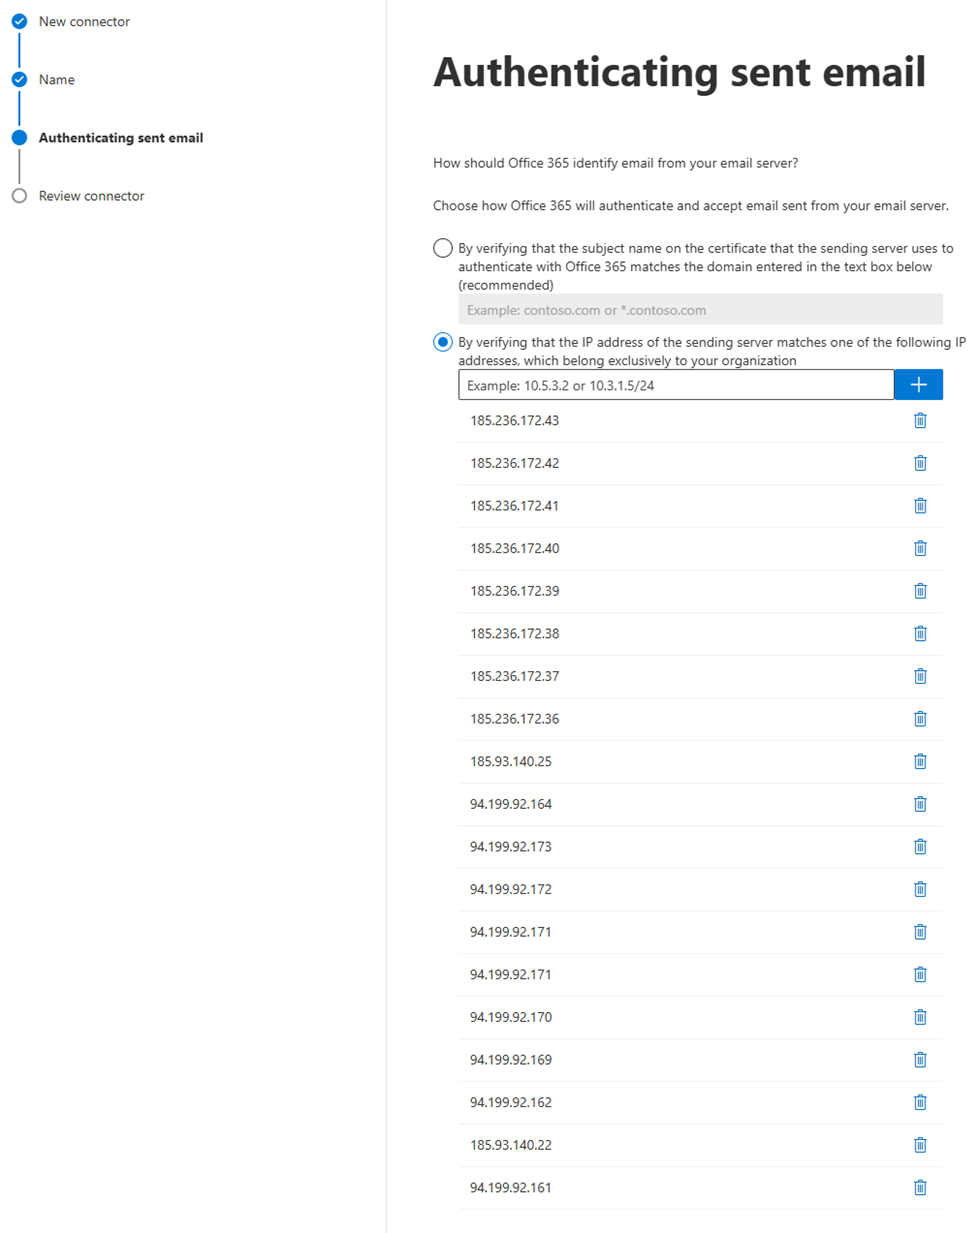
Contact Retarus Support to confirm the correct IP addresses for your configuration.
-
On the Review connector page:
-
Review all connector settings.
-
Click Create connector.
-
3. Configure outbound rules
-
Navigate to Mail flow - Rules.
-
Click Add a rule - Create a new rule to launch the New transport rule wizard.
-
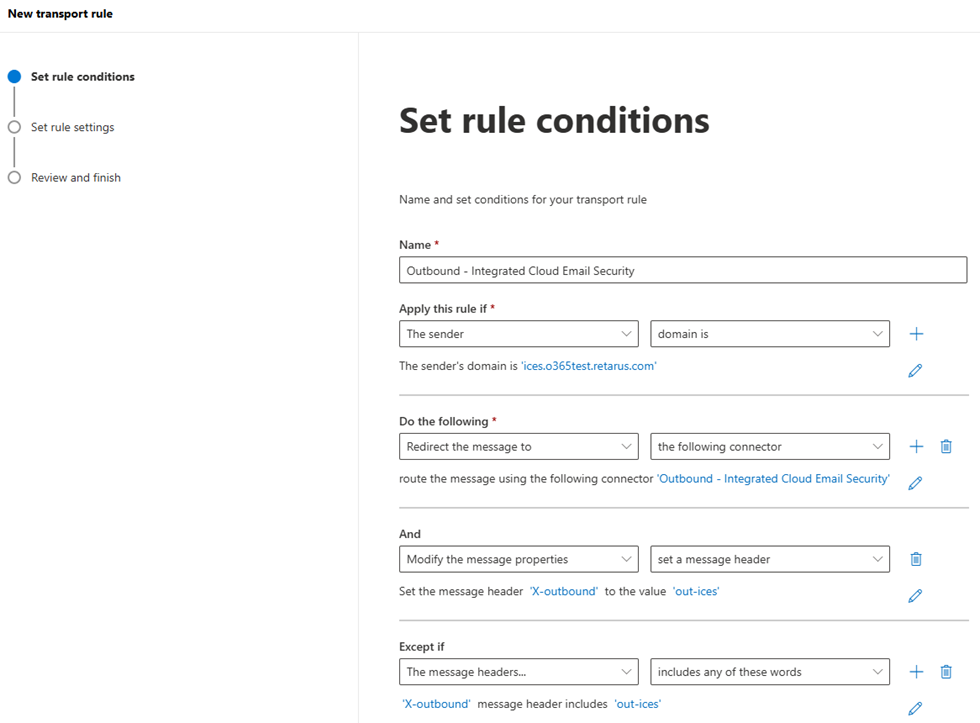
On the Set rule conditions page:
-
Specify a unique name for the rule.
-
Configure the rule to identify the specific domains that are permitted to send messages through the Retarus service using the connector you previously defined.
-
Include a custom message header, such as
out-ices, to track messages processed by this rule. This header helps identify messages that have already been routed through Retarus. -
Add an Except if condition to check for the presence of the custom header (e.g.,
out-ices). This ensures that messages already processed by the rule (and marked with the header) are not sent back to Retarus, preventing message loops.
-
The header name (e.g., out-ices) can be customized, but it must remain consistent throughout the rule configuration to ensure proper functionality.
-
On the Set rule settings page:
-
Select the Enforce and Activate the Stop processing more rules options.
-
Click Next.
-
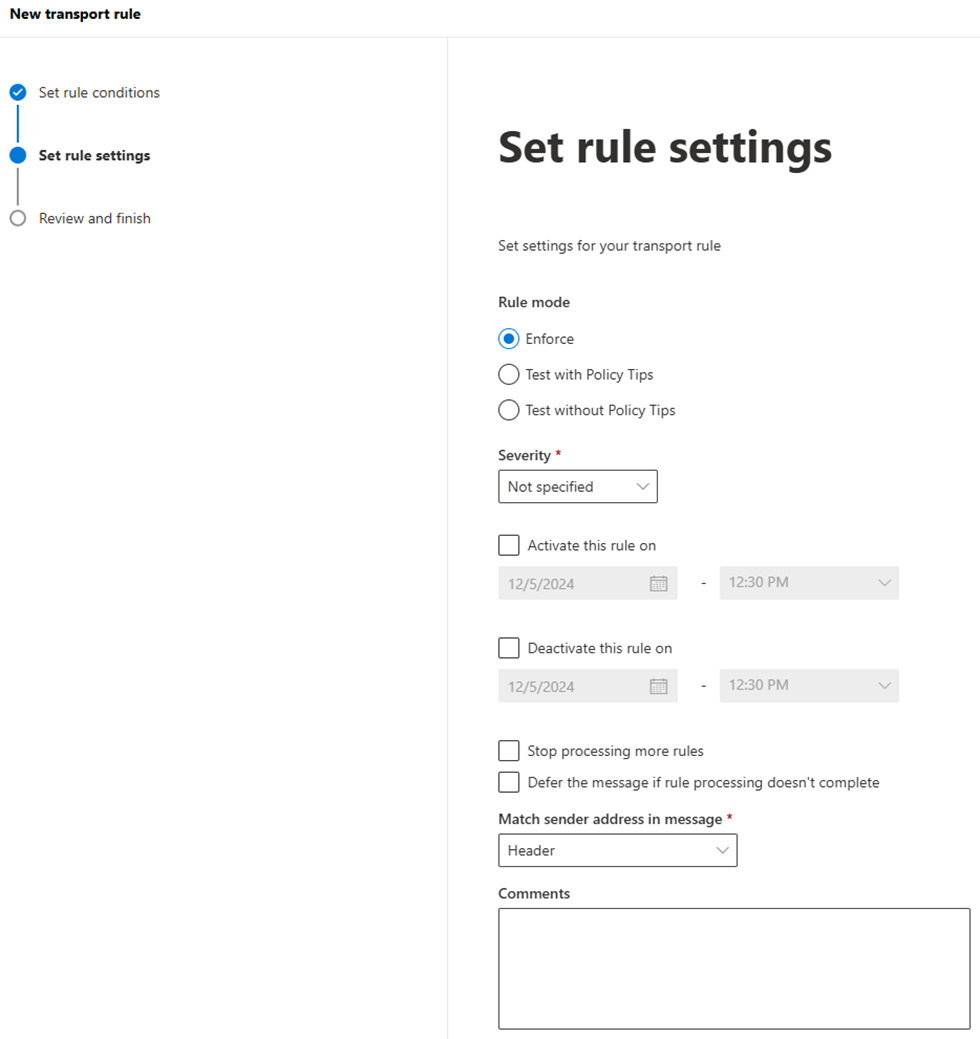
-
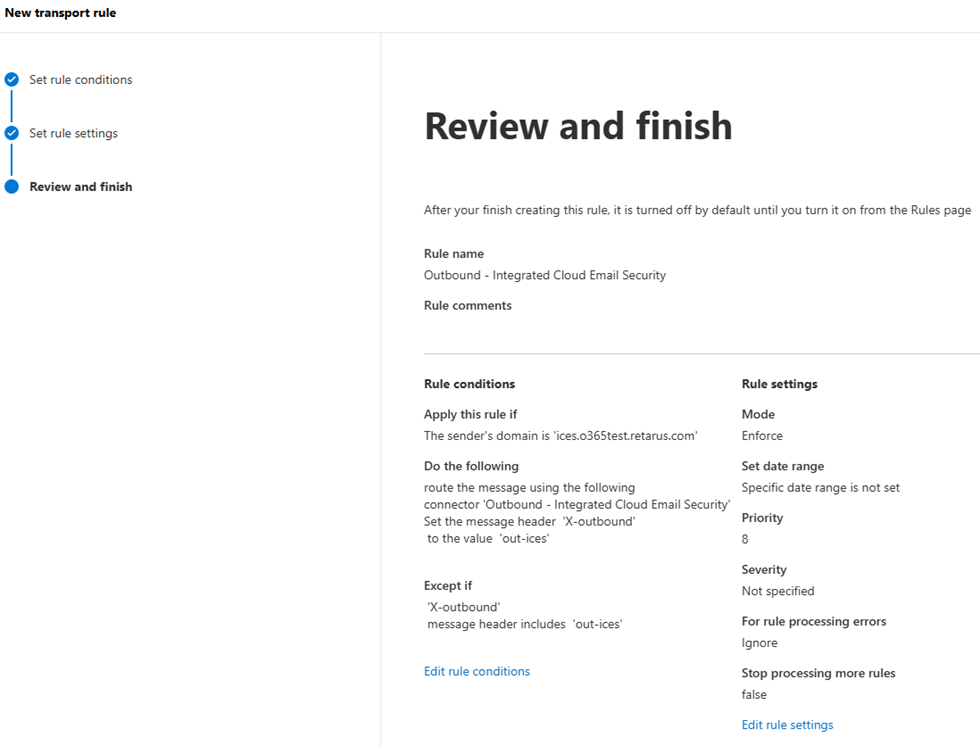
On the Review and finish page:
-
Review all rule settings.
-
Click Finish.
-
-
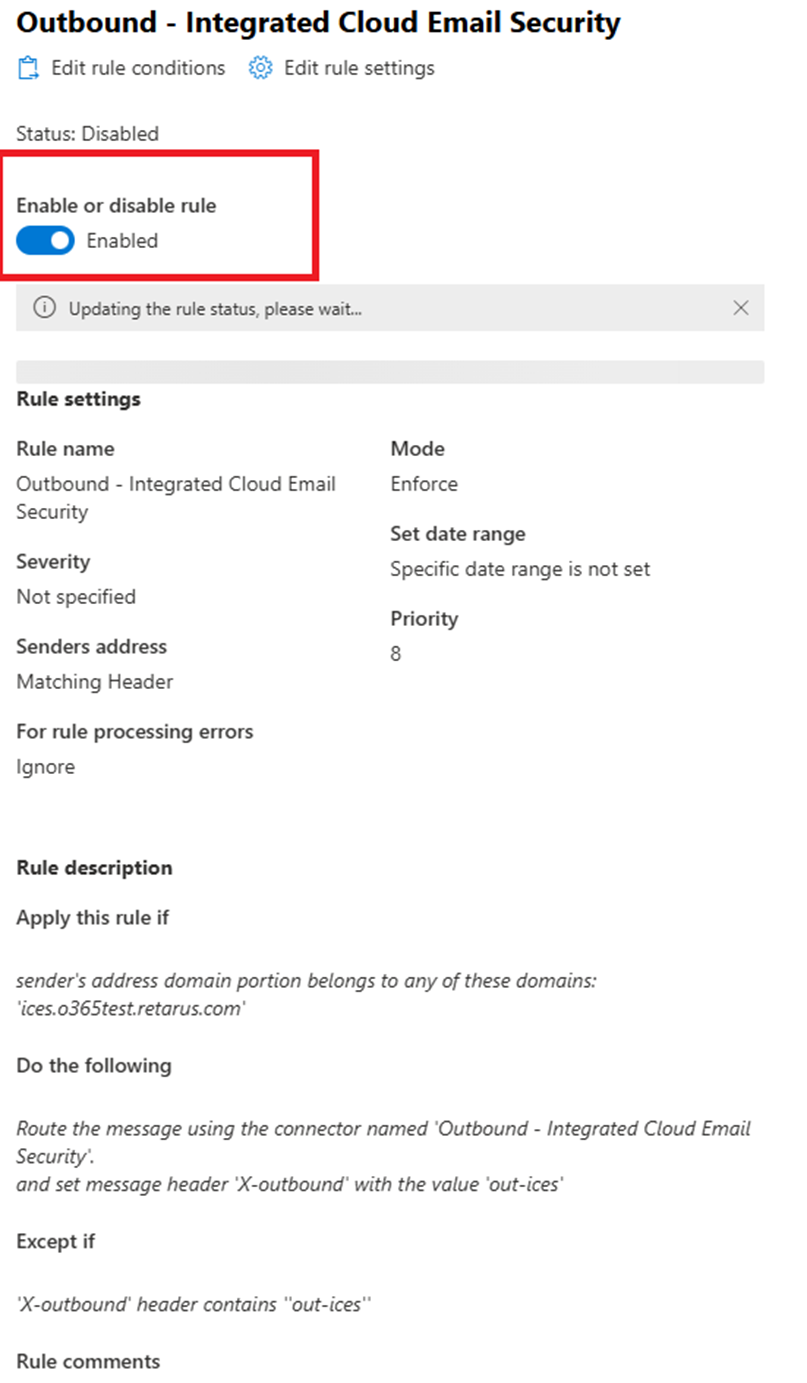
On the Outbound - Integrated Cloud Email Security page:
-
Enable the rule to start managing outbound mail flow.
-
How to test outbound traffic
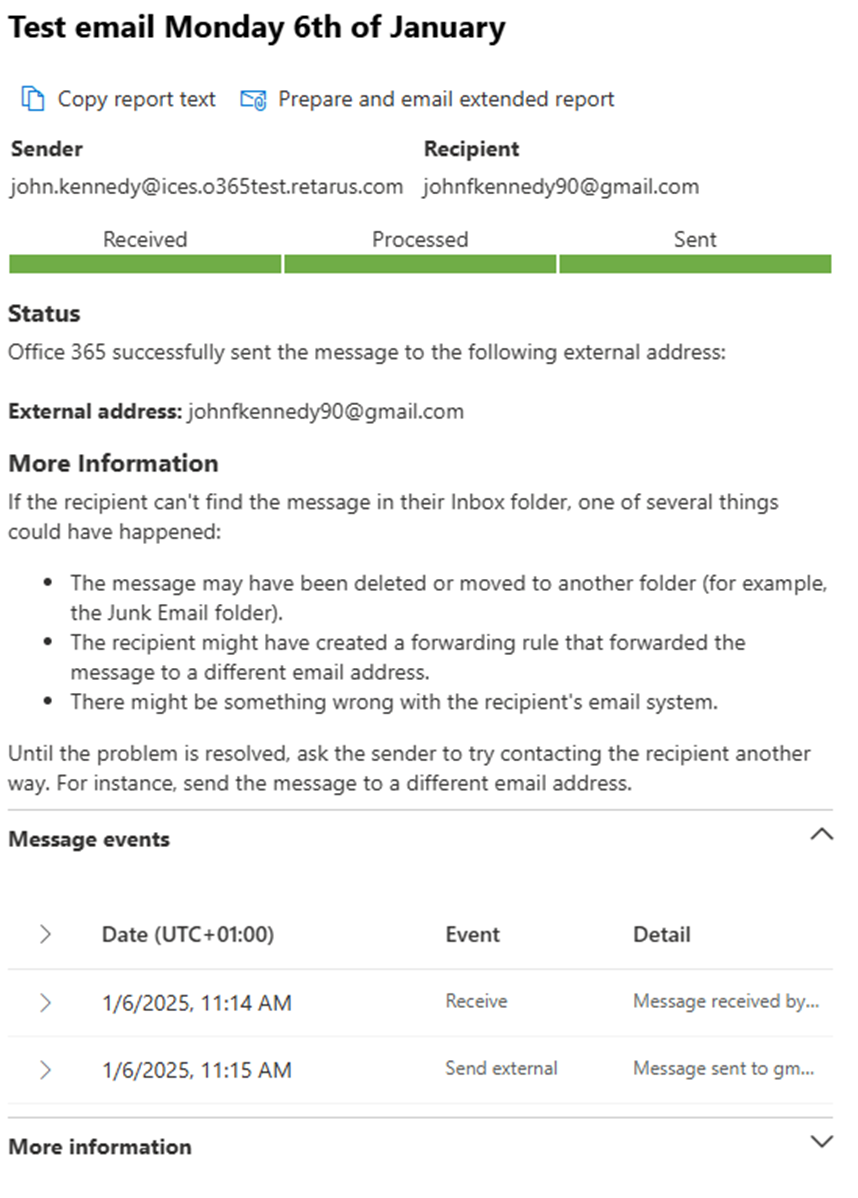
Ensure that email sent from internal mailboxes are correctly routed to Microsoft 365 through the Retarus system via the designated outbound connector.
-
Send a test email from an internal email address to an external service.
-
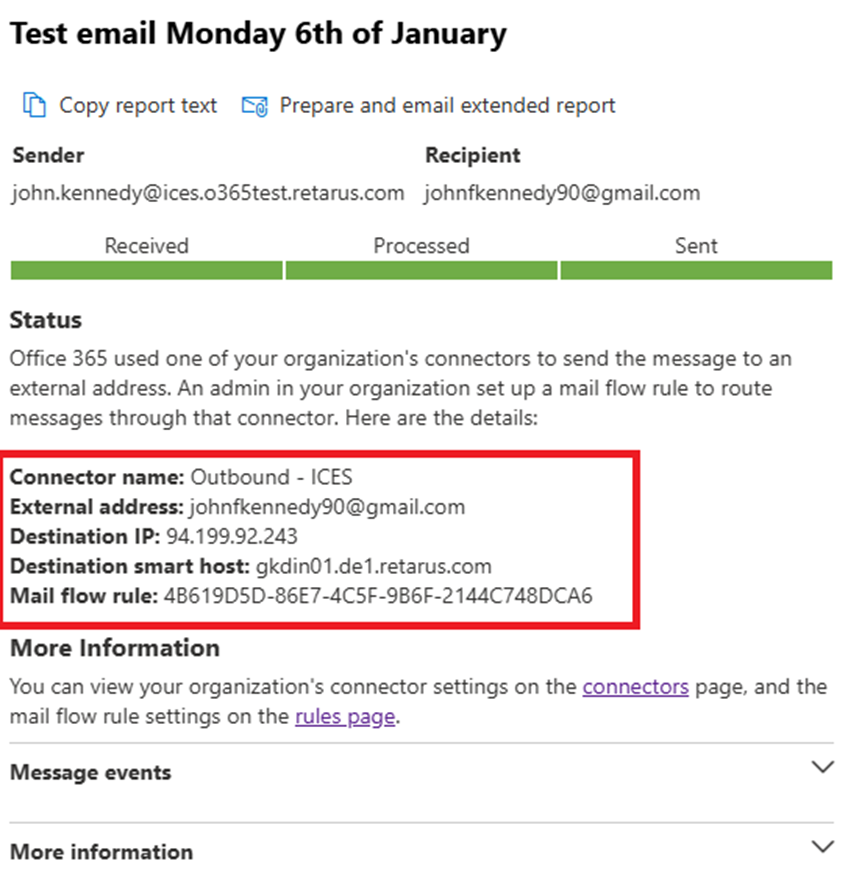
In the Exchange admin center, go to Mail flow - Message trace.
-
Click Start a trace.
-
Search for the test message. Enter the sender's and recipient's email addresses to filter the trace results.

-
Locate the test message in the results list and review the trace results.
→ Look for the Connector that is used to route the message.
→ Verify that the email was sent via the Outbound-ICES connector.
Check that emails sent from Retarus are correctly delivered to Microsoft 365.
-
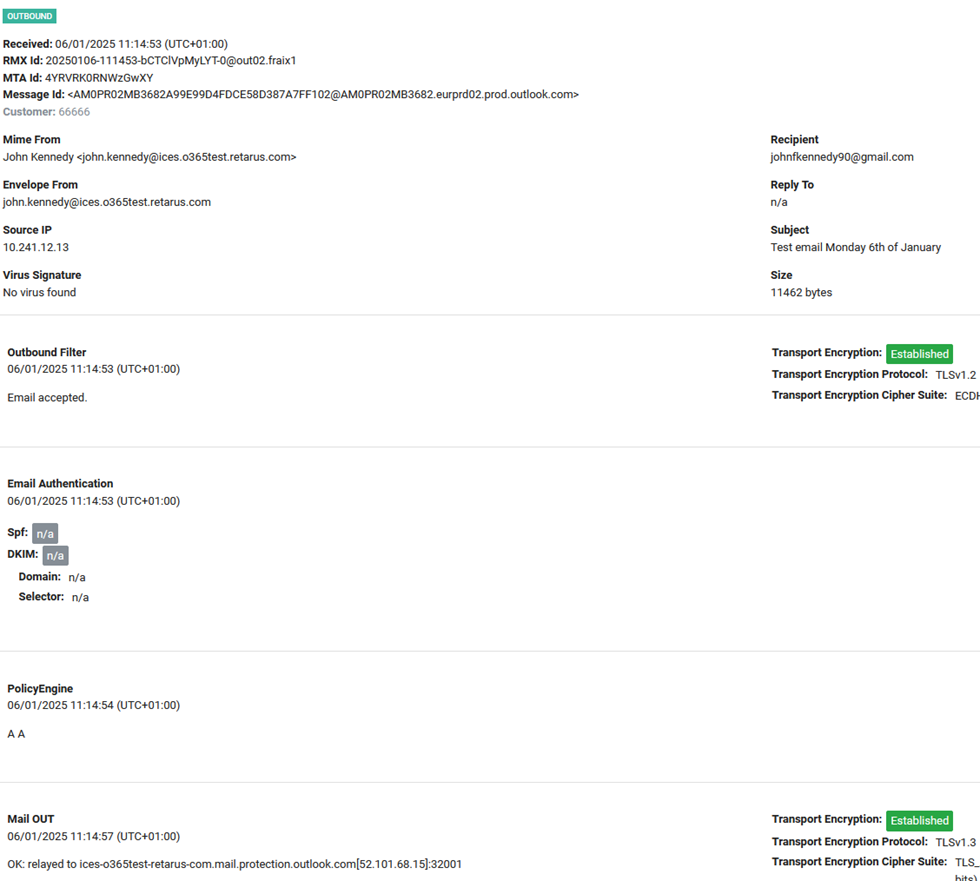
Log in to the myEAS portal.
-
Go to Email Security - Search.
-
Search for the test message log. To narrow down the results, specify the sender and recipient criteria.
-
Locate the test message in the search results and expand its log entry.
-
Check the last entry in the message log to confirm that the email has been sent back to Microsoft 365.
-
Go to the Exchange admin center and verify that the email was successfully processed for delivery to the external service.