
A key part of an SAP Cloud Integration project is to develop Integration Flows. An Integration Flow allows you to specify how SAP Cloud Integration is to process a message. SAP Cloud Integration provides a modeling environment that allows you to design the details of message processing (its senders and receivers as well as the individual processing steps) with a graphical user interface.
Prerequisites
-
An active subscription to the Integration Suite in SAP BTP
-
Assign the necessary capabilities to the Integration Suite.
-
Assign the correct user role for the activated capabilities.
-
-
A subscription to a Retarus cloud REST API product eg, SMS API, Email API, Cloud Fax API
-
Retrieve the necessary login ID credentials from Retarus.
-
-
A running instance of an Open Connector to the required Retarus service
-
Get the endpoint to call the Open Connector.
-
Get User, Organization and Element from the Open Connector instance to create an access key.
-
Creating an Integration Flow
1. Creating an integration package
→ Before designing any integration flow, create an integration package first and, within this integration package, create an integration flow.
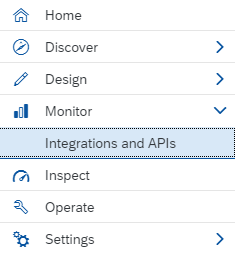
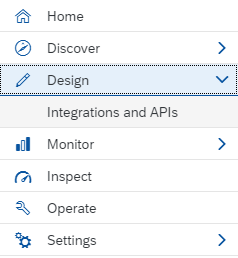
Looking at the menu on the left, if something is missing istead to this picture, please check the assigned capabilities and roles.
2. Creating credentials
→ Create a set of credential so that the Integration Flow will be able to access the Open Connector.
-
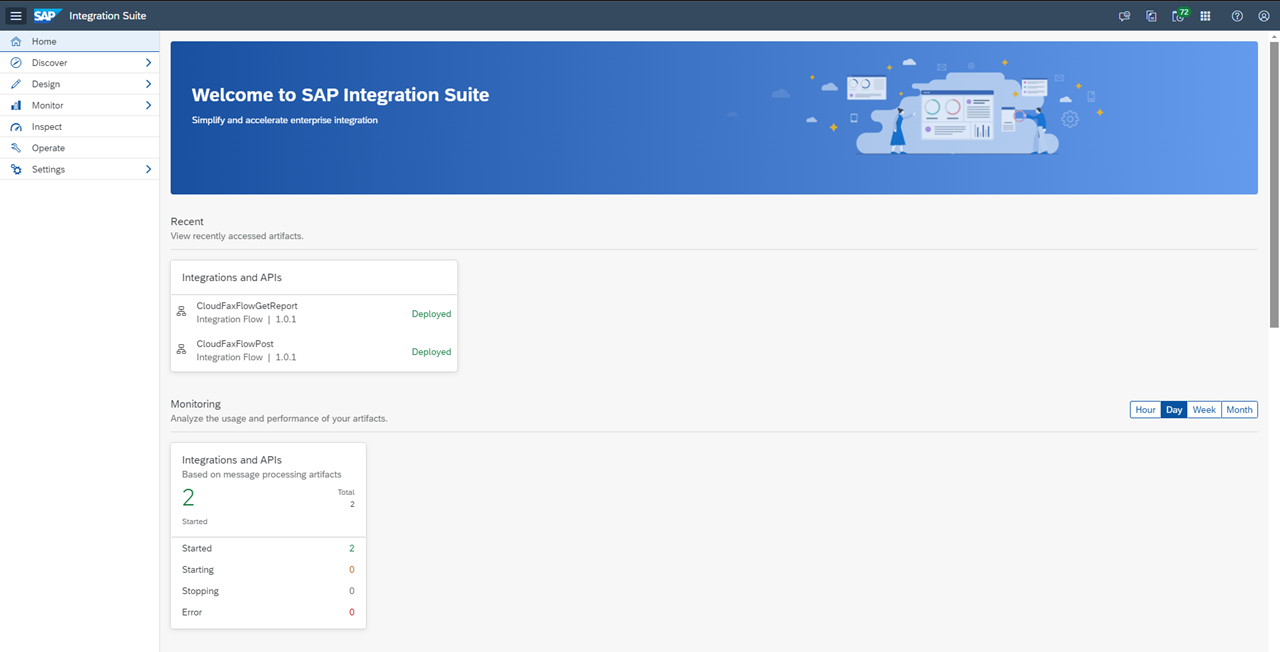
To do this, go to Monitor - Integration and APIs:
-
On the landing page, click on Security Material in the Manage Security section:

3. Getting credentials
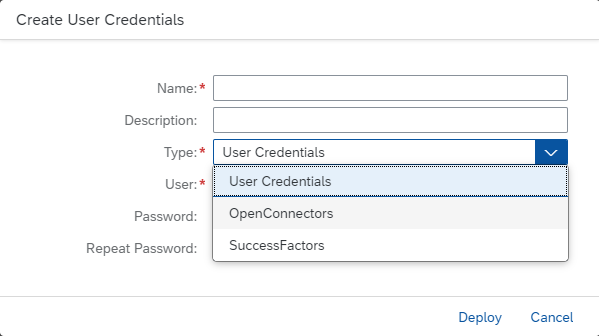
→ The next page shows the list of all the credentials created. Click on Create on the top right and then on User Credentials in the dropdown menu.

4. Defining settings
→ In the pop up box, select OpenConnectors in the Type dropdown menu:
→ Fill in the mandatory data:
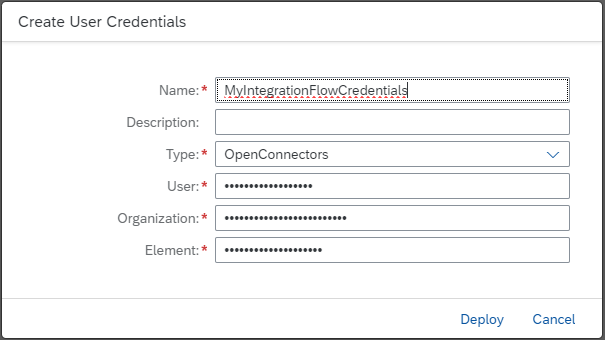
User, Organization and Element must be retrieved from the Open Connector instance which should be used in the Integration Flow (Check the point create instance in the Cloud Fax/SMS/Email Connector on BTP tutorials).
Remember to get the Open Connector endpoint too (it looks like this, even though it may differ a bit: https://api.openconnectors.eu10.ext.hana.ondemand.com/elements/api-v2).
A different set of credentials for every Open Connector Instance (even within the same kind of connector) as the Element changes every time.
Once all the fields have been filled, click on Deploy and the new set of credentials will be displayed in the list mentioned in the previous step.
5. Building an integration package
Now, the Integration Flow can be created by building an integration package. Every integration package may contain multiple Integration Flows.
→ Go to Design - Integration and APIs:
6. Viewing integration packages
The list of Integration Packages will show up (It is empty when the first integratio flow is generated):

→ Select Create on the top right corner to create a new Integration package.
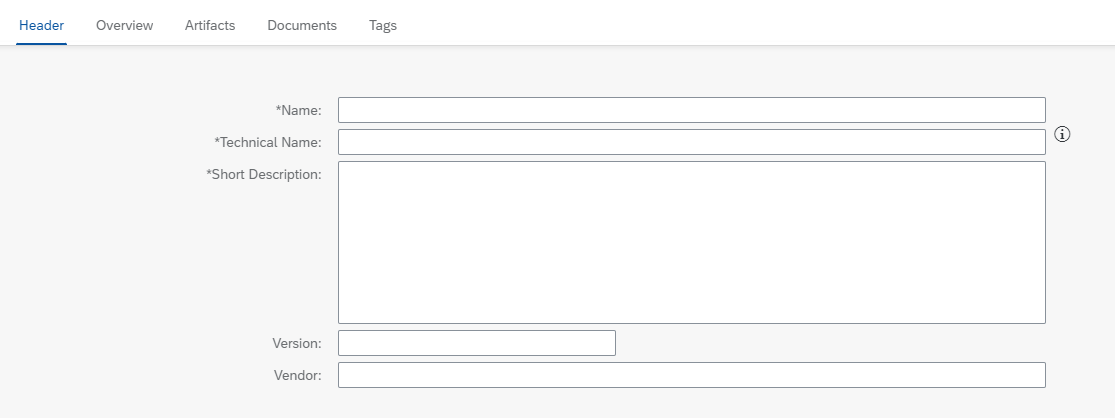
7. Filling in mandatory fields
→ Fill in the mandatory field in the Header tab:
→ Click on Save in the top right corner and then on the Artifact tab.
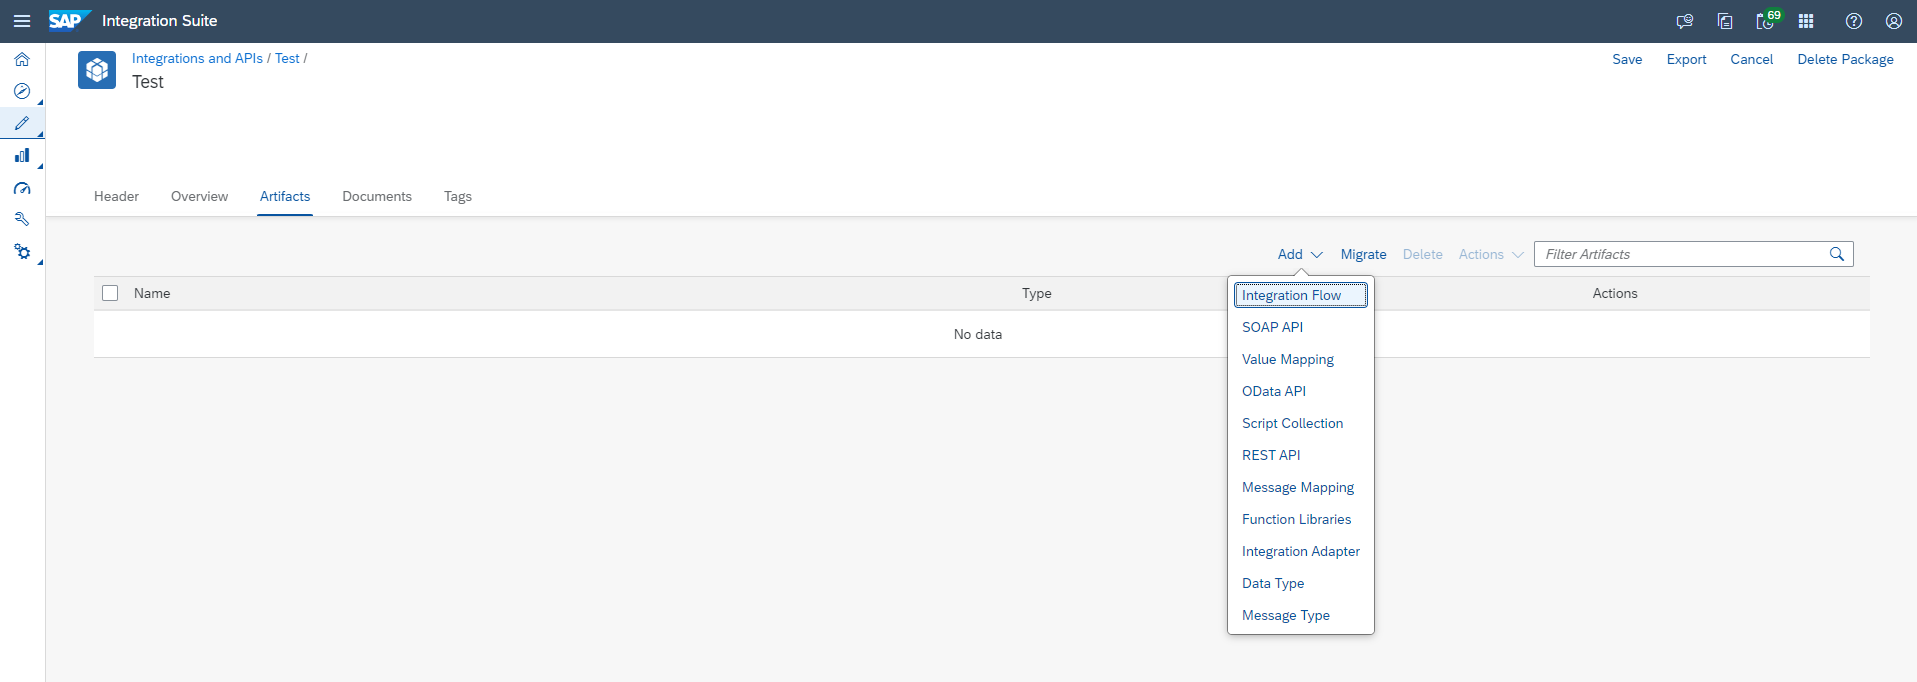
8. Adding the integration flow
→ Click on Add and select Integration Flow from the dropdown menu:
→ Fill in the required data and a description that may help in understanding what this flow does:
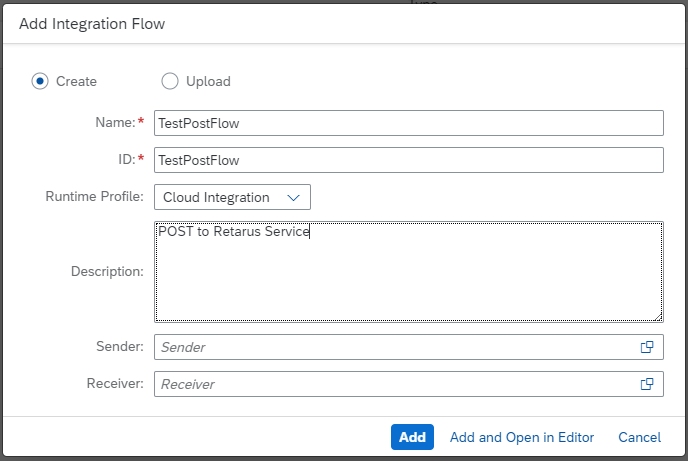
→ Once you filled the form, select the Add button.
9. Viewing the created integration flow
The Integration Flow has been created and it is added to the list of Artifacts of the actual integration package:

→ To edit, just click on anywhere on the line in the list.
The basic structure that has already been created is shown:
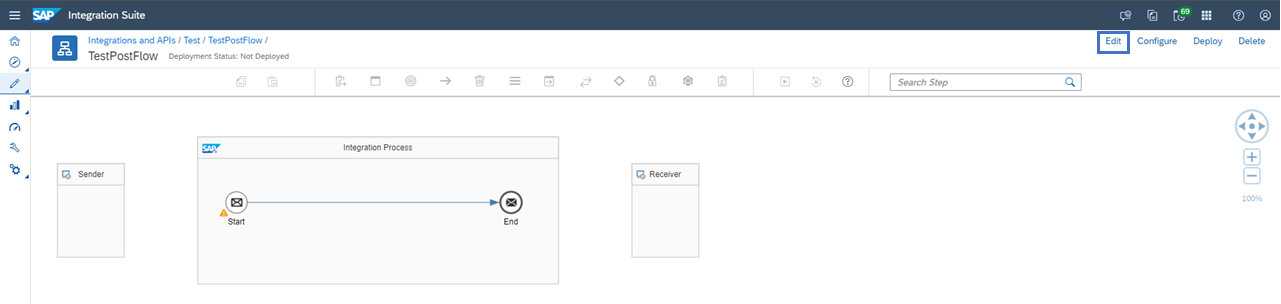
Now, depending on the method of the API implemented with the Open Connector, different settings are necessary.
Integration Flow - How to POST a Job
After completing the steps above, you are now ready to POST a job.
How to POST a job
1. Connecting to the Integration Flow
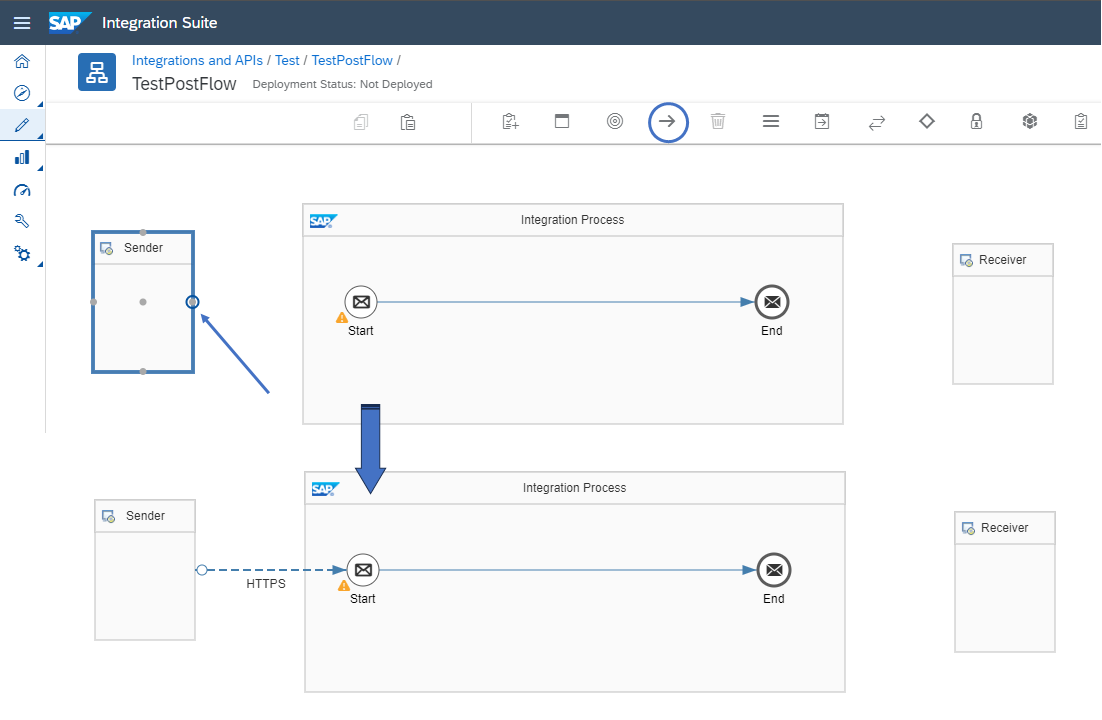
As a first step, connect the Sender to the Start of the Integration Flow. To do so, click on the arrow (Connectors) featured in the top menu bar.
By moving the mouse close to the Sender, a frame with connecting points will appear.
Click on the point of the right side or the one in the middle and draw a line until a similar connecting point at the center of the Start circle is reached.
Once the two elements have been connected, a pop up window will show up. Select HTTPS for the connection type.
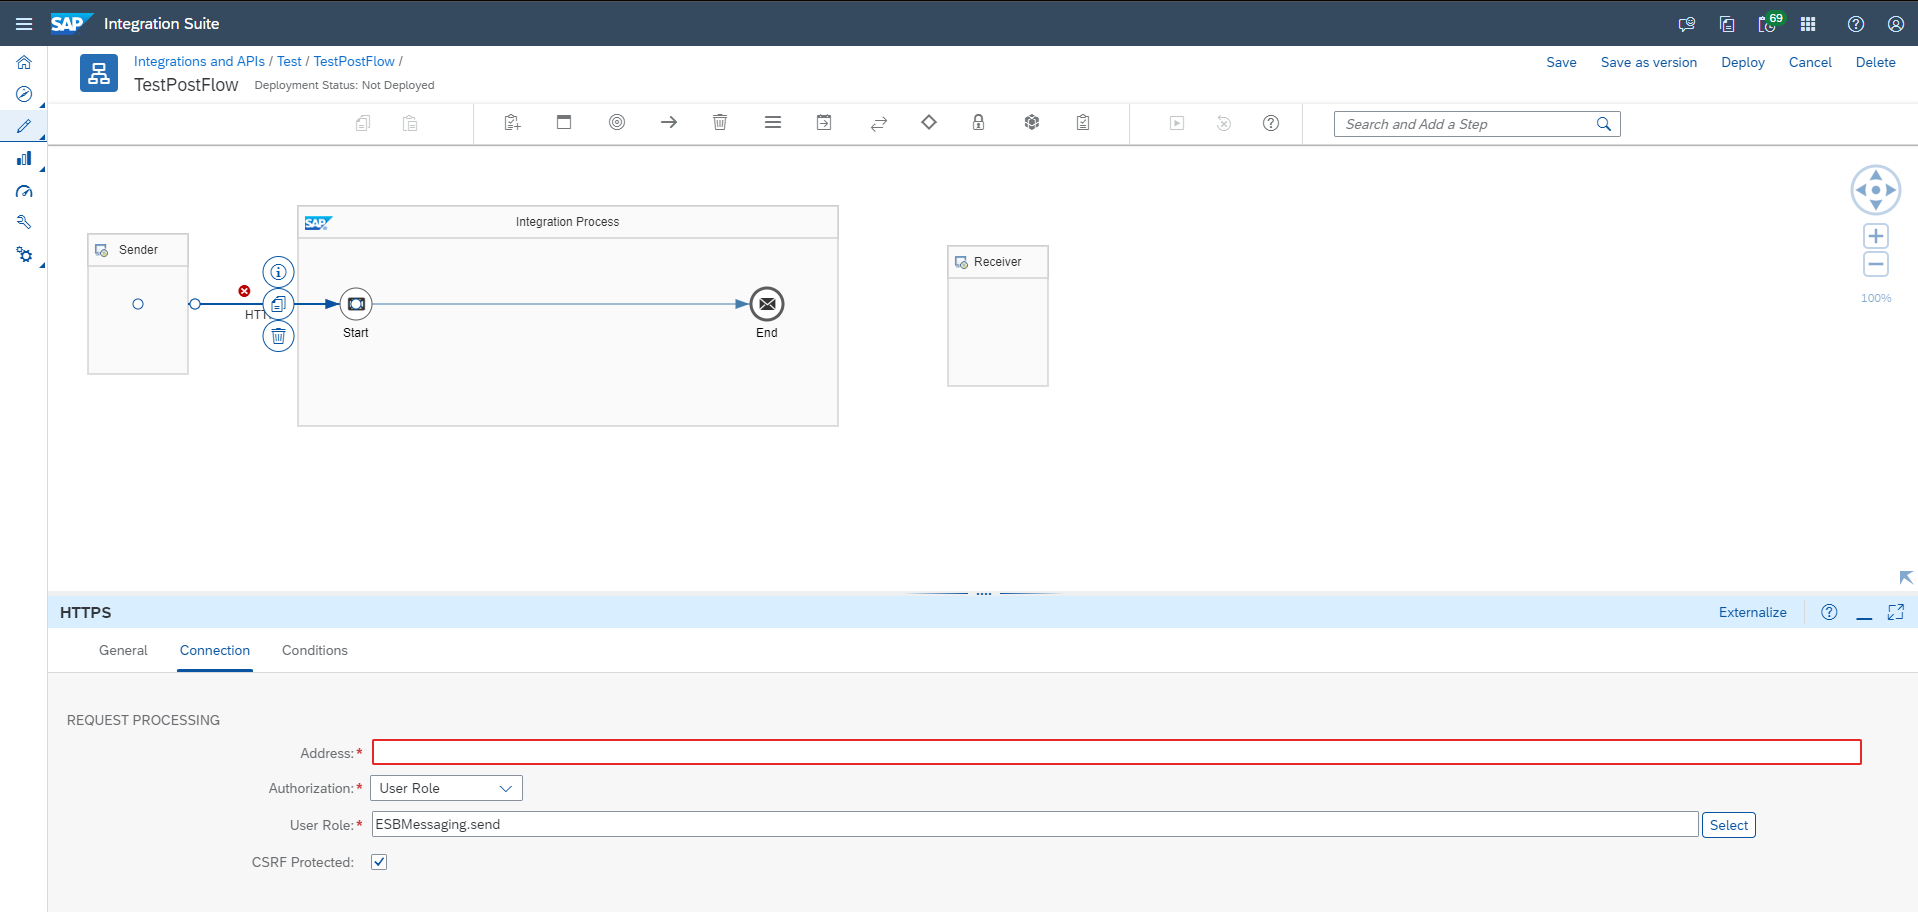
2. Setting up the connection
It is now necessary to set up the connection. Click on this icon at the bottom right corner:
This will show up the property setup window, which will be used from now on to define all the parameters needed by the flow.
📌 Graphical editor properties
Different properties will be displayed in this window depending on the element selected on the graphical editor. Click anywhere in a blank space, the general flow properties will be displayed.
Click on the connecting arrow HTTPS to see its properties, then select the Connection tab:
4. Configuring a send back element
The next step is to add an element capable of sending back to the sender the answer received by the called Retarus service (i.e. a message with the job ID).
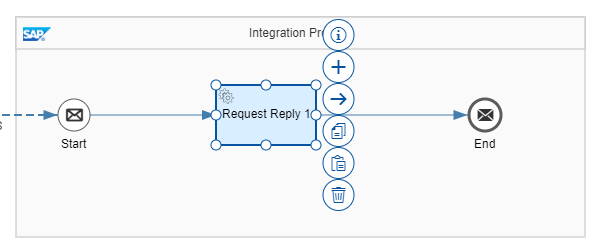
From the top menu, select Call => External Call => Request Reply:

Then, hover the mouse pointer to the arrow connecting Start and End:

Click on it to add the Request Reply element:
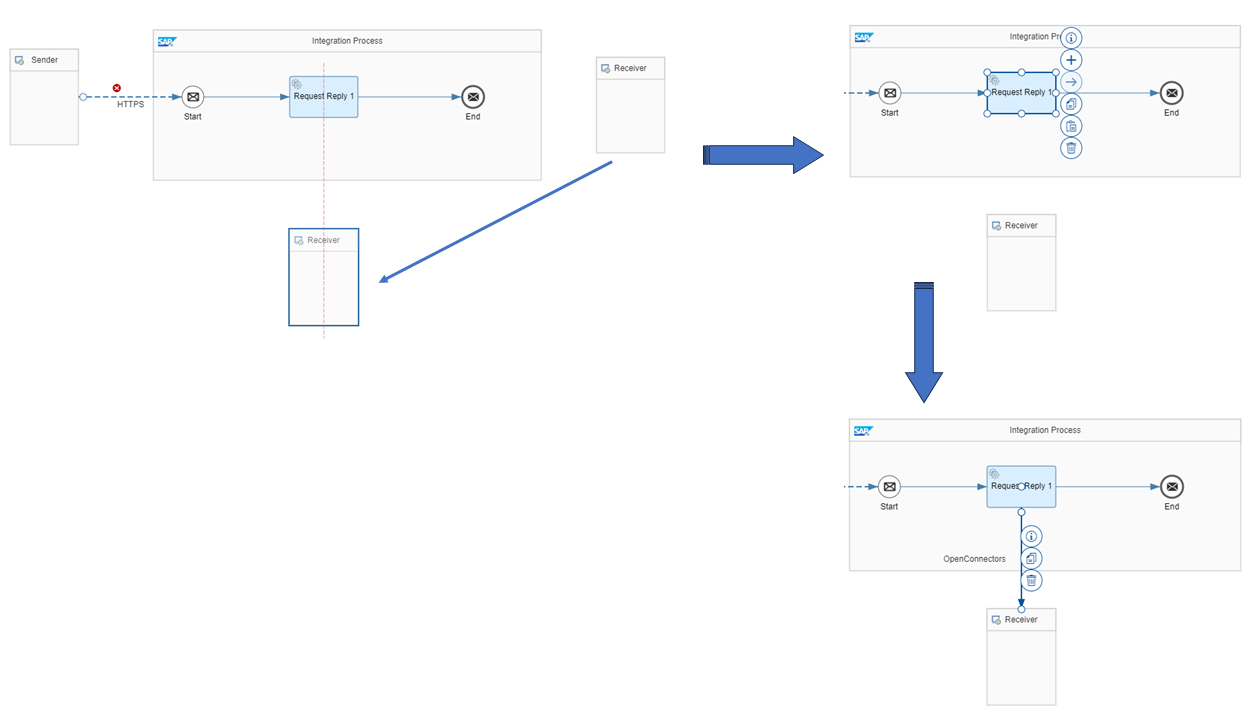
5. Connecting the Request Reply element with the Receiver
Request Reply must now be connected to the Receiver.
Drag the Receiver element underneath Request Reply then click on this one to make its context menu appear and use the Connector Icon (the arrow) to draw a connection between Request Reply and Receiver (keep clicked and drag to the Receiver):

6. Configuring properties for OpenConnectors
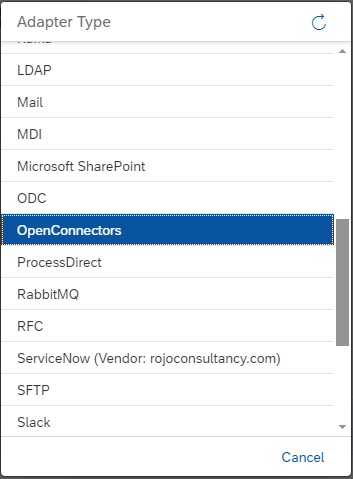
Once the Receiver has been connected, a pop-up window appears in which the Adapter Type can be selected.
Scroll down until OpenConnectors and select it:
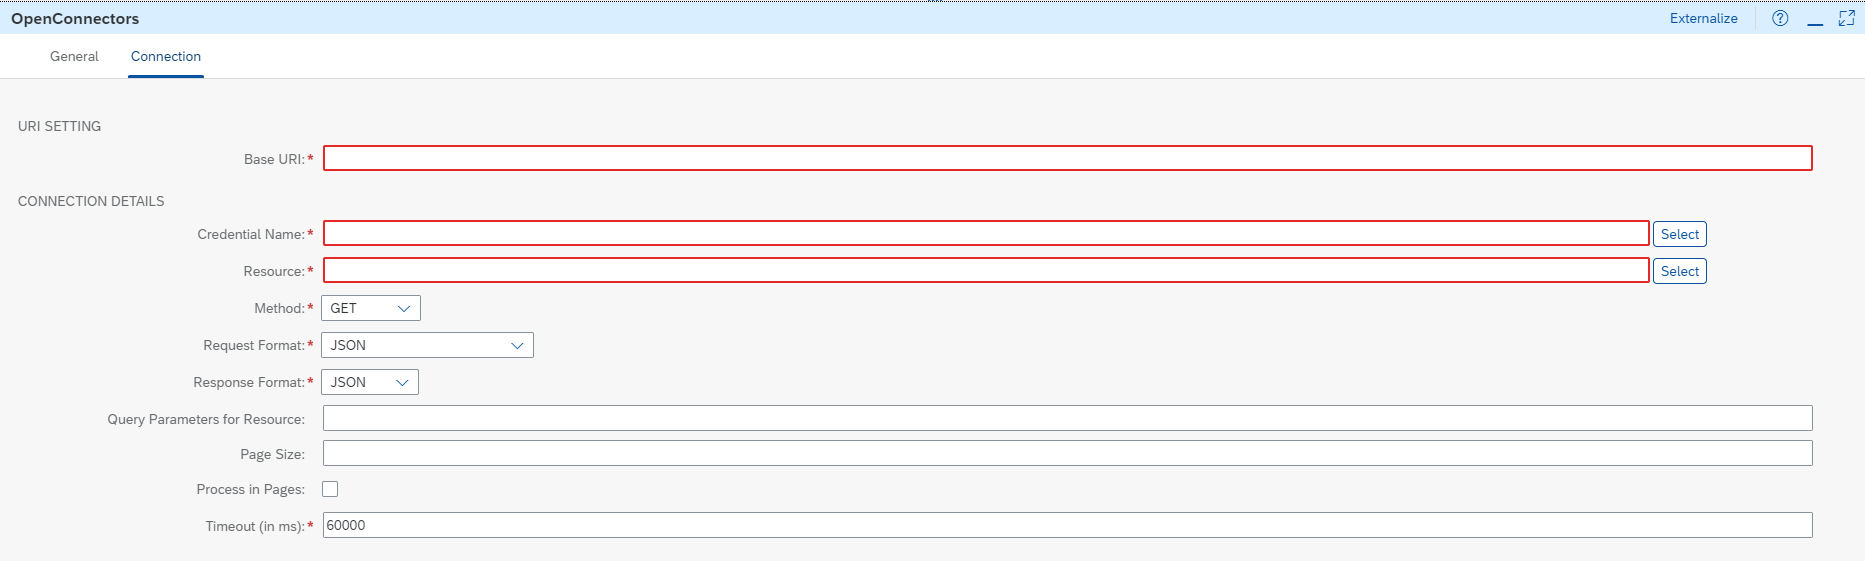
Now, look at the properties window and select the Connection tab:

Change Method to POST.
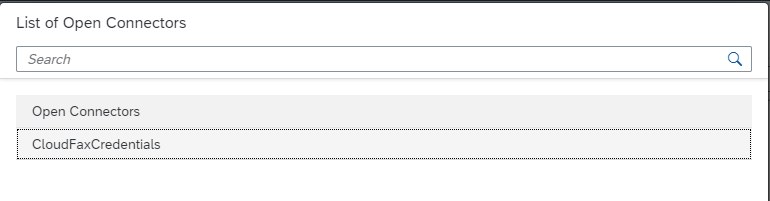
Push the Select button near the Credential Name field.
Select the set of credentials for the Open Connector to call:

Enter the Base URI of the Open Connector endpoint in the proper field.
📌 Base URI entry
The Base URI you get from the Open Connector instance is something like
"https://api.openconnectors.../elements/api-v2/{part depending on the service}". Here you have to enter everything from "https" to "api-v2". What follows "api-v2" must not be entered here.
7. Choosing resources
Click now on the Select button near the Resources field to open a pop up window. Here select the proper resource from the Open Connector to POST the job.
Of course, depending on the called Open Connector, this list may completely change. Here is an example:
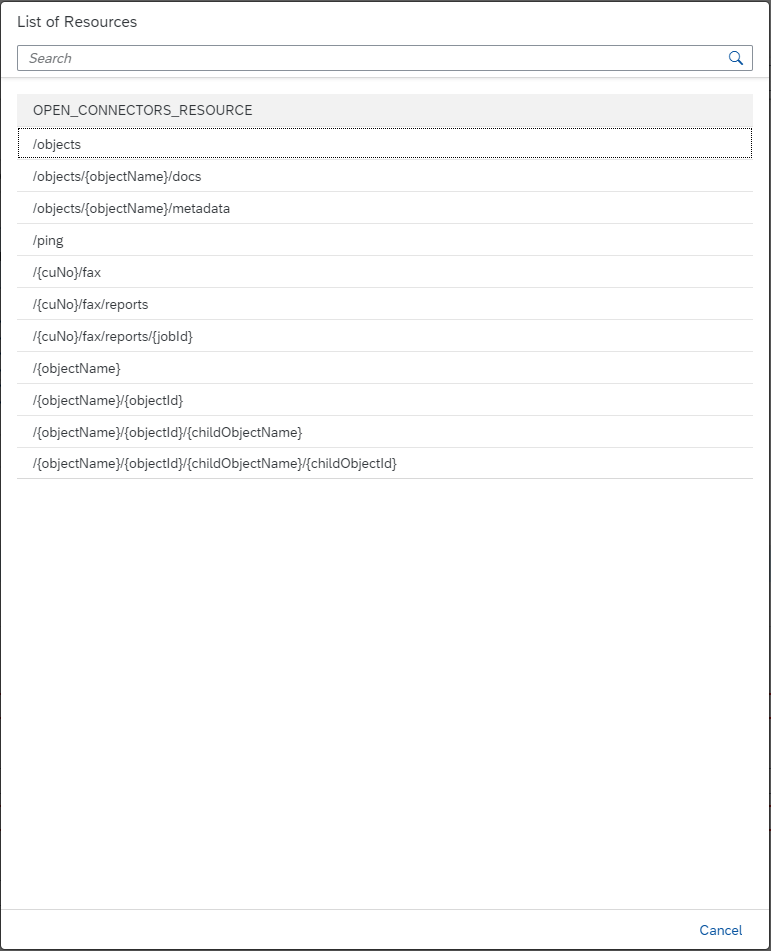
The Resources to choose depending on the service are:
-
Fax-for-Applications
/{cuNo}/fax
//Note: you can leave {cuNo} but it requires a dynamical replacement of the customer number at runtime, which is an advanced feature beyond the scope of this tutorial. If you don't know how to do
//it, replace it with the chosen customer number to get something like /12345/fax -
Transactional Email
/rest/v2/jobs -
SMS-for-Applications
/rest/v1/jobs
8. Finishing the deployment
Once the Resource has been correctly selected, click on Save in the upper right corner and all the eventual errors that may still be highlighted should disappear (if everything is correct).
The Integration Flow is now completed and can be deployed, so click on Deploy, again in the top right corner of the editing area.
Click anywhere in a blank area of the design window, the properties window will show the general properties of the Integration Flow. Select the Deployment Stats tab to check when the deployment is finished and if it has been completed without errors:

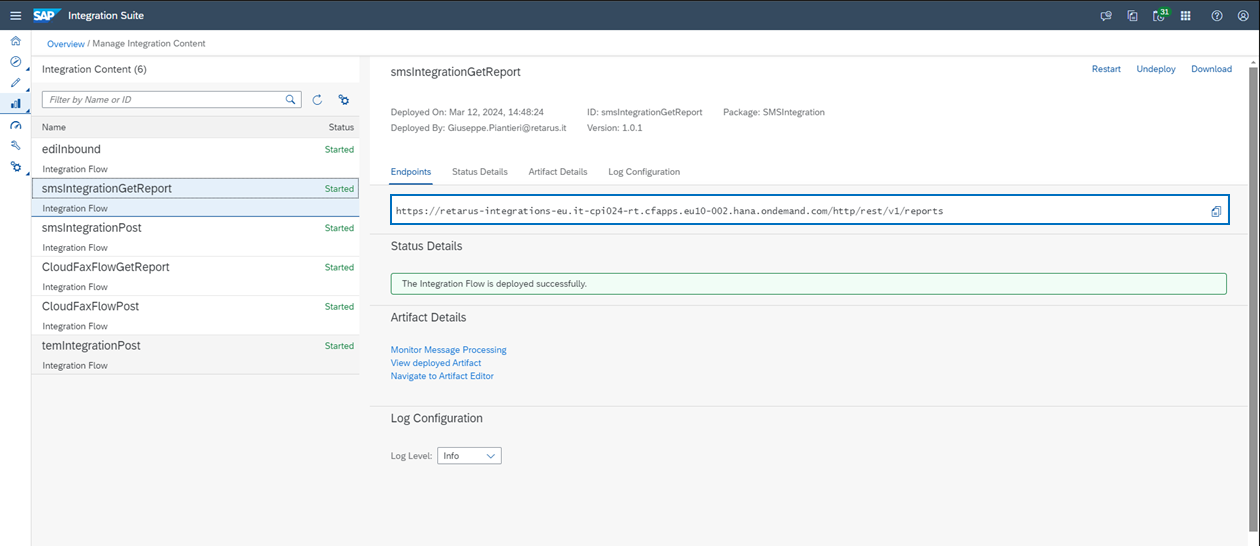
Click on Navigate to Manage Integration Content to move to the page where you can find the endpoint to call this Integration Flow to send your jobs. for instance:
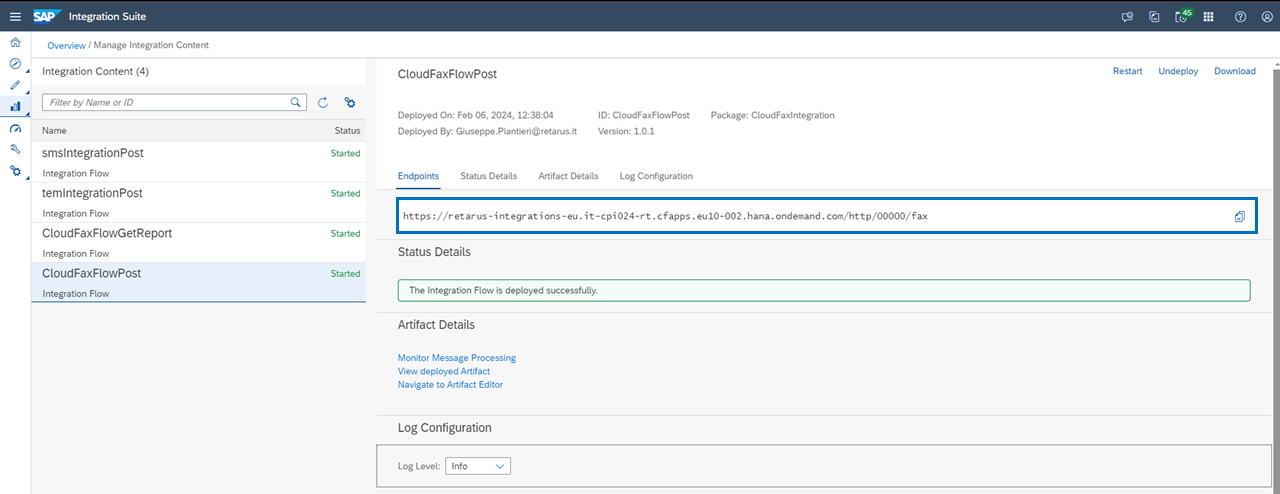
The part after "/http/" changes depending on the specified Resource.
📌 Endpoint authentication
To access this endpoint you will need to use a basic authentication method. The username and the password to log in are the Client Id and the Client Secret you have to get from the set of credentials associated to the Integration Flow Runtime instance of your sub-account.
Integration Flow - How to GET a report
SMS-for-Applications and Fax-for-Applications allow retrieving both a full list of reports per customer number and a single report given the job ID. This tutorial focuses on the second option, retrieving a specific report given the job ID, as it is the most difficult case.
The Integration Flow settings to GET the full list or reports are nearly the same as those for the POST case (see above) and can be easily derived from there.
How to GET a report
1. Connecting the sender to the Integration Flow
As a first step connect the Sender to the Start of the Integration Flow. To do so, click on the arrow (Connectors) featured in the top menu bar.
Move the mouse pointer close to the Sender, a frame with connecting points will appear. Click on the point of the right side or the one in the middle and draw a line the similar connecting point at the center of the Start circle.
Once the two elements have been connected, a pop up window will show up. Select HTTPS for the connection type.

2. Viewing connector properties
Now the created connector must be setup. Click on this icon at the bottom right corner:
This will show up the property setup window that will be used from now on to define all the parameters needed to the flow.
📌 Graphical editor properties
Different properties will be displayed in this window depending on the element selected on the graphical editor. Click anywhere in a blank space, the general flow properties will be displayed.
Click on the connecting arrow HTTPS to see its properties, then select the Connection tab:

4. Retrieving the job report
To retrieve the report about a specific Job, we need the Job ID. The Job ID will be provided as a parameter in the GET request (we'll see later how to setup the request).
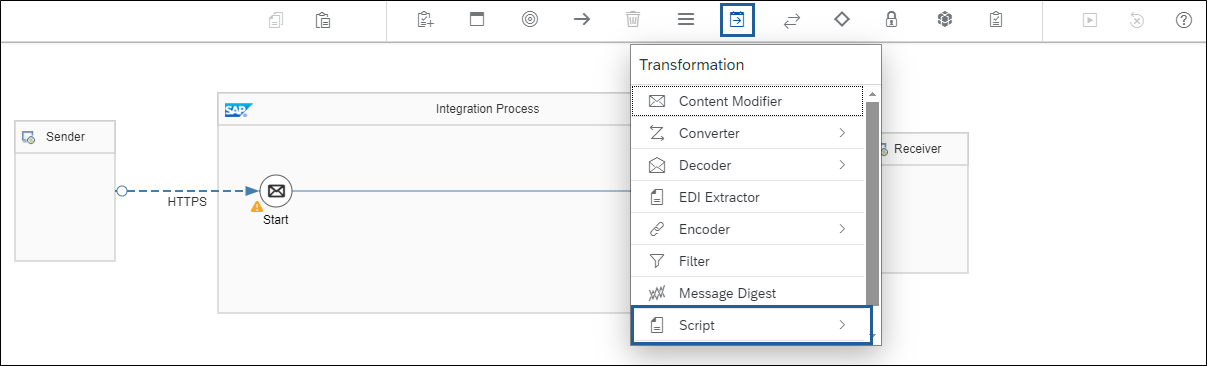
The Job ID can be obtained from the GET request by using a script so,
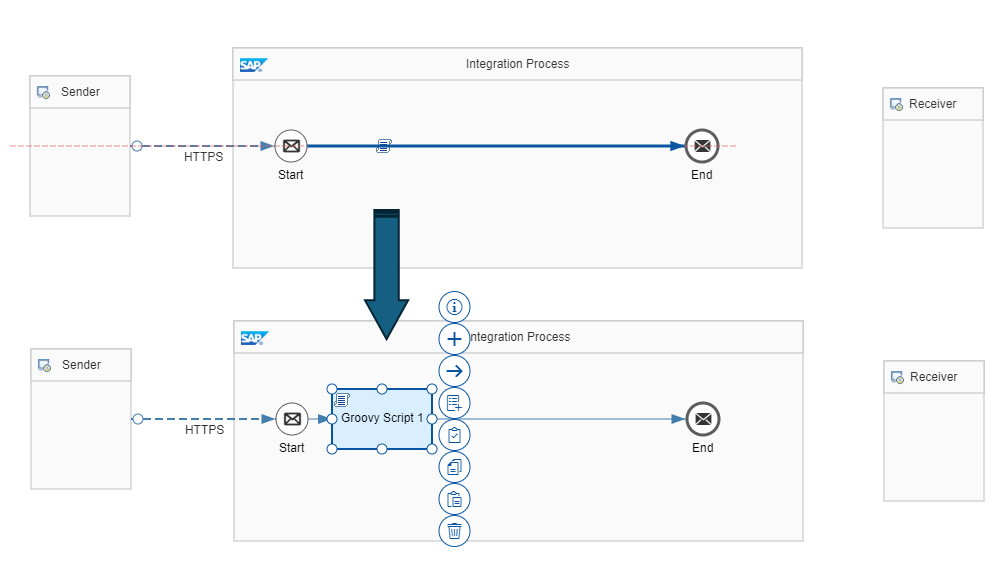
To enter a script, click on the Message Transformation icon in the top menu and then select Script => Groovy Script:
Click now on the arrow connecting Start and End to set the block for entering the script:
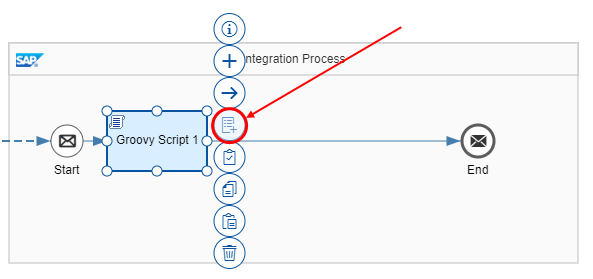
5. Creating a script
To create a new script for this block, click on the Create icon in the context menu:
The script editor will open with a default code already prepared like this:
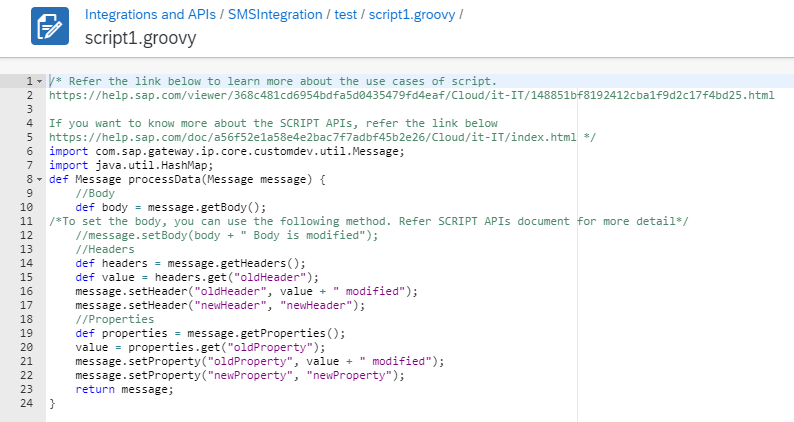
Delete everything and replace it with the following code:
/* Refer the link below to learn more about the use cases of script.
https://help.sap.com/viewer/368c481cd6954bdfa5d0435479fd4eaf/Cloud/it-IT/148851bf8192412cba1f9d2c17f4bd25.html

If you want to know more about the SCRIPT APIs, refer the link below
https://help.sap.com/doc/a56f52e1a58e4e2bac7f7adbf45b2e26/Cloud/it-IT/index.html */
import com.sap.gateway.ip.core.customdev.util.Message;
import java.nio.charset.Charset;

def Message extractUrlGetParameters(Message message) {

    String httpQuery = message.getHeader('CamelHttpQuery', String);

    if(httpQuery) {
        Map<String, String> queryParameters = URLDecoder.decode(httpQuery, Charset.defaultCharset().name())
        .replace("\$","")
            .tokenize('&')
            .collectEntries { it.tokenize('=')};

        message.setProperties(queryParameters);
    }

    return message;
}
6. Adding a sending back element
The next step is to add an element capable of sending back to the sender the answer received by the called Retarus service (i.e. a message with the job ID).
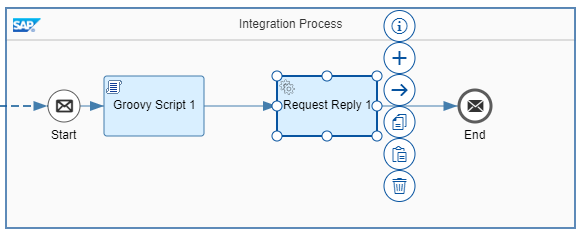
From the top menu, select Call => External Call => Request Reply:

Click on the arrow following the Script block to add the Request Reply one:
7. Connecting the Request Reply to the Receiver
Request Reply must now be connected to the Receiver.
Drag the Receiver element underneath Request Reply, then click on this one to make its context menu appear, and use the Connector Icon (the arrow) to draw a connection between Request Reply and Receiver (keep clicked and drag to the Receiver):
8. Configuring properties for OpenConnectors
After connecting the Receiver, a pop-up window will show up to choose the Adapter Type.
Scroll down until OpenConnectors and select it:

Now, look at the properties window and select the Connection tab:
Push the Select button near the Credential Name field and select the set of credentials for the Open Connector to call, for instance:
Enter the Base URI of the Open Connector endpoint in the proper field.
📌 Base URI entry
The Base URI you get from the Open Connector instance is something like
"https://api.openconnectors.../elements/api-v2/{part depending on the service}". Here you have to enter everything from "https" to "api-v2". What follows "api-v2" must not be entered here.
10. Finishing the deployment
Once the Resource has been correctly selected, click on Save in the upper right corner and all the eventual errors that may still be highlighted should disappear (if everything is correct).
The Integration Flow is now completed and can be deployed, so click on Deploy, again in the top right corner of the editing area.
Click anywhere in a blank area of the design window, the properties window will show the general properties of the Integration Flow. Select the Deployment Stats tab to check when the deployment is finished and if it has been completed without errors:

Click on Navigate to Manage Integration Content to move to the page the endpoint can be found to call this Integration Flow to send the jobs.
The part after "/http/" changes depending on the specified Resource.
📌 Endpoint authentication
To access this endpoint you will need to use a basic authentication method. The username and the password to log in are the Client Id and the Client Secret you have to get from the set of credentials associated to the Integration Flow Runtime instance of your sub-account.
11. Testing the integration flow
To test the integration flow we have just created, it is possible to use Postman.
Create a GET request in Postman specifying the above URL and adding jobId and its value as a parameter of the request.
For Fax:

For SMS:

📌 Case-sensitive Job ID parameter
The name of the parameter used to pass the Job ID must be the same as the one defined in the integration flow, including capitals, as it is case sensitive.