
With user management, you can create, manage, update, and delete users and groups.
Groups help you work more efficiently. By adding multiple users or administrators to a group, you can quickly assign that group to several faxboxes at once, saving you time and effort.
You and other admins can be part of multiple faxboxes. This gives you flexibility in managing faxbox access and permissions.
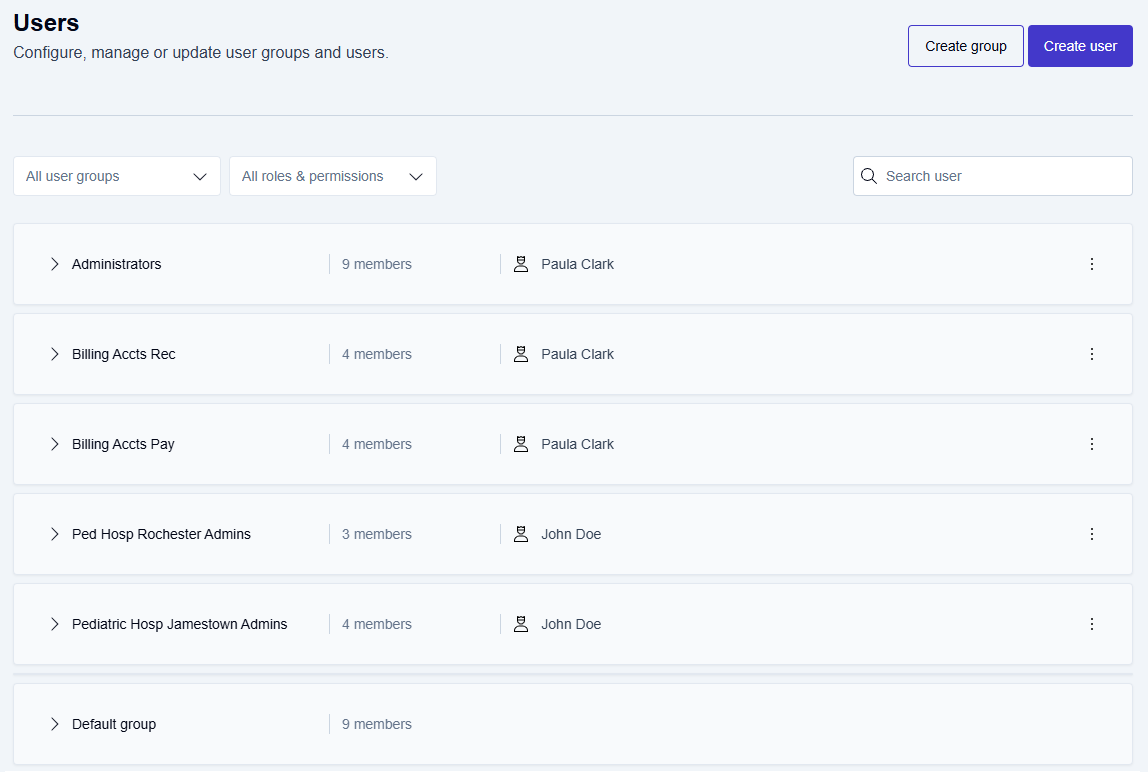
By default, you have two user groups:
-
Administrators
You have full permissions in this group. As an Administrator, you can create, update, and delete users, faxboxes, and folders. -
Default group
This group gives you the basic access you need to do your job, with only the minimum permissions required.
Whenever you create a new user, they are automatically added to the Default group at first. You can move them to other groups as needed.
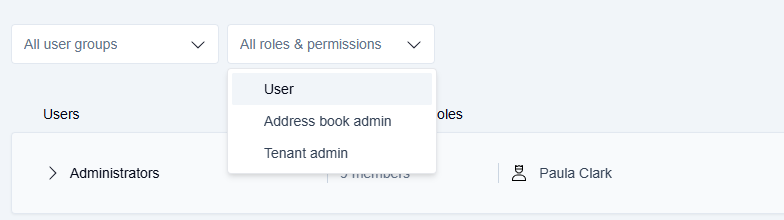
There are three default roles: User, Address book admin, and Tenant admin.
-
User
You can read, send, move, print, download, delete, and search for faxes in the faxboxes assigned to you. -
Address book admin
You can add, update, and delete address book contacts. You'll have this role if your organization activates the option to restrict outbound faxes to verified recipients only. This restriction is enabled in Advanced settings and ensures faxes can only be sent to contacts saved in the address book. -
Tenant admin
You have the highest level of access. As a Tenant admin, you can add, update, and delete users, admins, user groups, and admin groups. You can also manage folders and faxboxes, assign fax numbers, and assign users and admins to faxboxes. You can edit user information and perform many other administrative tasks.
📌 Creating users/user groups
Before assigning users and user groups to faxboxes, the admin of a faxbox must first create the users and user groups within User Management.
Creating a group
-
Click the Settings icon on the main Enterprise Fax Portal page.
→ The Users screen is displayed, showing any admins currently with access, and lists the default group and any other groups that may have been previously created. -
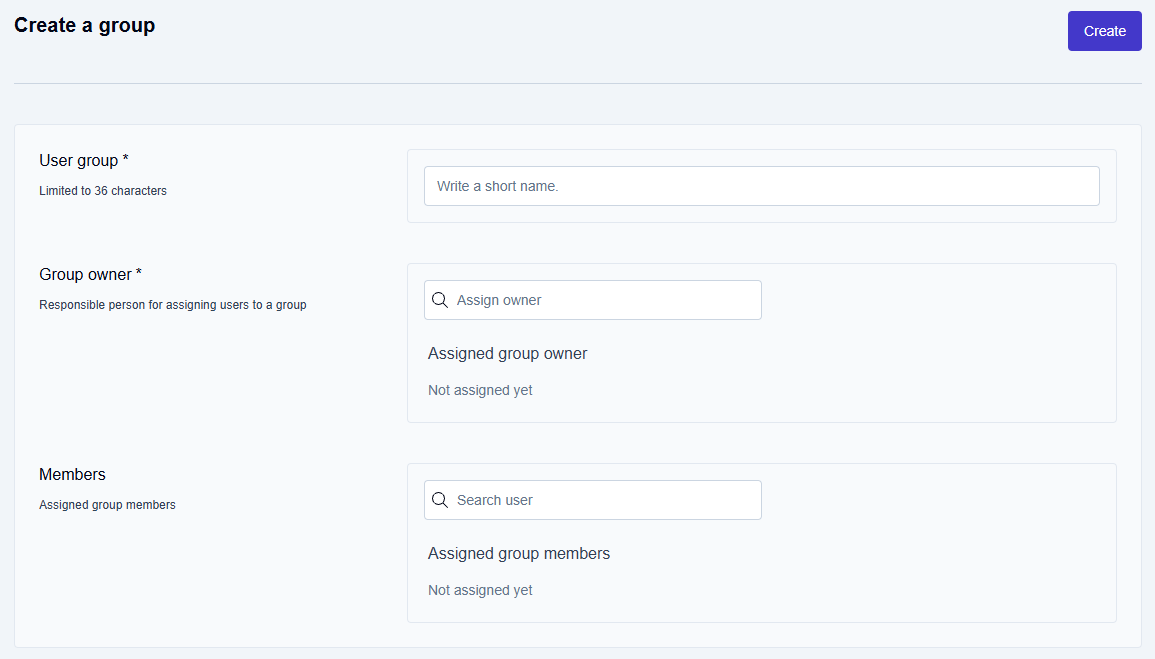
Click the Create group button.
→ The Create a group screen is displayed, and you are prompted to enter the user group name, group owner name, and group members' names.
-
Click inside the User group field and type the name of the new User group.
→ The User group name is limited to a maximum of 36 characters.
→ The new User group may be for a group of admins, for a group of users, or a group containing users and admins. -
Click inside the Group Owner field, type the first few letters of the group owner’s name to display the autocomplete list of available users, and select the user to be assigned as the group owner of this specific group.
Repeat this step to add additional group owners. You can assign up to 10 group owners. All group owners share equal responsibility for managing the group and have the same permissions. -
Click inside the Members field, type the first few letters of the member’s name to display the autocomplete list of available users, and select the user to be assigned as a member of this specific group.
→ Repeat this step until all members have been added to the group.
📌 Finalizing group creation
The group is not complete until you click the Create button at the top right corner of the Create a group screen.
-
Click the Create button.
→ The Group created message is displayed at the bottom of the page, and you are returned to the Users page.
Once the group is created, all assigned group owners receive an email notification confirming that the group has been created. The notification includes the group name, who created it, and the timestamp. If you no longer wish to receive these notifications, you can turn them off in the My Profile section. For details, see Email notifications.
Creating a user
-
Click the Settings icon on the main Enterprise Fax Portal page.
→ The Users screen is displayed, showing any admins currently with access, and lists the default group and any other groups that may have been previously created. -
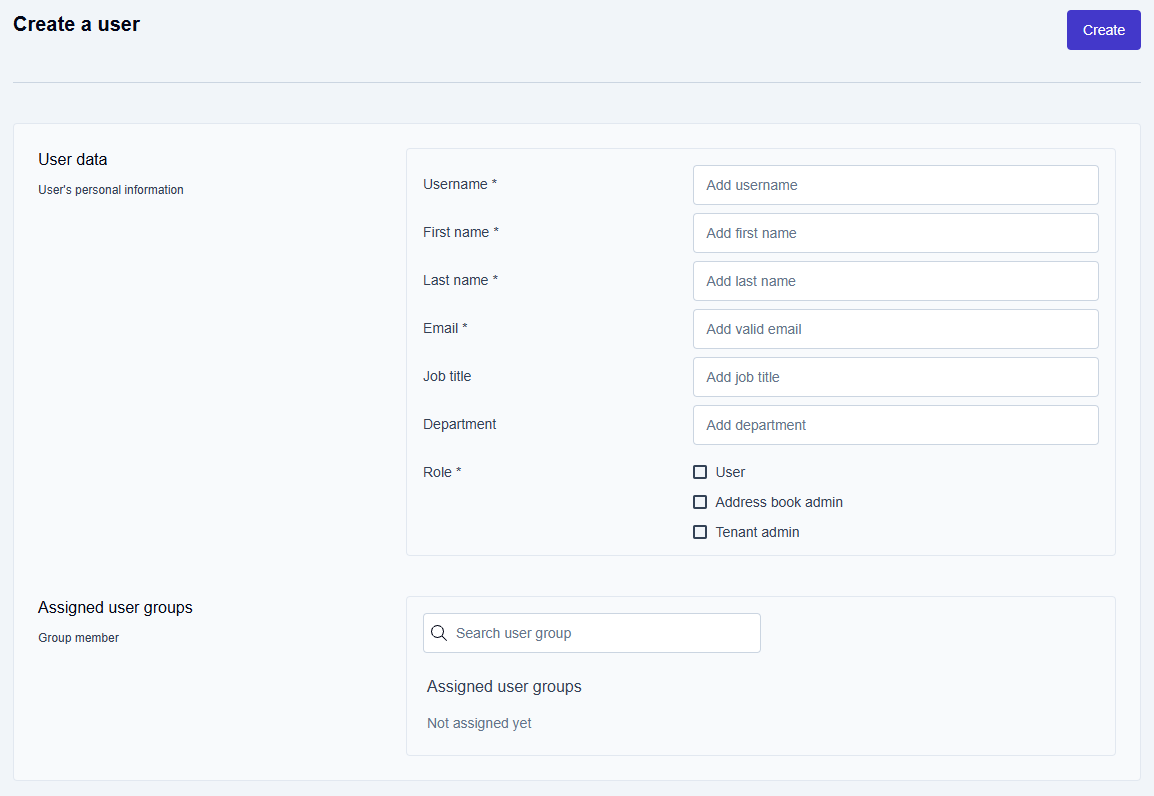
Click the Create User button.
→ The Create User screen is displayed. -
Enter the required details (username, valid email address, etc.).
-
Select a role for the user.
-
Assign the user to a group by clicking inside the Assigned user groups field and typing the first few letters of the group name. Select the desired group from the dropdown list that appears.
If you skip the Assigned user groups field, the new user will automatically be placed in the Default group. You can assign them to a different group at any time later.
-
Click the Create button.
→ The User created message is displayed at the bottom of the page, and you are returned to the Users page.
→ The system automatically sends two emails to the new user:-
A Welcome email introducing them to the Fax Portal.
-
A Set up Your Password email containing a unique registration link.
-
Activation email and user status
After you create a user, the system sends an activation email with a registration link. The link is valid for 7 days, and the user’s status remains Pending Activation until they complete registration.

To activate the account, the user must click the link and complete the required setup steps, such as setting a password or configuring additional security options like two-factor authentication (2FA). Once activated, the user can sign in and access the faxboxes assigned to them.
If the user does not receive the activation email or the link expires, you can resend the activation email at any time. See Users with pending activation status for details.