Forward a fax to a fax number
Users can easily forward a fax to a different fax number.
Two ways to forward a fax to a different fax number:
While viewing the faxes on the main page of any folder,
While hovering over a fax
Hover over the fax message to be forwarded. Click the More actions icon (
). The more actions menu pops up. Scroll down and click to select the Forward option.
→ The Forward fax window opens.
→ For step-by-step instructions, see Forward a fax when hovering over a fax message below.While previewing a fax
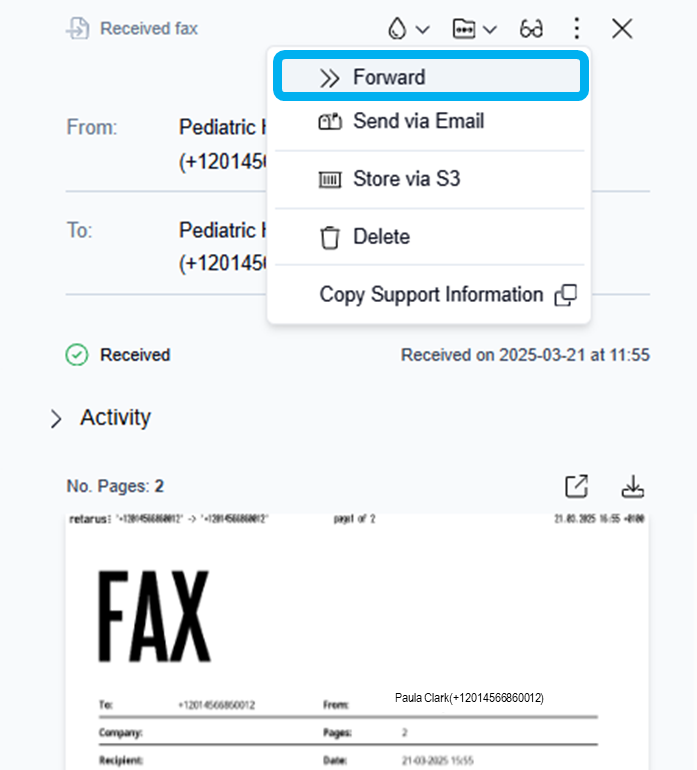
Click to select a fax message in the current folder to preview it. From the fax preview window, click the More actions icon (
). The More actions menu pops up. Click to select the Forward option.
→ The Forward fax window opens.
→ For step-by-step instructions, see Forward a fax when previewing a fax message below.
Forward a fax when hovering over a fax message

Hover over the fax message to be forwarded and click the More actions icon (
).
→ The More actions menu pops up.

Click to select the Forward option.
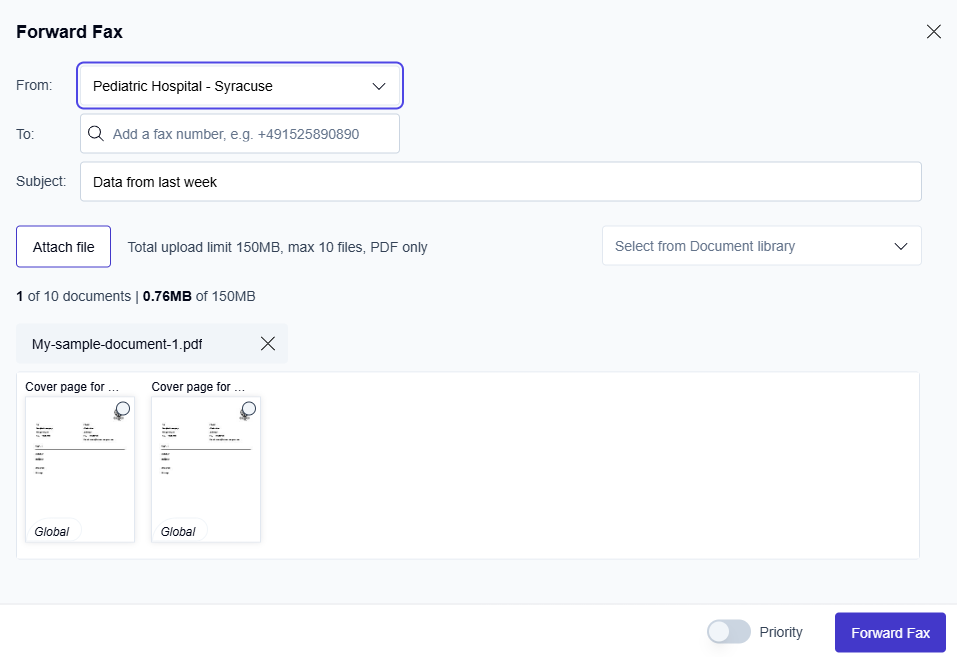
→ The Forward fax window opens.

Click inside the “To:” field.
To manually enter your Retarus fax number, use the following format and type: a plus sign, the country code, and the fax number without any spaces (e.g. +12013770597, +4989902694001).
To leverage the address book contacts to enter your Retarus fax number: type a + (plus sign), or type a + and the first 2 or 3 digits of the recipient’s fax number, or type the first 2 or 3 characters of the recipient’s company name, or type the recipient’s first name to display the autocomplete list of available fax numbers/address book contacts and select the recipient’s contact.
→The plus sign and domain are automatically added to the selected fax number.Click inside the Subject: field and type the subject of your fax message.
Attach additional docs to the forwarded fax
When you select the forward option, the fax you want to forward is automatically generated as an email attachment. You can also include additional documents as attachments in the forwarded fax message.
To attach optional, additional documents to the forwarded fax:
Click the Attach file button, go to the folder containing the file you want to attach, and select the document you want to send with your fax.
Click the Open button to attach the document to your fax message.
→ The selected file is added and displayed underneath the Attach file button.
Include a cover page with the forwarded fax
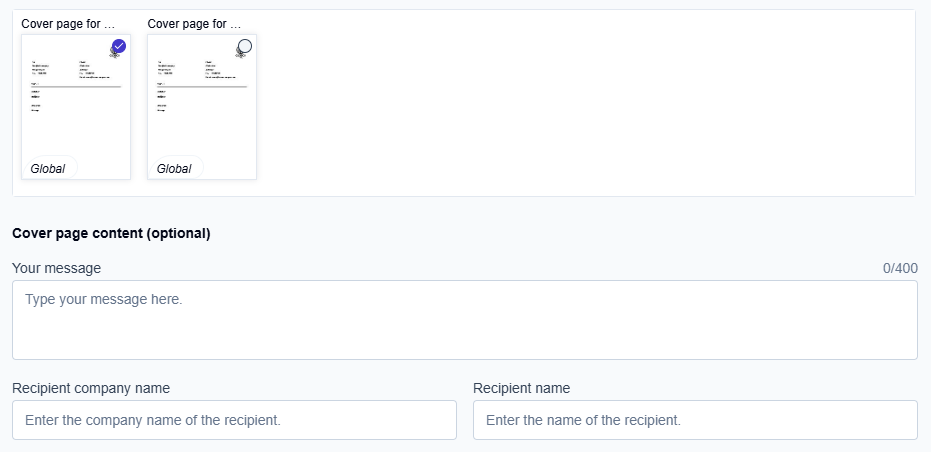
Click to check the Cover page included checkbox at the bottom left corner of the Forward Fax message screen.
Click inside the Your message field and type a message to yourself.
→ The message you enter is included on the first page of the outbound fax.The “Recipient company name” and “Recipient name” fields:
The “Recipient company name” and “Recipient name” fields may already be auto-filled if you select the fax number/contact from the address book.
To manually enter the “Recipient company name” and “Recipient name” fields, click inside each field and type the contact’s information.
→ The first page of the outbound fax includes the message, the recipient's company name, and the recipient's name you entered.
Click the Forward fax button in the bottom right corner of the Forward Fax message window.
→ The Forward fax message window closes, and the “Forward fax submitted” message displays at the bottom of the screen in a black box.

Forward a fax when previewing a fax message

Click to select and preview any fax message in the current folder view.
→ The fax opens in the document preview window on the right side of the screen.Click the More actions icon (
) in the top right corner of the fax preview window.
→ The More actions menu pops up.

Click to select the Forward option.
→ The Forward fax window opens.

Click inside the “To:” field.
To manually enter your Retarus fax number, use the following format and type: a plus sign, the country code, and the fax number without any spaces (e.g. +12013770597, +4989902694001).
To leverage the address book contacts to enter your Retarus fax number: type a + (plus sign), or type a + and the first 2 or 3 digits of the recipient’s fax number, or type the first 2 or 3 characters of the recipient’s company name, or type the recipient’s first name to display the autocomplete list of available fax numbers/address book contacts and select the recipient’s contact.
→The plus sign and domain are automatically added to the selected fax number.Click inside the Subject: field and type the subject of your fax message.
To attach optional, additional documents to the forwarded fax
When you select the forward option, the fax you want to forward is automatically generated as an email attachment. You can also include additional documents as attachments in the forwarded fax message.
Click the Attach file button, go to the folder containing the file you want to attach, and select the document you want to send with your fax.
Click the Open button to attach the document to your fax message.
→ The selected file is added and displayed underneath the Attach file button.
To include a cover page with your fax message:
Click to check the Cover page included checkbox at the bottom left corner of the Forward Fax message screen.
Click inside the Your message field and type a message to yourself.
→ The message you enter is included on the first page of the outbound fax.The “Recipient company name” and “Recipient name” fields:
The “Recipient company name” and “Recipient name” fields may already be auto-filled if you select the fax number/contact from the address book.
To manually enter the “Recipient company name” and “Recipient name” fields, click inside each field and type the contact’s information.
→ The first page of the outbound fax includes the message, the recipient's company name, and the recipient's name you entered.
Click the Forward fax button in the bottom right corner of the Forward Fax message window.
→ The Forward fax message window closes and the “Forward fax submitted” message displays at the bottom of the screen in a black box.