Skip table of contents

Hyland: Integrating Retarus Cloud Fax with OnBase

This guide explains how to integrate Retarus Cloud Fax with Hyland OnBase to streamline fax processing. It covers the configuration of both the Fax-to-Email method and the Fax-to-FTP method.

Prerequisites

Before you begin, ensure you have:

  • An active Retarus Cloud Fax account

  • Administrative access to your Hyland OnBase platform

  • Access to an FTP/SFTP server (required only for the Fax-to-FTP method)

Integrating with Fax-to-Email

1. Set up Retarus Cloud Fax
  • Log in to Retarus EAS portal.

  • Navigate to Administration - Fax Services - Fax Inbound Services.

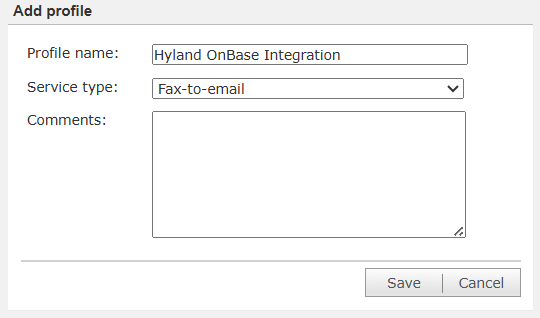
  • Create a new profile and configure at least the following settings:

    • Provide a descriptive name for your profile (e.g., Hyland OnBase Integration).

    • Select Fax-to-email as the service type.

      image-20250521-084839.png
    • Choose the desired document format, such as PDF or TIFF.

    • Specify the destination email address used by Hyland OnBase to receive and process incoming faxes.

    • Assign a fax number that will be used to receive faxes.

📌 Fax-to-Email settings

For more information about configuring Fax-to-Email settings, see Configuring a Fax-to-Email profile.

2. Configure Hyland OnBase
  • Log in to the OnBase Configuration module:

    • Launch the OnBase Configuration module.

    • Enter your administrative credentials.

    • Click Login.

  • Navigate to the Import/Export settings and select Email Import.

  • Create a new mailbox import configuration and provide at least the following information:

    • Specify the email address used for fax delivery.

    • Select the appropriate document format, such as PDF or TIFF.

    • Specify the Hyland OnBase destination folder where the imported fax documents should be stored.

3. Test the integration
  • Send a test document to the Retarus fax number you configured.

  • Verify that the sent document was correctly imported into the configured destination folder in Hyland OnBase.

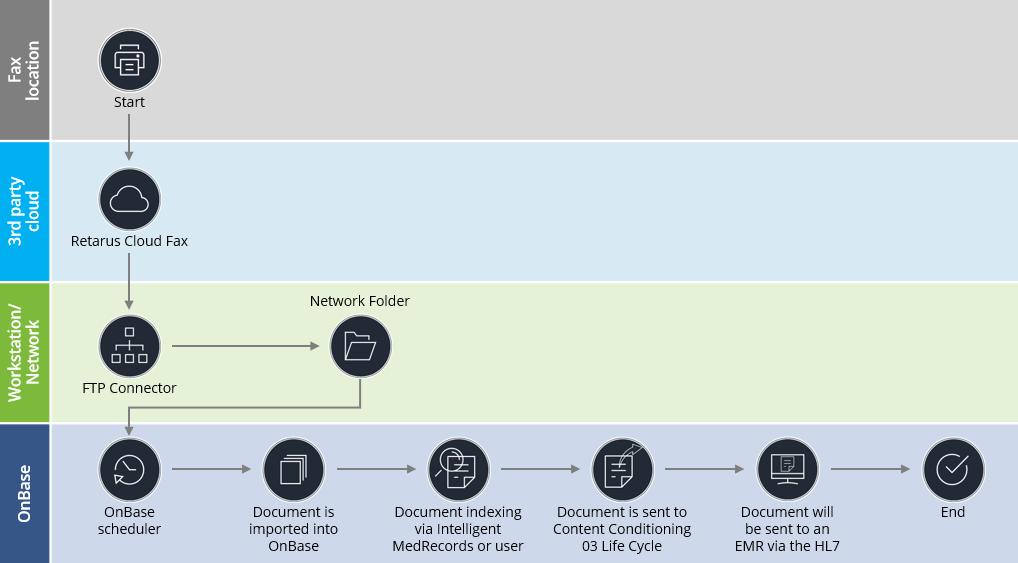
Integrating with Retarus Fax-to-FTP

This integration method offers multiple server hosting options to accommodate different organizational needs and infrastructure preferences.

image-20240617-104355.png

Server hosting options

You have three options for hosting the FTP/SFTP server:

  • Retarus-hosted FTP/SFTP server
    Use an FTP/SFTP server provided by Retarus.

  • Customer-hosted FTP/SFTP server
    Set up and maintain your own FTP/SFTP server.

  • Hyland Cloud SFTP service
    Use Hyland's cloud-based SFTP service (available for OnBase Cloud Edition).

Retarus-hosted & customer-hosted FTP/SFTP server

1. Configure the FTP server
  • Prepare the FTP environment:

    • Ensure your FTP/SFTP server is properly configured and accessible from the Retarus service.

    • Create a dedicated directory for storing incoming faxes from Retarus.

  • Verify FTP connectivity:

    • Use an FTP client to connect to the FTP/SFTP server.

    • Confirm you can access the directory using the credentials specified in the Retarus configuration.

2. Set up Retarus Fax-to-FTP
  • Log in to Retarus EAS portal.

  • Navigate to Administration - Fax Services - Fax Inbound Services.

  • Create a new profile for the FTP configuration:

    • Provide a descriptive name for your profile (e.g., Hyland OnBase Integration).

    • Select Fax2FTP as the service type.

      image-20250521-085024.png
    • Choose the desired document format, such as PDF or TIFF.

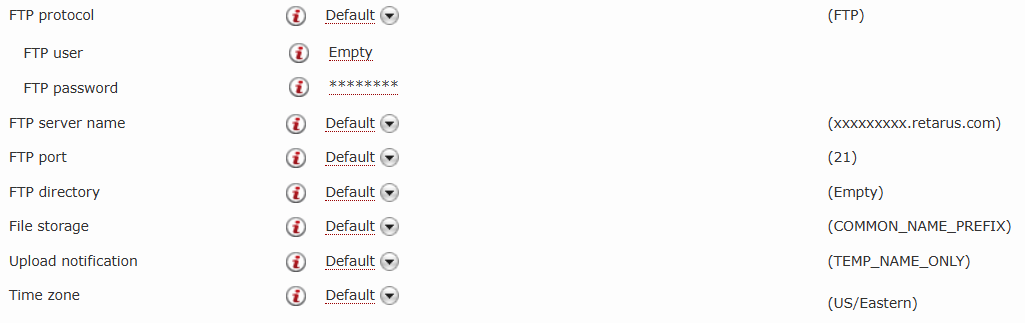
    • Specify the hostname or IP address and the port (default is 21 for FTP and 22 for SFTP) of your FTP/SFTP server.

    • Provide the credentials for accessing the FTP/SFTP server.

    • Specify the directory where faxes will be uploaded.

      image-20250521-084127.png
    • Assign a fax number that will be used to receive faxes.

📌 Fax-to-FTP settings

For more information about configuring Fax-to-FTP settings, see Configuring a Fax-to-FTP profile.

3. Configure Hyland OnBase for FTP import
  • Log in to the OnBase Configuration module.

    • Launch the OnBase Configuration module.

    • Enter your administrative credentials.

    • Click Login.

  • Go to the Import/Export settings and select FTP Import.

  • Create a new FTP import configuration:

    • Provide the hostname, port, username, and password for the FTP/SFTP server.

    • Specify the exact directory path where Retarus delivers fax documents.

    • Select the appropriate file format, such as PDF or TIFF.

    • Define the Hyland OnBase folder where the imported fax documents should be stored.

  • Set up document processing rules:

    • Set up appropriate document types for incoming faxes.

    • Configure keyword types and metadata extraction rules to properly process the documents during import.

4. Test the integration
  • Send a test fax to the configured Retarus fax number.

  • Verify that the fax is uploaded to the FTP/SFTP server.

  • Confirm that the fax is then imported into the Hyland OnBase system.

Hyland Cloud SFTP service

If you are using OnBase Cloud Edition, Hyland offers SFTP ingest capabilities as part of their cloud services. This provides secure file transfer without requiring you to maintain your own server infrastructure.

📌 Configuration process

The exact configuration process for integrating external systems like Retarus with Hyland Cloud SFTP may differ from traditional FTP setups. The integration approach depends on Hyland's specific cloud service offerings and security requirements.

1. Contact Hyland support

Before configuring Retarus for SFTP delivery, consult with your Hyland Cloud administrator or Hyland support to understand the available SFTP integration options.

2. Verify integration method

Confirm whether direct external system access is supported or if an alternative workflow (such as user-mediated file transfer) is required.

3. Follow Hyland guidelines

Use the configuration process specified by Hyland for your specific cloud deployment and service level.

For current information about Hyland Cloud SFTP capabilities and supported integration methods, refer to the Hyland support documentation or contact Hyland support directly.

JavaScript errors detected

Please note, these errors can depend on your browser setup.

If this problem persists, please contact our support.