This manual explains how to use the Patient Zero Detection Real-Time Response as part of Retarus Email Security.
The patented functionality Patient Zero Detection (PZD) is able to detect threats in Inbound emails even after the emails have been delivered to the customer infrastructure (post-delivery protection).
In order to identify malicious emails after delivery, hashes of all Inbound emails are stored for 30 days in a dedicated database at Retarus. As soon as an email, that hasn’t been detected as malicious for the first time, comes in a second time and is then classified as malicious (due to updated virus signatures etc.), the hash is compared to the database and the recipient (customer admin or end user directly) is notified via email about the potential threat that had been delivered previously. In order to react to these PZD events (logs), admins like you may move or delete the concerned emails manually from their users’ inboxes or they may automatize this process using PowerShell scripting.
With the PZD Real-Time Response as an application to be installed locally by the customer, you have another – more comfortable and reliable – way of automating the reaction process. As an administrator, you may configure individual rules to automate the reaction process, using the user interface (console) of the PZD Real-Time Response.
In the background, this tool consumes the PZD events of the Retarus Forensic SIEM Integration provided via web socket, searches for the corresponding email in the user’s Exchange mailbox using the and moves or deletes the mail (or simply logs the action it would have performed).
If you are using Exchange on-premise, the Microsoft Exchange Web Services (EWS) API is used by the PZD RTR, while the Microsoft Graph API is used if you are using Microsoft 365 Exchange Online.
The action depends on the rules that the administrator has defined before using the PZD Real-Time Response frontend (=console). Email notifications for the administrator or the user about the performed action may be defined in addition.
Prerequisites for using the PZD Real-Time Response (PZD RTR)
Service Booking: Patient Zero Detection® (PZD) & PZD Real-Time Response
In order to use the PZD Real-Time Response application, the Retarus Patient Zero Detection® service as part of the Retarus Email Security services has to be booked and configured. For details regarding this service, please refer to Retarus and/or the Email Security admin documentation in the EAS portal.
Apart from the PZD service itself, the PZD Real-Time Response (PZD RTR) has to be ordered at Retarus as well. The sales bundle includes the Retarus Forensic SIEM Integration (see below).
Retarus Forensic SIEM Integration
Instead of processing PZD notifications by email, the PZD Real-Time-Response consumes the PZD events from the Retarus SIEM event feed. This requires the Retarus Forensic SIEM Integration (included in the PZD Real-Time Response sales bundle).
Technically, the SIEM integration is not included in the PZD Real-Time Response setup, but requires implementation support by Retarus. Retarus Service Implementation will support you and take over the internal activation of the service at Retarus. You will also receive a SIEM token from our Implementation Engineers that you will need when configuring the PZD Real-Time Response (see Settings).
Microsoft Windows operating system and .NET framework
Retarus PZD Real-Time Response may be installed on Windows operating systems. The setup detects a 32- or 64-bit version automatically and installs the corresponding version.
Retarus PZD Real-Time Response has been programmed using .NET Framework and native Microsoft libraries. The software neither uses nor depends on third party libraries.
Microsoft .NET Framework 4.8 is required.
Common server versions supporting .NET Framework 4.8 are Windows Server 2016, 2019 and 2022. For the full list of Windows (Server) versions supporting .NET Framework 4.8, refer to https://learn.microsoft.com/de-de/dotnet/framework/migration-guide/versions-and-dependencies..
Microsoft Exchange
Retarus PZD Real-Time Response supports Microsoft Exchange on-premise and Exchange Online as email clients. The supported versions are:
-
Microsoft 365/Exchange Online
-
Microsoft Exchange 2013 SP1 and all later versions
-
Microsoft Exchange 2013
-
Microsoft Exchange 2010 SP2
-
Microsoft Exchange 2010 SP1
-
Microsoft Exchange 2010
-
Microsoft Exchange 2007 SP1
For communication with an Exchange server on-premise, Retarus PZD Real-Time Response uses the Exchange Web Services (EWS) API. For communication with an Exchange Online server, Retarus PZD Real-Time Response uses the Microsoft Graph API. Required dll files are included in the Retarus setup file.
To be able to react to PZD notifications and move or delete emails from the users’ inboxes, a connection to the Exchange server has to be set up by the administrator.
Administrative user account (Exchange on-premise only)
In order to connect to Microsoft Exchange on-premise via EWS API, the Retarus PZD Real-Time Response requires an administrative Exchange user account possessing the permissions to move/delete emails from other user accounts.
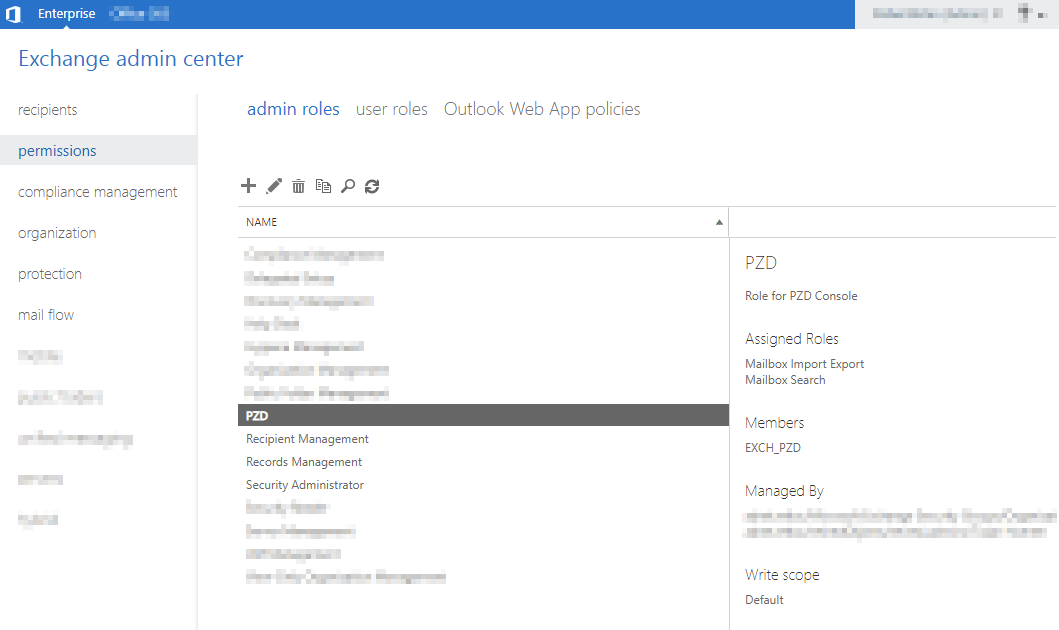
Best practice would be to create a dedicated technical admin user in your Active Directory (in the example below it’s called “EXCH_PZD”) with assigned roles Mailbox Import Export and Mailbox Search. If you have organized your users in AD groups by default (or of you think that you might want to create additional admin users in the future), you may of course create a dedicated AD group as well including the roles listed above and add the admin user to this group (Exchange admin center - permissions - admin roles).
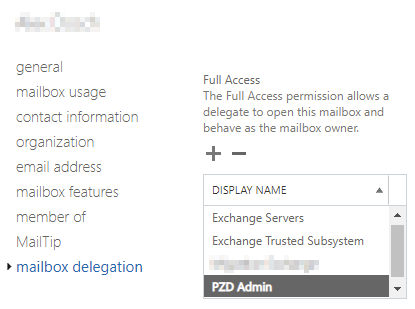
When your PZD RTR admin user has been created, for every user mailbox, you have to grant the admin user permission to read, move, and delete emails (in the mailbox delegation section). The easiest way to do this (automatically for new users as well) is to grant the admin user the full access permission via a PowerShell script.
Firewall permissions
As the PZD Real-Time Response requires access to Exchange as well as to the SIEM Webservice, the needed firewall permissions have to be granted.
-
Port 443 is used for the connection to the Retarus SIEM webservice and required all the time.
-
Port 80 is used once at every startup to determine the URL of the Exchange server (“Autodiscover Service”). If you are blocking this port for security reasons, see Microsoft Exchange Connectivity on how to make the PZD Real-Time Response work without a connection at port 80.
Communication with the Exchange server (EWS vs. Graph API)
In order to give you some technical background about how the communication between the Retarus PZD RTR and your Exchange server is established (which helps to understand the different settings described in Microsoft Exchange Connectivity), we have to distinguish between Exchange on-premise and in the cloud.
Exchange on-premise
The PZD RTR Windows service uses the Microsoft Exchange Web Services (EWS) API. Username and password of an Exchange administrative account is used for authentication (Basic Auth).
Retarus does not have any access to customer email content.
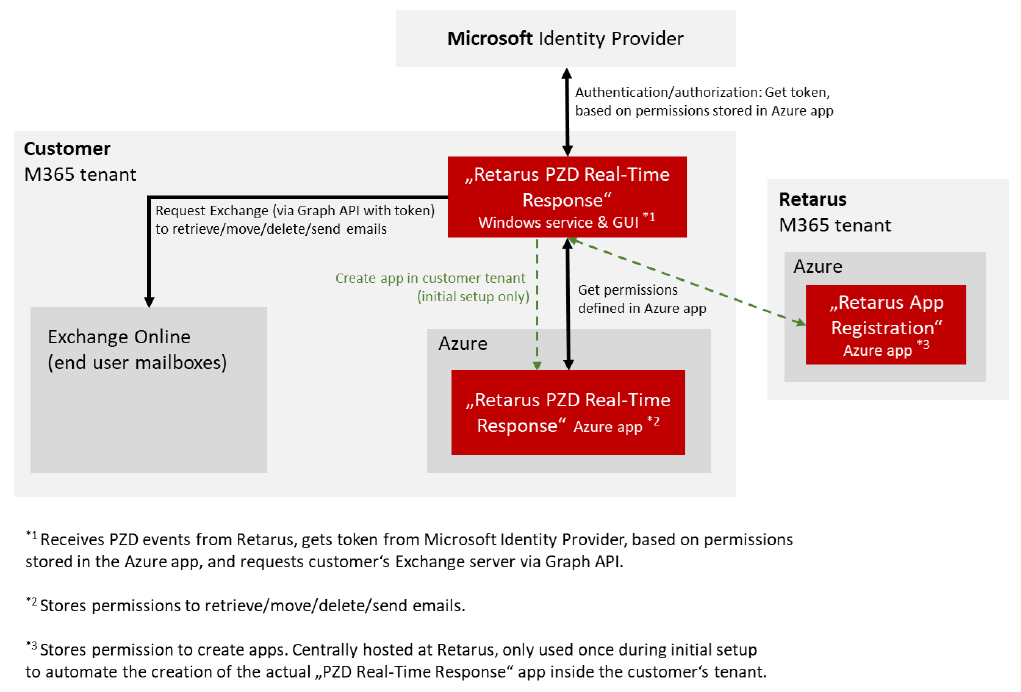
Exchange Online (Microsoft 365)
With Exchange Online, the communication is different, as Microsoft requires to use the Microsoft Graph API incl. authentication via OAuth 2.0. For authorization and authentication, the PZD RTR requests a security token from the dedicated Microsoft Identity Provider, based on the permissions to retrieve/move/delete/send emails. The list of permissions is stored in a dedicated “enterprise application” inside the customer’s Azure environment, initially created during the setup. With the received token, the PZD RTR may request the Exchange server via Graph API in order to retrieve/move/delete emails and send notifications.
Retarus does not have access to customer email content at any time.
The communication flow is illustrated in the graphic on the following page.
The initial setup is done in several steps. A wizard will guide you through the setup process, see Microsoft Exchange Connectivity for details.