
This tab (which is also opened when using the console for the first time) contains all configuration options for the PZD Real-Time Response. All settings are described in the following chapters.
Mandatory settings are marked with a red * symbol.
If you’ve changed one or more settings, click on the Save button on top in order to really save them. (Program Settings are an exception, these changes have immediate effect.)
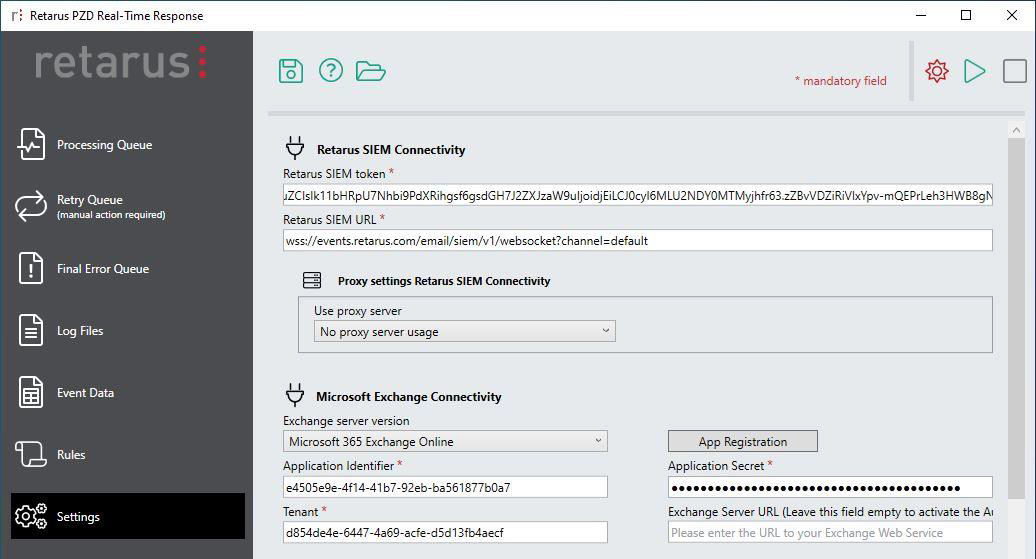
Retarus SIEM connectivity
These settings are mandatory for the PZD Real-Time Response to work.
-
Retarus SIEM token
Please enter the SIEM token for PZD events that you have been provided by Retarus. -
Retarus SIEM URL
Please enter the URL of the SIEM event feed that you have been provided by Retarus. For most customers (using only one event feed), the pre-filled default URL is already the correct one:
wss://events.retarus.com/email/siem/v1/websocket?channel=default
Valid channel names have a length of 6-32 characters and contain the characters [a-z0-9-]. If no channel name is provided, the service will use default automatically. -
Proxy Settings Retarus SIEM Connectivity
If you would like to use a proxy, you may configure it here.
For details concerning the Retarus Forensic SIEM integration itself, please refer to the corresponding documentation or contact your Retarus sales representative or consultant.
Microsoft Exchange connectivity
These settings are mandatory for the PZD Real-Time Response to work.
-
Exchange Server version
Please choose your Exchange server version. -
App Registration
If you are using Microsoft 365 Exchange Online, click this button for the initial setup of the connection between the PZD Real-Time Response and your Exchange Online tenant. This setup may also be done at a later stage, if for example the Azure app has been accidentally deleted manually.
A wizard will guide you through the process that is required to set up the communication with Exchange Online. For details about the communication flow, see Exchange Online (Microsoft 365). The following steps are required:-
Admin consent (Application.ReadWrite.All permission via device login) has to be granted for the Azure application called Retarus App Registration”. This app, centrally hosted at Retarus, is only used to create the dedicated “PZD Real-Time Response” application inside the customer’s tenant that stores the permissions to access the end users’ mailboxes and move or delete malicious emails, as well as send notifications.
The Retarus App Registration app only requires permission to create another app.
Retarus does not have any access to customer email content.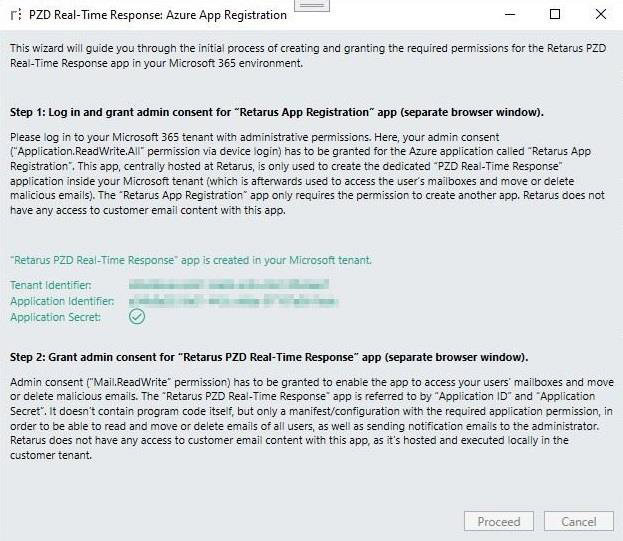
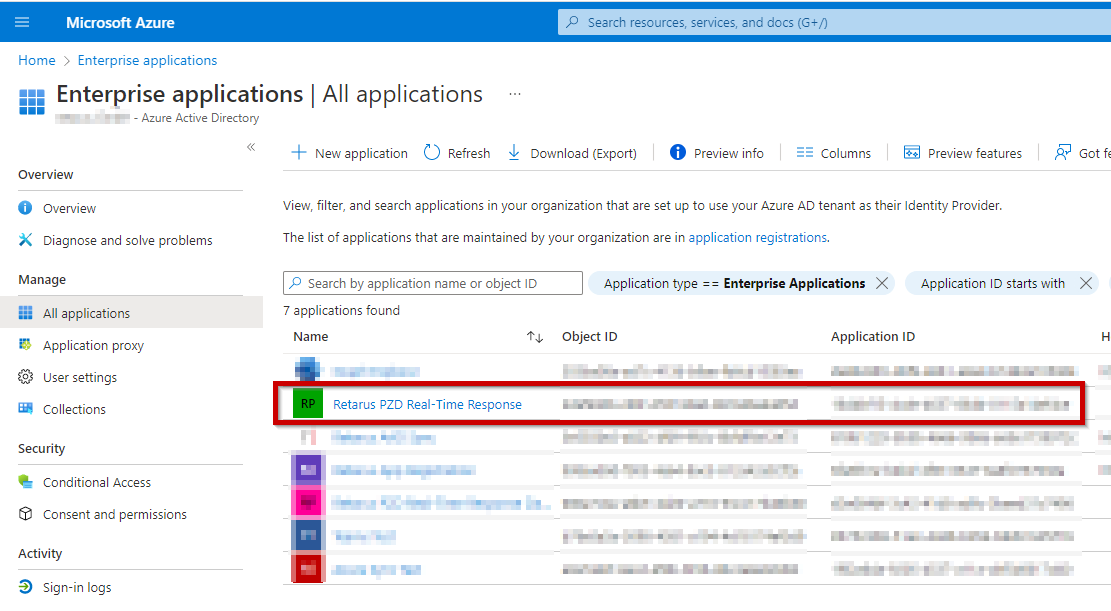
As a result of this first step, the Retarus PZD Real-Time Response app has been created in the customer’s Microsoft 365 tenant:
-
Admin consent (Mail.ReadWrite permission, see the screenshot below) has to be granted for the newly created app in order to be able to access the users’ mailboxes and move or delete malicious emails, as well as send notifications.
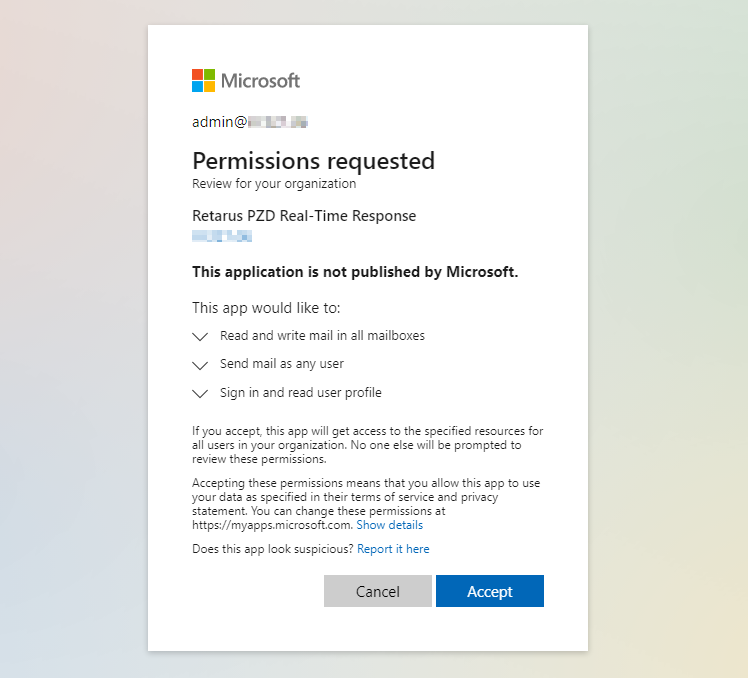
The Retarus PZD Real-Time Response app is referred to by Application ID and Application Secret. It doesn’t contain the program code itself, but only the list of permissions in order to be able to read and move or delete emails of all users, as well as send notification emails to the administrator.
Retarus does not have any access to customer email content with this app, as it’s hosted and executed locally in the customer tenant.
-
-
Administrative Account & Password / Application ID, Application Secret, Tenant
When using Exchange on-premise, please enter username and password for an Exchange user that has administrative permissions to access the users’ mailboxes, move and delete emails.
When using Exchange Online, the Application ID and Secret are required, as well as the Microsoft M365 tenant name (or identifier). If you are using the App Registration button, these fields will be filled automatically after the wizard has been completed successfully (Azure application created and admin consent granted). -
Proxy Settings Microsoft Exchange Web Services Connectivity (available with Exchange on-premise only)
If you would like to use a proxy, you may configure it here. -
Exchange Server URL
This field may be left empty because the PZD Real-Time Response is able to determine the URL of your Exchange server via the Autodiscover Service.
Nevertheless, for the Autodiscover Service, a connection via port 80 is required and if you are blocking port 80 for security reasons (see Firewall permissions), you may want to enter the Exchange Server URL manually here.
If a URL is entered here, PZD Real-Time Response tries to reach the Exchange server at this URL and the Autodiscover Service is skipped.
If you don’t know the URL, you may find it in the logs by following these steps:-
Make sure that this field is empty and application logging is set to DEBUG (see Logging Preferences).
-
Grant access for the PZD Real-Time Response via port 80.
-
(Re-)Start the PZD Real-Time Response Windows Service.
-
Start the PZD Real-Time Response Console and choose Log Files from the navigation menu to the left (or check the application log on your hard drive) in order to find the URL of your Exchange server which is included in the following log line:
Function[ConnectToEWS] Autodiscovered Connection to:
https://outlook.office365.com/EWS/Exchange.asmx -
Navigate to Settings and enter this URL in the Exchange Server URL field.
-
Block access via port 80 again.
-
Logging preferences
Here, you may define to which extent you’d like to log the information, actions and warnings of the PZD Real-Time Response.
-
Application log level
Possible options for the log level of the application are TRACE, DEBUG, INFO, WARN, ERROR, and FATAL. Your choice defines the lowest level that shall be logged (Default: INFO).
Example
If you choose “INFO”, all events of the categories INFO and higher (WARN, ERROR, FATAL) are logged. -
Possible options for the log level of the Windows event log are TRACE, DEBUG, INFO, WARN, ERROR and FATAL. Your choice defines the lowest level that shall be logged (Default: ERROR).
Example
If you choose “INFO”, all events of the categories INFO and higher (WARN, ERROR, FATAL) are logged.
As the Windows event log only has three different categories, some of the categories from the application are mapped to the corresponding Windows event log categories: TRACE, DEBUG, and INFO are grouped under “INFO” in the Windows event log, WARN is displayed as “WARNING”, ERROR and FATAL are grouped under “ERROR”. -
Retention time of log files
Choose how many days the application log files shall be kept before deletion (Default: 30 days). -
Retention time of event data files
Choose how many days the JSON event data files shall be kept before deletion (Default: 30 days).
Notification settings
In order to receive notifications about general errors (SIEM connection problems persisting after several retry attempts or other application-related errors), you may configure a recipient email address here. (Nevertheless, these major errors are normally visible for an administrator as well by monitoring the Windows service.) If there is no valid address stored here, error notifications are sent to the email address configured as Exchange admin user, see Microsoft Exchange Connectivity.
For notifications related to a certain rule (information about processing, actions, errors concerning a specific rule), the recipient email address configured in the rule itself is used (see Rules), not the general notification address configured here.
When using Exchange Online, you also have to configure a sender email address manually. This address has to exist in your tenant. When using Exchange on-premise, the sender email address is always the address of the administrative user configured in the Microsoft Exchange Connectivity settings section.
Program settings
These settings take effect immediately, there is no click on the “Save” button required.
-
Path to the PZD Real-Time Response service data
For your information, the path in which the PZD Real-Time Response service saves its data is displayed here. -
Create a backup of the XML configuration file during startup of this application
Activate this checkbox to have the configuration saved automatically in the backup folder every time the application starts. Please note that these files are not purged (deleted) automatically.