With Retarus Faxolution for Windows, you can send faxes directly from your Windows Desktop and
any Windows applications via the high-performance Retarus Fax Cloud. No special hardware or
software is required to install and use Retarus Faxolution for Windows. You also do not have to invest in any line capacity to utilize the service.
Retarus Faxolution for Windows is perfect for quickly sending individual faxes or fax jobs to larger distribution lists, for example, as part of marketing promotions.
The software offers sophisticated and logical user guidance and does not require any significant training time.
System Requirements
-
Microsoft Windows 11, 10, 8, 8.1, Microsoft Windows 7 with Service Pack 1, and Microsoft
Windows Vista with Service Pack 2 -
Internet access
-
Retarus Faxolution for Windows software and license key
-
Data transmission to Retarus uses the secure HTTPS protocol. For your free copy of the Retarus
Faxolution for Windows software and the required license key, contact your Retarus
Implementation Engineer. == License Key, Installation
If you want to start using Faxolution for Windows right away, run the fax4win-setup.exe installation program first. Once you have finished the installation, the Profile settings window opens. You can drag & drop the subscription key into the License entry field. Alternatively, you can save the key file to your PC and then load it by selecting File and Open. You can also open the key file in a text editor (such as notepad.exe), select all displayed content, and then copy and paste it into the entry field.
If you want to use Retarus Faxolution for Windows with Microsoft Windows Terminal Server, refer to Does Faxolution for Windows run in a terminal server environment?
Updates and new versions
You will be notified whenever a new version of Retarus Faxolution for Windows is available. Retarus recommends having the latest version installed at all times.
Silent Install
An additional installation method is the Silent Install. This variant of Faxolution for Windows is installed via the Windows Command Prompt or using a batch file stored on the Windows Server.
The following commands are of crucial importance, and are always specified in association with the name of the Faxolution for Windows Setup to be installed:
/silent
The Setup runs using standard values without user input and only displays a window with progress bars.
/verysilent
The Setup runs using standard values without user input and doesn’t display anything.
E.g.:
Fax4Win-Setup.exe /lang=fr /verysilent
→ The Setup is installed in French without a visible window.
/license=<filename>
E.g.:
Fax4Win-Setup.exe /license=c:\install\mylicense.lic
→ The Setup is run from the license information contained in the file — a validity check does not take place. Put a file named Fax4Win.lic in the same folder as the one containing the setup. No parameters have to be specified, and the Setup automatically locates the license file.
/log=<filename>
E.g.:
Fax4Win-Setup.exe /log=c:\install.log
→ The de/-installation is logged in the c:\install.log file.
/saveinf=<filename>
E.g.:
Fax4Win-Setup.exe /saveinf=c:\install\custom.inf
→ Settings configured in the Assistant during the installation are saved in the c:\install\custom.inf file.
/loadinf=<filename>
E.g.:
Fax4Win-Setup.exe /loadinf=c:\install\custom.inf
→ Settings for the Assistant are loaded from the c:\install\custom.inf file — it is recommended that you include the /silent or /verysilent parameters, so that user-defined installations can then be carried out without manual input.
/pagesize=[A4|Letter]
If the language is set to English (it’s ignored otherwise), the page size can be entered as a parameter
E.g.:
Fax4Win-Setup.exe /lang=en /pagesize=A4
/tasks=""
Don’t create a desktop-icon
/noicons
from 3.6.x: don’t create start-menu entries
/restartspooler
from 3.6.47: restart the Windows Print Spooler before installing Fax4Win
/keepocx
from 3.6.47: when upgrading from Fax4Win <3.5, don’t delete or unregister the OCXs (Richtx32.ocx, ccrpftv6.ocx, Comdlg32.ocx, Mscomctl.ocx, Mscomct2.ocx) used by the old version
📌 Uninstallation options
The
/silent,/verysilent, and/logoptions are also available for uninstallation.
You may use the following values for the language parameter /lang:
-
de_DE → Client will be installed with German language set and a default profile with the country code 0049 will be created
-
en_US → Client will be installed with English language set and a default profile with the country code 001 will be created
-
en_GB → Client will be installed with English language set and a default profile with the country code 0044 will be created
-
fr_FR → Client will be installed with French language set and a default profile with the country code 0033 will be created
-
it_IT → Client will be installed with Italian language set and a default profile with the country code 0039 will be created
-
de → Client will be installed with German language set and a default profile with the country code 0049 will be created
-
en → Client will be installed with English language set and a default profile with the country code 001 will be created
-
fr → Client will be installed with French language set and a default profile with the country code 0033 will be created
-
it → Client will be installed with Italian language set and a default profile with the country code 0039 will be created
Structure of Faxolution for Windows
Retarus Faxolution for Windows is composed of three program components and main windows.
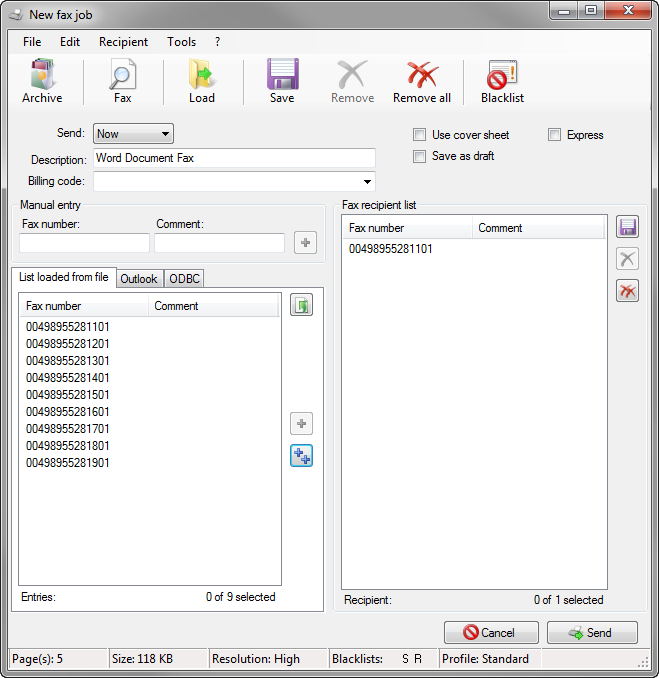
New fax job window
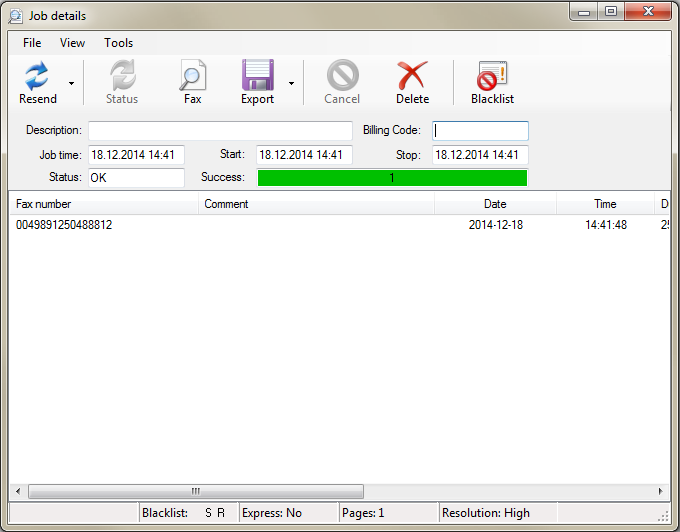
Job details window
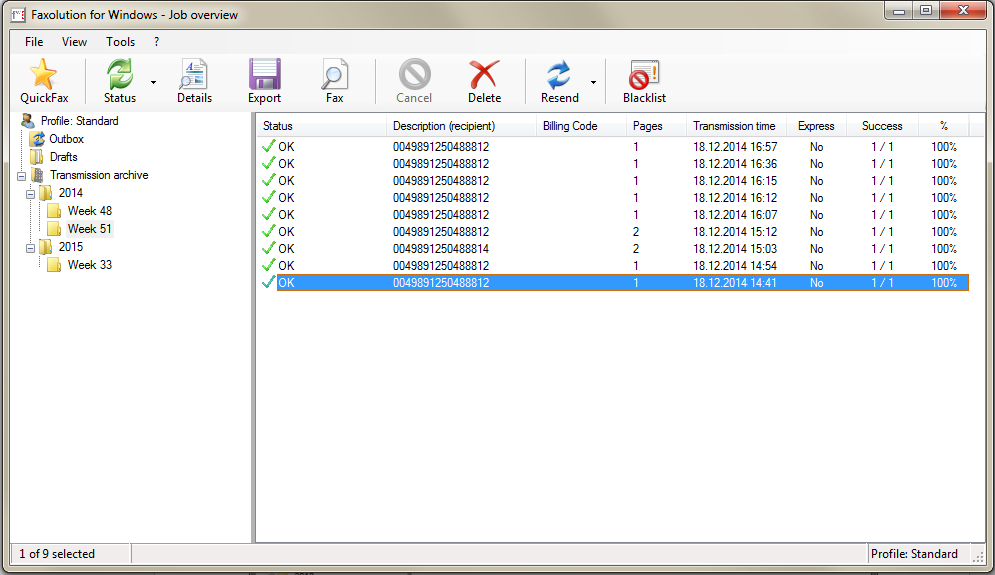
Job overview window
Example 1 – Sending a single fax from Microsoft Word
Once you have finished the document you want to send, go to the File menu and select Print. For the
printer, select Faxolution instead of your usual printer.

Click on OK. The New fax job window opens.
In the Fax number field, enter the fax number and area code. We recommend entering your own fax
number to test the function.
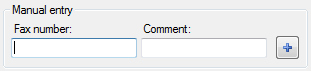
To add the number you entered to the recipient list, click on ![]()
The job overview in the Outbox folder indicates that the fax job was transferred to Retarus, and the
status is changed to Sending.
If the fax was successfully sent, the status changes to OK, and the fax job is saved in the Transmission archive folder under the correct week.

Example 2 – Sending a fax from Microsoft Word to a test distribution list
Begin by creating a test distribution list. The best way to do so is to open a text editor such as
Windows Notepad (notepad.exe). The fax number must be the first entry in the file, i.e. the first field
must contain the fax number. If you are sending the fax to multiple numbers, enter/arrange the
numbers line by line because the file can only contain one fax number per line.
Below is an example of a comma-separated file consisting of two numbers:
08955281919,Retarus GmbH
08955281501,Retarus Sales
The information following the fax number after the comma is optional. It is displayed in the Comment field and can be assigned to each fax number as additional information, if required. The next step is to save the file, for example asTestDistributionList.txt. The default path for distribution lists (profiles) is C:\ProgramData\Faxolution4Win\Distribution-Lists.
Go to your word processor and, once you the document you want to send is complete, open the File menu and select Print. Select Faxolution as the printer.

Click on OK. The New fax job window opens. To load the test distribution list you just created, click ![]()
TestDistributionList.txt file.
To add all the loaded numbers to the recipient list, click ![]()
To send the fax to the recipient list, click on Send.
The job overview in the Outbox folder indicates that the fax job has been transferred to Retarus, and
the status has been changed to Sending.
If the fax was successfully sent, the status changes to OK, and the fax job is stored in the Transmission archive folder under the correct week.

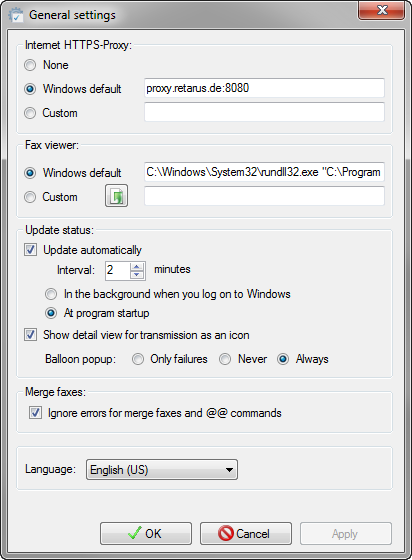
General settings
The General settings are reached by clicking on Tools and then Options. If necessary, enter the
name of a proxy server, set up an application to view fax documents, and define the status update
intervals.
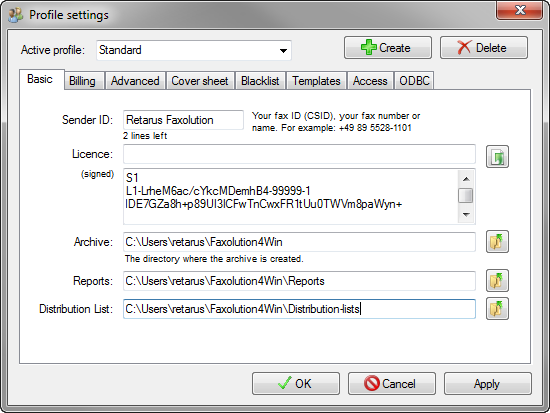
Profile settings
You can customize settings, such as the sender’s fax number or the header, in the Tools menu under
Profiles. Additional information on profile settings is available in What is the purpose of profiles.