Domain and user management
Domains and users are managed in two different sections of the EAS portal:
Directory Administration offers an overview about the existing domains and users protected by Retarus Email Security. New users can be added manually in this section. An additional allow- and blocklist for user addresses can be maintained as well, which is particularly useful if addresses cannot be included or removed from the synchronization file used for the automatic sync. Also, a list of all existing domains is available (but new domains cannot be added here; this is done in the “Service Configuration” section).
Service Configuration allows you to manage the detailed configuration and settings for the different services of the Retarus Email Security portfolio. Also, new domains may be added and configured here.
Domain management
If you would like to make sure that In- and Outbound email traffic is filtered by Retarus Email Security, you have to register the corresponding domain first. Adding a domain can be done via the “Service configuration” section of the EAS portal. This is described in Domain management.
User management
After the domain has been added, you have to provide Retarus the email addresses of all your users, in order to make sure that Inbound emails are accepted for these addresses (Directory Filter) and configuration can be made on user level (e.g. profile assignment, dedicated service settings).
Most of the time, you will add/upload new Retarus Email Security users by using an automated synchronization of your Active Directory (DirSync Service). For more information concerning the automatic synchronization of an existing Active Directory with the Retarus services, refer to the DirSync Service documentation.
Nevertheless, in some cases (testing etc.), you may want to add a user manually via the EAS portal. This is described in User management.
Directory administration
The Directory Administration section is used to manage valid email addresses (primary and alias addresses) in domains where valid email addresses are not automatically synchronized with the DirFilter databases. In addition, it can also be used with domains whose valid email addresses are automatically synchronized, but where you would like to add a new address immediately, independently from the synchronization interval.
EAS (https://eas.retarus.com) - Administration - Email Services - Directory Administration
User list
The user list displays all of the users registered for the displayed domain. Also, new users can be added to the Directory Filter here (see below). At the top of the screen, directly below the tabs, you can see the number of email addresses entered in the user list along with the name of the selected domain and the date of the last synchronization and update. This distinction is important as synchronizations may occur due to automatic synchronization intervals but not necessarily include any address book updates.
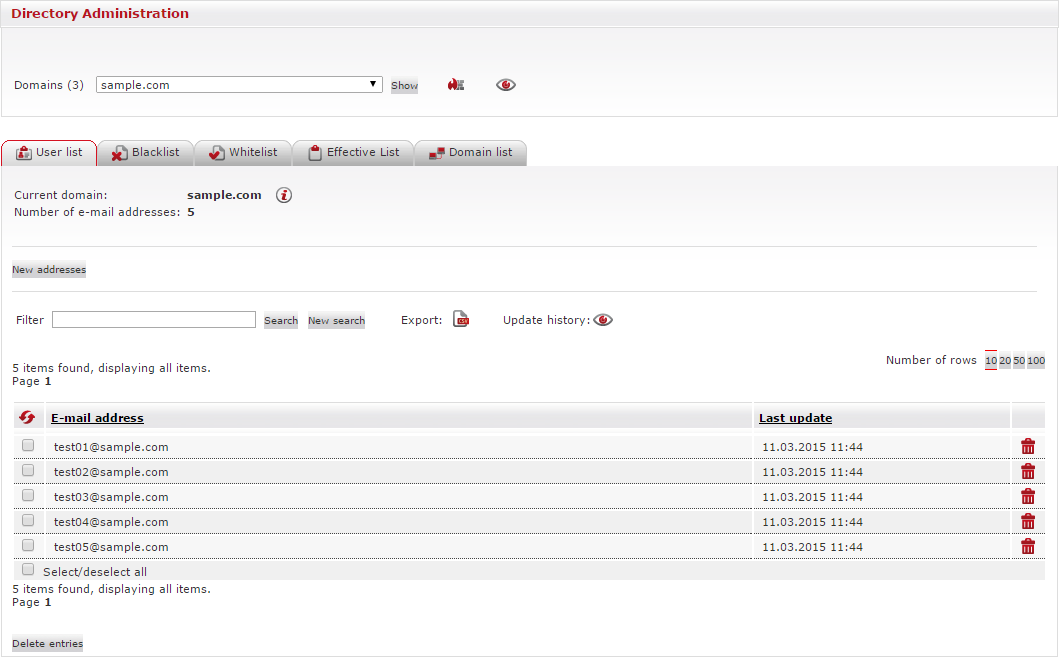
The table itself shows a list of email addresses entered in the address book and user list along with the last revision date for each address. You can delete existing addresses by clicking on the ![]() icon. If you want to search for a specific entry, simply enter a portion of the address in the box next to Filter and then click on the gray Search button. If you want to perform another search, just click on New search to reset the Filter field. You can export the user list as a CSV file- simply click on the
icon. If you want to search for a specific entry, simply enter a portion of the address in the box next to Filter and then click on the gray Search button. If you want to perform another search, just click on New search to reset the Filter field. You can export the user list as a CSV file- simply click on the ![]() icon.
icon.
Adding a new user to the Directory Filter
To add a new entry to the user list, click on the New addresses button. Another box will then appear in the window in which you can enter the addresses you want to add, separating each individual entry by pressing the return key. You can also upload address lists in CSV and TXT format. If you only enter the local part of the email addresses and then click on Normalize, the @ and the selected domain will automatically be added to the addresses.

DirFilter Blocklist
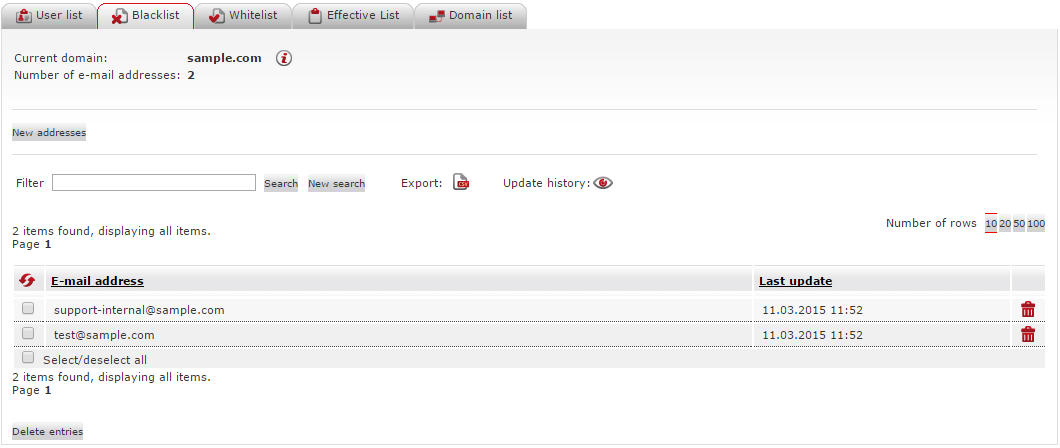
Emails sent to recipient addresses on this blocklist are rejected. This is an especially useful feature for companies that have email addresses solely intended for internal use because these addresses can be isolated from external communication while remaining on an internal user list, that is used as a base for the automatic user synchronization with Retarus via the DirSync.
To view the blocklist for the selected domain (as this blocklist is configurable on domain level only), just click on the Blocklist tab. The example below does not have any existing entries. Add new entries by clicking on the New addresses button and entering them in the entry window that appears.
DirFilter Allowlist
This allowlist contains addresses permitted to receive emails but are not located in the address book (DirSync file). For example, these addresses may be group mailboxes or alias addresses of users not entered in the user list. To view the allowlist (which is configurable on domain level only), click on the Allowlist tab. The addresses that appear in the table below also include the date of their last update and you can sort them by clicking on the Last update header at the top of the column. You can add or delete entries in the same manner as in user- and blocklists. It is easier to locate some entries by using the Search function, which is located above the allowlist address table. You can export the table as a CSV file using the ![]() button. Here you can choose whether to export all entries or just those returned after performing a search.
button. Here you can choose whether to export all entries or just those returned after performing a search.

Effective List
The effective list is a user list that does not include the block- and allowlists. To create the effective list all users in the blocklist are removed from the user list and added to the list of users in the allowlist.
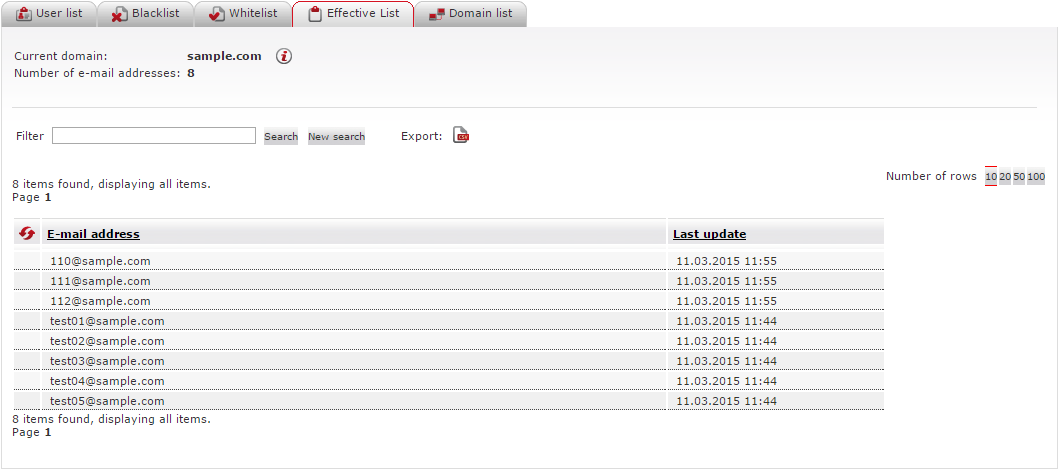
In contrast to the other lists, the effective list cannot itself be modified because it is the product of the results of entries in other lists. You can, however, search and export this list. You can sort entries alphabetically or chronologically (by their most recent update).
Domain list
Domain lists display all of the domains for which you can carry out directory administration.
The screenshot below shows an example involving one domain. In the case of multiple domains, you can also sort the entries alphabetically according to the number of entries in the effective list or the Last modification field.

The column on the right-hand side of the table includes the ![]() and
and ![]() symbols to indicate whether the domain in question has been activated for the directory filter. Click on a domain in the Name column to retrieve its user list.
symbols to indicate whether the domain in question has been activated for the directory filter. Click on a domain in the Name column to retrieve its user list.
Adding a new domain, assigning a profile or changing the service settings for an existing one is done in the “Service Configuration” section described in the next chapter.
Domain management (Add new domain)
The domain list in the Directory Administration section mentioned above is useful to get an overview about your registered domains, but adding a new domain, assigning a profile or changing the service settings for an existing one is done in this section described below.
EAS (https://eas.retarus.com) - Administration - Email Services - Service configuration - Domain
When you click on the Domain tab, you see an overview of domains protected by Retarus Email Security. Domains that you can manage yourself have red icons and domains that only Retarus can manage have gray icons. In addition to the domain name, the table displays information about the type of domain in the Relay Type/Host//Port) column, additional security options in the Features column, and whether a profile was assigned to the domain (in the Domain profile) column.

You have the option of assigning an existing profile to an existing domain from the drop-down selections under Domain profile. To modify the domain settings for existing domains, click on the Domain settings button (![]() ), which takes you to the interface shown in the following screenshot:
), which takes you to the interface shown in the following screenshot:
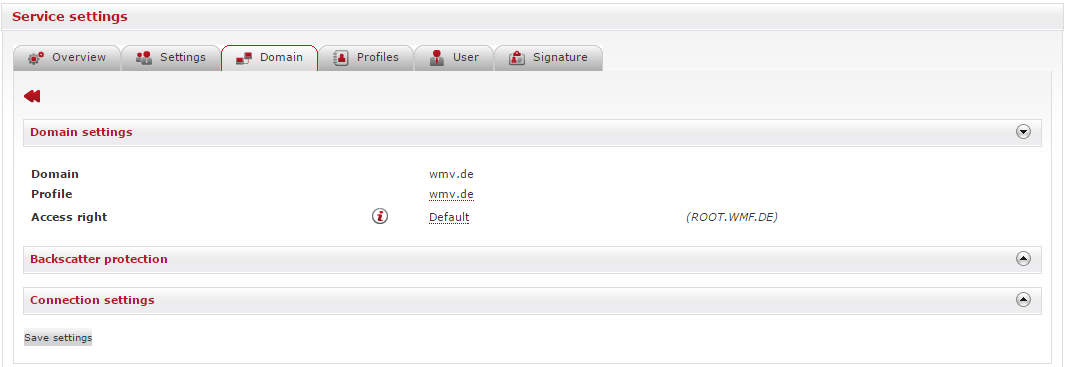
For existing domains, the Domain settings menu displays the domain name and a drop-down menu from which you can select the profile that you want to assign to the domain.
Adding a new domain
One or more domains can be added by clicking on the Add domain button, which will also automatically take you to the interface displayed below:
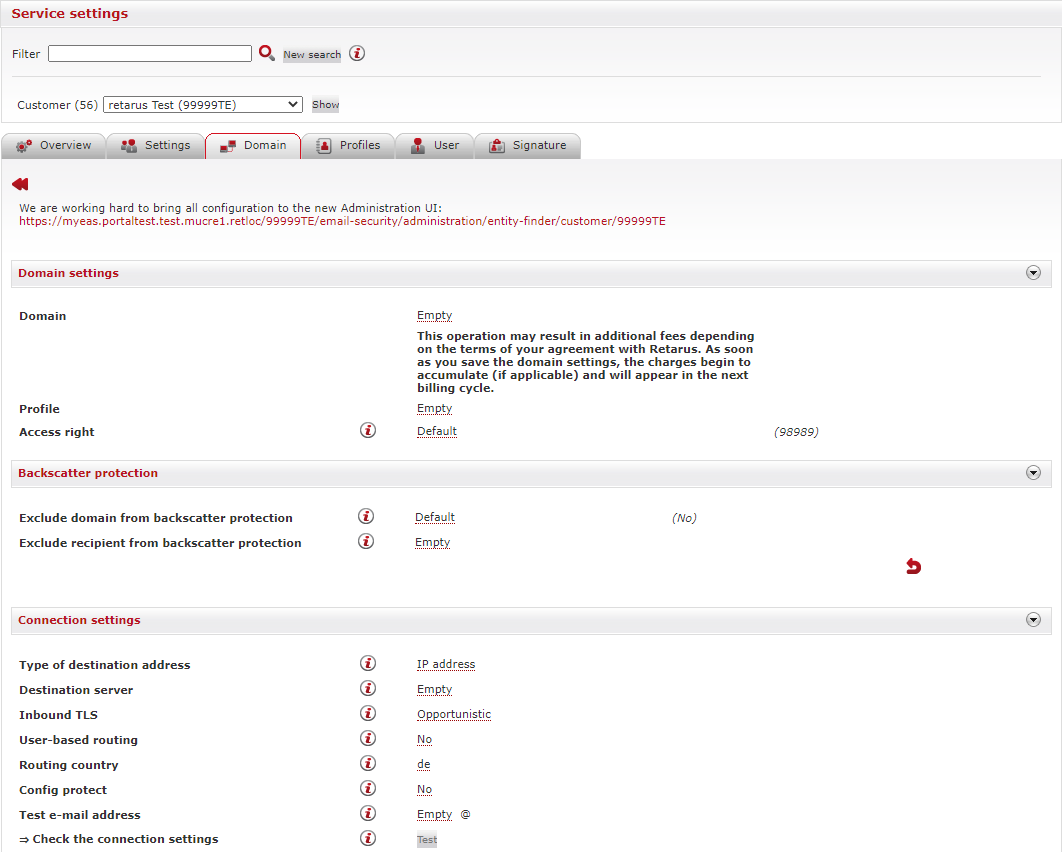
When you are creating a new domain, first enter the domain in the Domain field. The next step is to select a profile to assign to the domain from the drop-down menu in the Profile field. In the Access right field, you can opt to restrict access to the domain settings to a specific group of users, e.g. the Sales Department in your US subsidiary. The default option is no restriction at all, i.e., all users can access the domain settings.
In the Backscatter protection menu, you can opt to exclude a domain or a specific recipient from the Backscatter protection feature.
The Connection settings menu fields contain a number of important settings related to the connection between your system and the Retarus infrastructure:
The Type of destination address field allows you to define the destination server’s address type (it can be an IP address or an A- or MX record).
The destination server’s address is in the Destination server field and depends on the type of address selected in the Type of destination address field.
The Inbound TLS field describes how a TLS connection will be set up between the customer and Retarus. You can opt for either Opportunistic (the default) or Enforced to secure the connection. With Opportunistic, the connection is built whether or not the customer gateway supports TLS. If TLS cannot be negotiated, the messages are sent unencrypted. If you select Enforced TLS, messages can only be sent of the customer gateway supports TLS, otherwise the messages are queued.
The User-based routing field allows administrators to enable or disable routing for predefined recipients within a domain. This setting supports the Advanced Routing & Rewriting capability.
The Test email address indicates the valid email address that will receive the message sent to verify the configurations. Click on the Test button in the Check the connection settings field to send the test email. After you have successfully received the test email, you can save the domain and its settings for the new domain by clicking on the Create domain button.
Adding a domain may, depending on the terms of your contract with Retarus, result in additional costs. As soon as you save the domain, charges will begin to accumulate (if applicable) and will appear in the following billing cycle.
User management (Add new user address)
After the domain has been added, you have to provide Retarus the email addresses of all your users, in order to make sure that Inbound emails are accepted for these addresses (Directory Filter) and configuration can be made on user level (e.g. profile assignment, dedicated service settings).
Most of the time, you will add/upload new Retarus Email Security users by using an automated synchronization of your Active Directory (DirSync Service). For more information, refer to the DirSync Service documentation.
Nevertheless, in some cases (testing etc.), you may want to add a user manually via the EAS portal.
Adding a new user (main or alias address)
In order to add a new user manually, one mandatory and one optional step have to be done. Details are described below.
Create user in the Directory Administration section (mandatory)
This first step ensures that the email address exists in the Directory Filter; otherwise, deliveries to the address cannot be made. This step is required for an alias address as well; as soon as an alias address is created this way, you may create a quarantine mapping for it. For details, see Quarantine Mapping (alias address mapping).Create user in the Service settings section (optional)
When the user has been created in the Directory Administration, you may do this second step. It is required if you would like to assign a dedicated profile to the user or make individual settings.
Step 1: Create user in the Directory Administration section (mandatory)
This first step ensures that the email address exists in the Directory Filter; if it does not exist, emails to this recipient address would be rejected. For details, see User list.
Step 2: Create user in the Service Configuration section (optional)
When the user has been created in the Directory Administration, you may do this second step. It is required if you would like to assign a dedicated profile to the user or make individual settings.
Navigate to:
EAS (https://eas.retarus.com) - Administration - Email Services - Service configuration - User
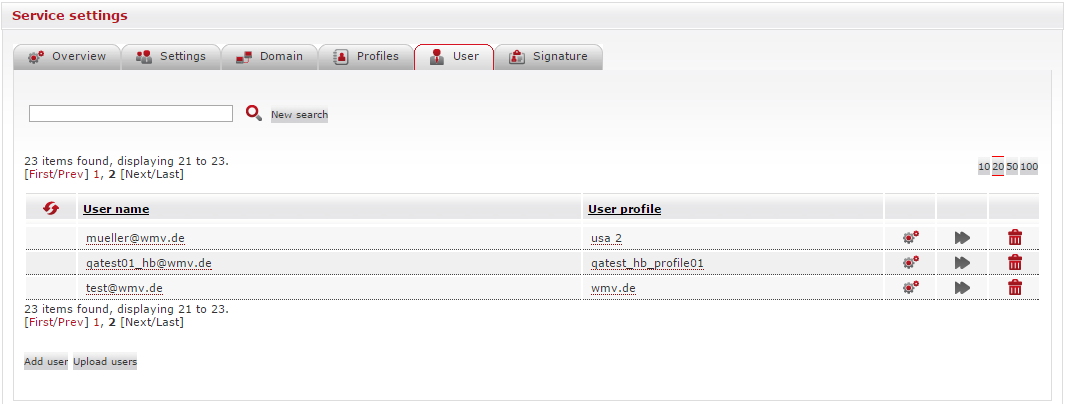
Under the User tab, you can begin adding an individual user by clicking on the Add user button. An empty entry field will appear at the top of the User name column. After entering the email address there, assign the user a customized profile using the drop-down selections in the User profile column. You can only add users with an email address that belongs to a domain configured within the EAS. If the chosen domain is not yet configured, see Domain management.
Furthermore, within the same context, you can upload completely new data directly to the EAS portal, a process similar to a DirSync upload. To do this, create a CSV file that contains the relevant user data, but the initial two fields in the file must contain the following information: user email address, alias address (if applicable), and the profile name (if profile assignment is supposed to take place).
Separate the email address, alias address, profile name and all other personalized fields, with a comma. You can expand the personalized fields, depending on the information you need to have in your signature, and separate multiple alias addresses within a row using blank spaces. The headings extracted from the first row are available as placeholders in the signature file.
Here is a sample file with personalized fields/entries:

In order to upload the file, click on the Upload user button to begin the upload process via the following window:

Click on Browse to locate the desired upload file. In the Data handling drop-down menu, there are three options to chose from with regards to the processing of existing entries and the new data sets:
Overwrite existing data and delete all values not included in the upload file
Add new values and overwrite existing ones
Add new entries while maintaining the existing ones
During the user upload, user addresses are placed in the DirFilter, and alias mapping takes place. If the corresponding data already exists in the CSV file, a profile is assigned during this process.
Profile management
Profiles can be used to store predefined settings and assign those like “templates” to domains or users. On the other hand, profiles can be seen as independent hierarchy level of settings; for example, settings on user profile level win over settings on domain level. For details, see Hierarchy and inheritance of settings.
Profiles can be managed by navigating to:
EAS (https://eas.retarus.com) - Administration - Email Services - Service configuration - Profiles
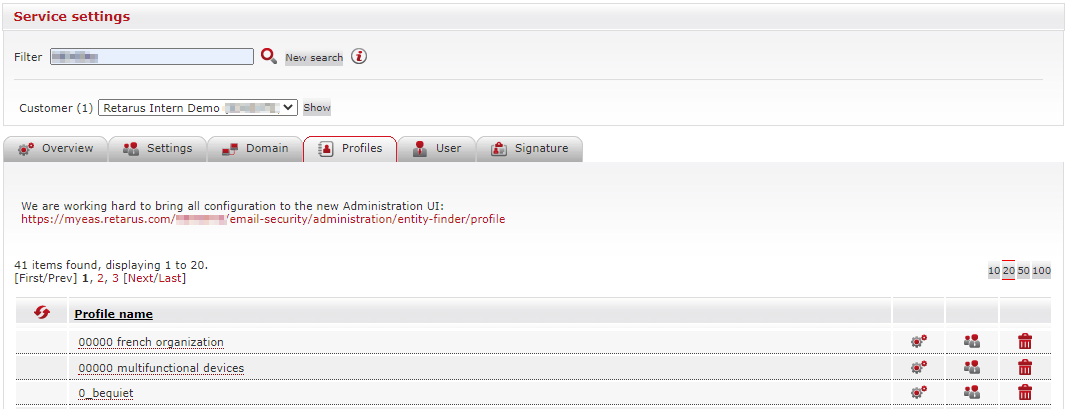
In this section, you may view existing profiles, create new ones, as well as view and edit the users having assigned a profile.
Assigning a profile to a user, but also to a domain, can be done on one of the neighboring tabs: Domain and User.
