Email transmission
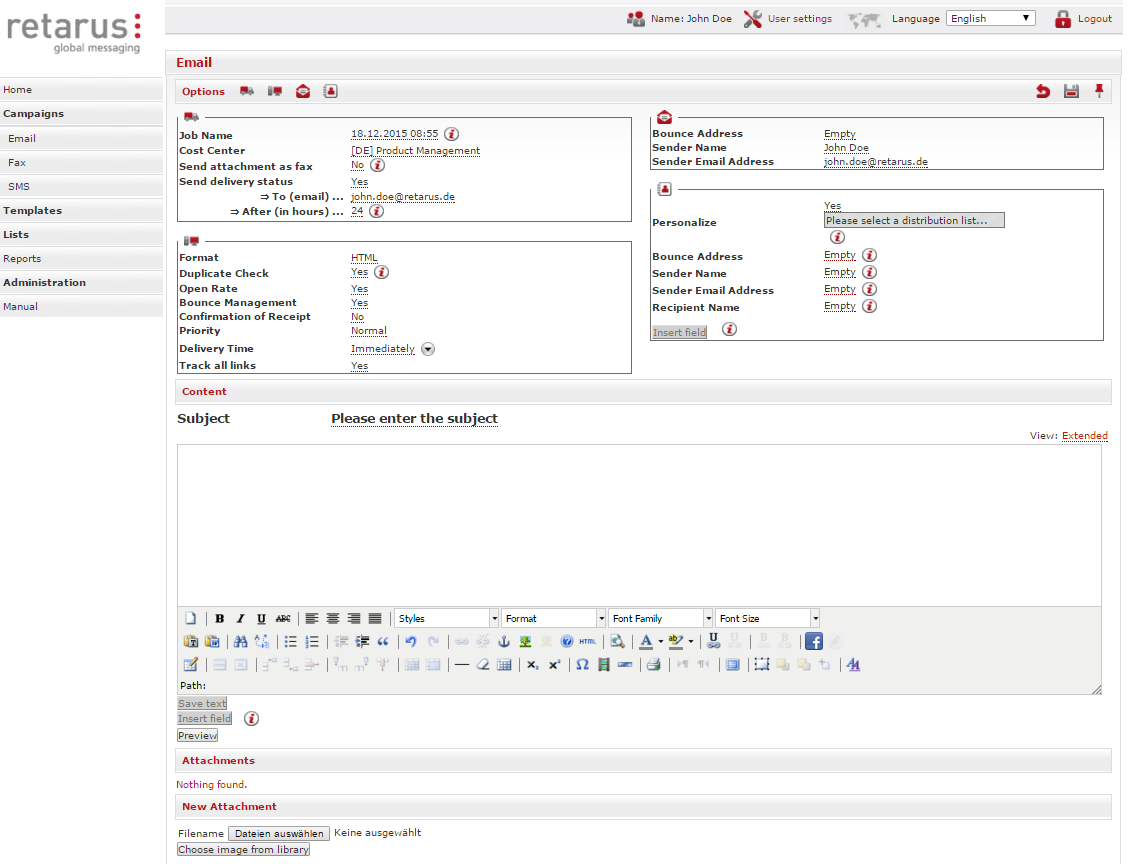
Emailings can be sent rapidly and conveniently using Retarus WebExpress. Click on the Email tab in the navigation menu to bring up the Email menu, where numerous settings and transmission options are available to you. These options are described in the following pages.
Transmission options
At the top of the Email menu are symbols for four blocks in which the transmission control options are defined. Information on a specific area of the fax transmission process is consolidated in each block. You can either hide or display an entire block as needed by clicking on the corresponding symbol. If you want to permanently save settings that have been made in one or multiple areas, click on the ![]() symbol in the upper-right corner of the menu. You can save your distribution and transmission control options at any time during the processing of a transmission job by clicking on the
symbol in the upper-right corner of the menu. You can save your distribution and transmission control options at any time during the processing of a transmission job by clicking on the ![]() symbol. In order to discard all changes that have been made up to that point, click on the
symbol. In order to discard all changes that have been made up to that point, click on the ![]() symbol.
symbol.
Transmission job

You can name each transmission job individually in the Job Name field, which enables you to track an individual transmission in reporting and on your invoice by name and cost center.
The Cost Center can be assigned permanently for each user in the customer settings or modified depending on the user. The permanent assignment of users and a cost center is sensible if several departments in your company or organization, such as Marketing, Controlling, etc., use Retarus WebExpress. You can then allocate the monthly amounts in full detail to the individual cost centers’ invoices. If you do not permanently assign the cost center, it will be entered individually for each transmission job.
With the Send delivery status option, you can have a detailed report of the job sent to you that makes it possible for you to view, for example, which emails have been rejected and for what reason. You can then remove these numbers from your distribution list and they will not be included in future transmissions. You receive this report after all faxes have been sent and/or the error is known.
Transmission parameters

Emails can be sent in either TXT or HTML format. If you switch the content type from TXT to HTML in the Format menu option, Retarus WebExpress displays the HTML code. HTML emails can be edited using a versatile WYSIWYG-HTML editor. Microsoft Word documents can easily be imported using the ![]() function, located on the HTML Editor’s symbol bar. After you click on the symbol, a window opens up into which you can copy the Word text and then click on Insert. It is recommended that HTML emails with complex formats be compiled in an HTML editor in order to ensure optimal display results.
function, located on the HTML Editor’s symbol bar. After you click on the symbol, a window opens up into which you can copy the Word text and then click on Insert. It is recommended that HTML emails with complex formats be compiled in an HTML editor in order to ensure optimal display results.
The Duplicate Check reviews your distribution list for duplicate numbers. Individual contacts may have been addressed more than once if no check for duplication is completed, particularly if multiple distribution lists are selected for transmission. Information can be sent to several employees at the same company by using the Extended option in the Duplicate Check field, where, in addition to the contact data for fax, email or SMS, Retarus WebExpress takes the reference column into account.
Your transmission is then delivered to all addressees within the company, even if they must be contacted at the same email address.
You can specify whether Retarus WebExpress should track the Open Rate (in the Open Rate field) of the emailing which has been sent and whether you want to use the analysis of the responses that the Bounce Management function provides. The Open Rate and Bounce Management functions are described in greater detail in Reports.
Additional options include using Return Receipt for your emailing, or using the Priority function to set the priority with which your emailing will be sent, and specifying the delivery time (see the Delivery time option). Even if you do not configure a specific delivery time, you can opt to send your transmission immediately or when you have finished creating it.
If you have already uploaded one or more image files, you can view them in the Images field. You can decide whether to send them along with the mailing transmission or have them reloaded via a mouse click by the recipient.
If you activate the Track all links option, Link Tracking is applied to all links contained in the emailing (with the exception of the non-traceable Unsubscribe links and personalized links). This means that you do not have to verify that Link Tracking has been activated for every link you insert.
Sender information

If you enter an email address in the Bounce Address field, soft bounces will be sent to the address when the Bounce Management option is set to Yes.
The sender name pops up as the friendly name of the sender and can be entered in the Sender Name field. Retarus WebExpress takes the entry in the Sender Email Address field from the User Settings, which can be changed in the Options. The address displayed in the Options is seen by the recipient of the email as the sender. Being able to choose the sender email address gives you the option of selecting a function- or a group mailbox to receive responses.
Personalization
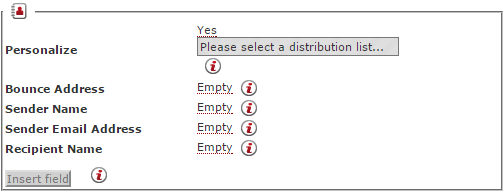
Here you can configure whether you want to personalize your distribution. Select Yes, in the Personalize field in order to be able to use the contents of your distribution list columns in the subject and body of your emailing.
After you have selected the options for your emails, compile the body of the email. If you wish to personalize your emails, indicate Yes in the Personalize options. You can personalize both the subject line and the body of the email at any point in the text. For the personalization process, Retarus WebExpress uses the column headers of the selected distribution list and places these in curly brackets with a prefixed $ sign in the relevant position, e.g., ${title}. The personalization information which has been accessed in the drop-down menu is placed at the position of the cursor using the Insert field option.
In addition, this information can also be used for a personalized bounce email address in order to have emails that would otherwise be returned to the sender instead sent as a group to a specific address. With the assistance of the information in the distribution list, a more accurate determination of the sender name and sender’s email address can take place, which makes it possible to send mailings that were created by different senders. In order to create optimal contact approaches to the recipient, you can personalize the recipient name in the addressing beforehand. This means that the initial contact occurs in the addressing, not in the distribution.
The distribution recipient sees the following address format: firstname.lastname@gmail.com.
To begin the process of defining the distribution list’s personalization fields for the bounce email address, sender name, recipient name, or sender email address, click on the corresponding field. The next step is to select the column in the distribution list in which you want each of them placed (this is done in the drop-down box directly to the right of the field name) and then click on the Insert field button.
Textual format of the email transmission
A versatile WYSIWYG HTML Editor is available for the design of the layout of your mailings. In order to optimize the clarity of the mailings, you can vary the number of options that are displayed. To do this, click on the View button to the right above the Editor, which allows you to switch it from the basic to the expanded overview, where some options become visible. You can always switch back and forth between the basic and the expanded overview.
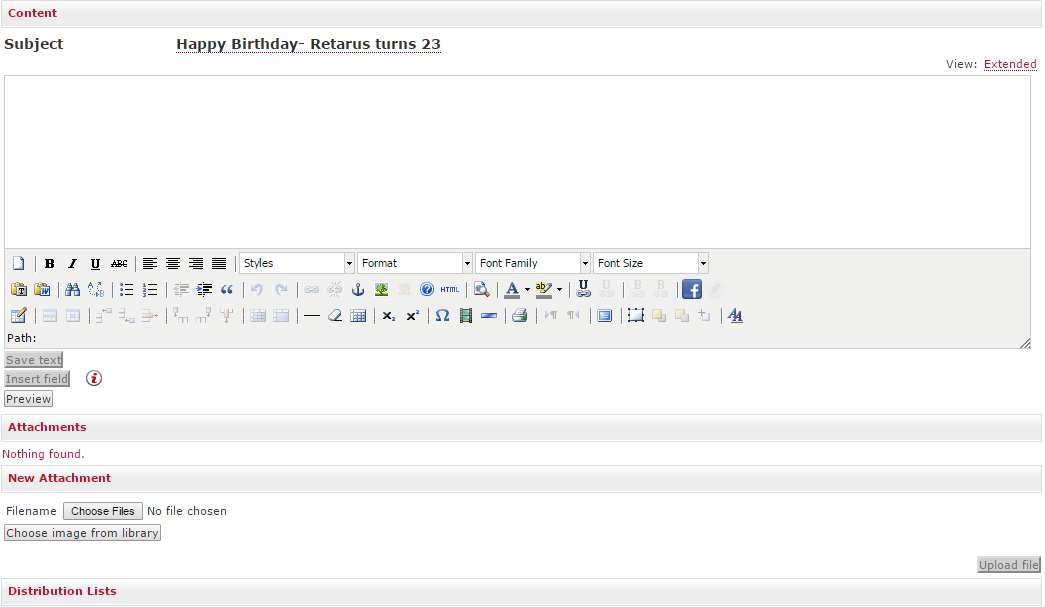
Microsoft Word documents can conveniently be imported using the Paste from Word function (![]() ), which is located on the HTML Editor’s symbol bar. After you click on the symbol, a window opens up into which you can copy the Word text and then click on Insert. It is recommended that HTML emails with complex formats be compiled in an HTML editor in order to ensure optimal display results. The contents can be inserted directly from the source text by clicking on the HTML symbol.
), which is located on the HTML Editor’s symbol bar. After you click on the symbol, a window opens up into which you can copy the Word text and then click on Insert. It is recommended that HTML emails with complex formats be compiled in an HTML editor in order to ensure optimal display results. The contents can be inserted directly from the source text by clicking on the HTML symbol.
File attachments and embedded objects
You can attach any file type to the emails that you compose with Retarus WebExpress. You can select these files by clicking on Browse and uploading them with the Upload file command. You can attach several files to an email, but altogether they must not exceed 2 MB. If you wish to send emails with very large attachments, please contact your personal communications adviser. Once you have uploaded the files, they appear in the Attachments table with the file type (![]() ) (attachment) designated.
) (attachment) designated.
It is also possible to embed objects in the email body, for instance graphics such as a corporate logo. In order to embed objects, begin by uploading them in the same way as file attachments, then click on the symbol for Insert/edit image in the menu bar (![]() ) and select – in the window which appears – the required file from the Image list. After all settings have been made, transfer the image or graphic by clicking on Insert.
) and select – in the window which appears – the required file from the Image list. After all settings have been made, transfer the image or graphic by clicking on Insert.
In Retarus WebExpress, you can also integrate Cascading Style Sheets (CSS). This ensures that your transmissions match the corporate identity of your company or organization. With CSS you can specify how distinctly marked content or sections are to be presented. For example, background colors, font sizes and paragraph indentations can be defined in CSS files.
Embedded objects also appear in the Attachments list after they have been uploaded and successfully embedded. They are marked with the Embedded Object symbol (![]() ).
).
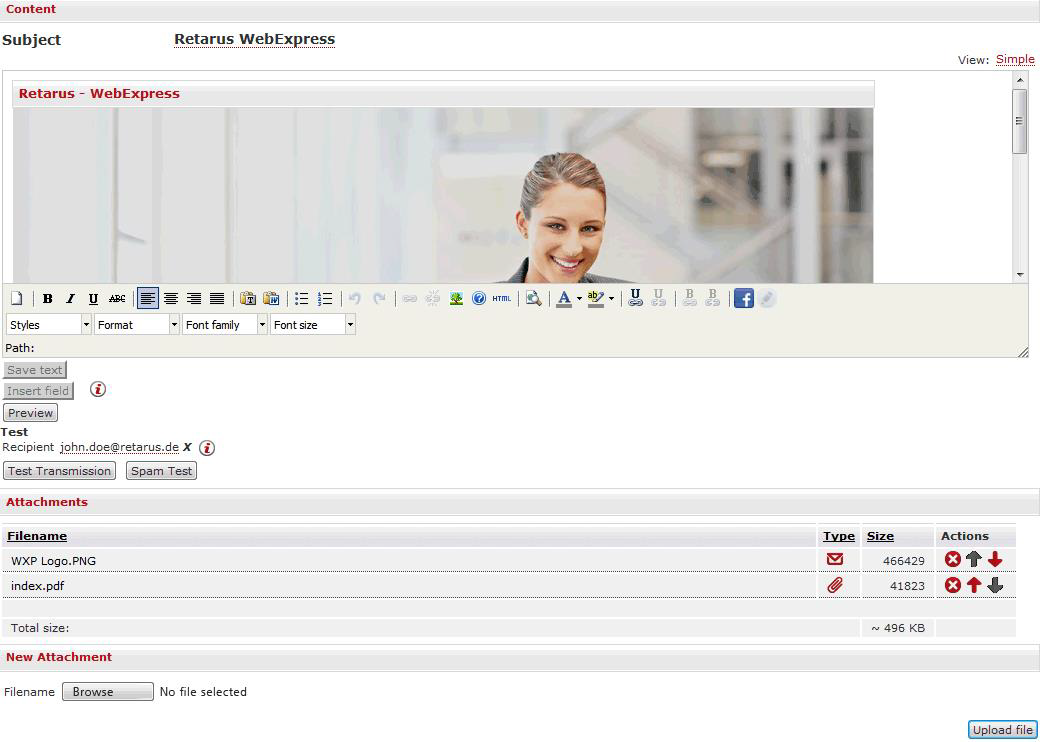
Embedded images can be sent with the transmission or reloaded via a mouse click by the recipient. You can make this choice in the Options menu under Images.
Sending attachments as faxes
If necessary, Retarus WebExpress will send files attached to an email as a fax message – to all addressees in the distribution list for whom a fax address, but no email address, has been stored.
The contents of the email’s body are not sent as a fax.

You can personalize the attachment which you want to send as a fax in the same way as with normal fax transmission. To do so, activate the Personalize option (see Personalization). Then, under the distribution list table, select a saved fax personalization template that you want to use for the attachment.

There are different delivery options for your transmission depending on the preferred method of transmission. With the choice of preferred transmission method, you can ensure that all your addressees are reached on the first delivery attempt.
The following table describes the delivery options:
Distribution list line contains | Email preferred | Fax preferred |
|---|---|---|
Email and fax | Fax | |
Email only | ||
Fax only | Fax | Fax |
Spam test
While you are composing your email, Retarus WebExpress checks the likelihood of it being classified as spam, which means that the throughput of your mailing is optimized prior to being sent. When you have finished compiling the contents of your mailshot, simply click on Spam Test.

The probability of your messages being categorized as spam is dependent on a number of factors. The triggers for spam alerts can be unusual HTML formats or table structures, an excessive number of links, or dubious formulations in the subject line or email body.
To give you an idea of how spam filters interpret your email, the probability ratings are presented in different colors. Everything marked green is usually classified as being non-spam and should reach the intended recipient as intended.

Retarus WebExpress marks ratings up to 33 percent green. Ratings between 34 percent and 50 percent are highlighted in yellow, while red indicates a spam probability of greater than 50 percent. Because Retarus updates its anti-spam infrastructure on a continuous basis, it is possible that a saved email whose spam probability has been previously determined will be assigned a different rating at a later juncture.
Linking in emails
Links and link tracking
You can mark any text passages or images within your emails and assign them a link to additional sources of information. To do so, you simply need to mark the text or object to be linked and click on the Insert/edit link symbol (![]() ). A selection window then opens in which you can enter the relevant link and activate the Link Tracking function. Clicking on the remove (
). A selection window then opens in which you can enter the relevant link and activate the Link Tracking function. Clicking on the remove (![]() ) symbol deletes the link.
) symbol deletes the link.
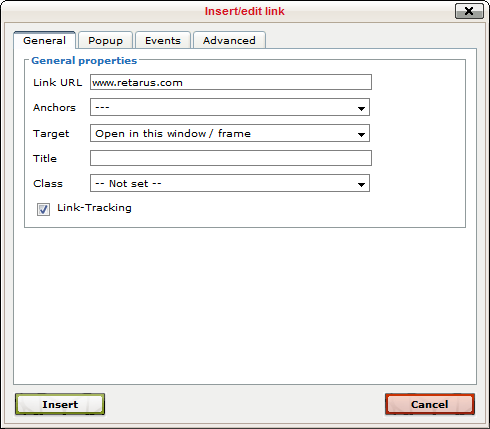
The Link Tracking function informs you how many recipients have clicked on the links in your email and how often. A distinction is made between gross and net clicks (for more details, see Status reports). You can activate Link Tracking for each link which you wish to track. If you want to activate Link Tracking for all links, activate it in the transmission parameters.
Browser link
You can have an email displayed in the browser. This circumvents problems that may arise with different mail clients. This option works by saving an image of the email on Retarus servers and routing the user to the page. This option is activated by clicking on the ![]() button. The selected text is now a link and displays the image of email on the Retarus server.
button. The selected text is now a link and displays the image of email on the Retarus server.
The link can also be counted by using Link Tracking. To use this particular function, click on the Insert/edit link button (![]() ) button and activate Link Tracking by clicking on the checkbox. Alternatively, you can have the clicks on the browser link counted by using the Track all links option.
) button and activate Link Tracking by clicking on the checkbox. Alternatively, you can have the clicks on the browser link counted by using the Track all links option.
Social media links
Retarus WebExpress gives you the option of linking the contents of your mailings with social networks. To integrate a social media link into your distribution, click on the ![]() symbol in the editor. A pop-up window will then open where you can enter the desired link, which can be connected to one or multiple networks.
symbol in the editor. A pop-up window will then open where you can enter the desired link, which can be connected to one or multiple networks.
If you already have a link located in the emailing that you want to reference, click on the second option displayed in the window and select the corresponding link in the drop-down menu. The browser link also appears in the list, in case it has already been replaced. This enables you to prepare to link your entire distribution to the social network.
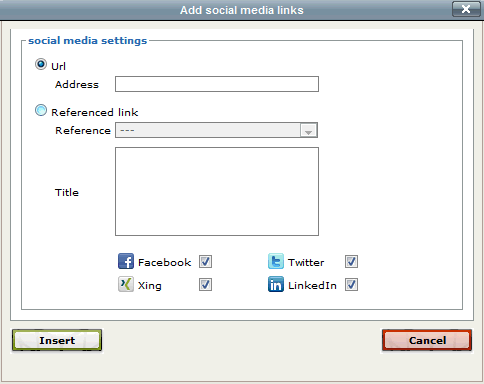
Image maps
The Image Map Editor, which is a subset of the HTML Editor, is used to overlay links in embedded images with links in specific locations.
As soon as you have uploaded a picture and embedded it in the email, the Image Map Editor is available to you (be sure to select the Extended view). The Image Map Editor can be reached by clicking on the image in the Editor and then the ![]() symbol, if you have already embedded the image in a mailing.
symbol, if you have already embedded the image in a mailing.
The Editor opens in a pop-up window:
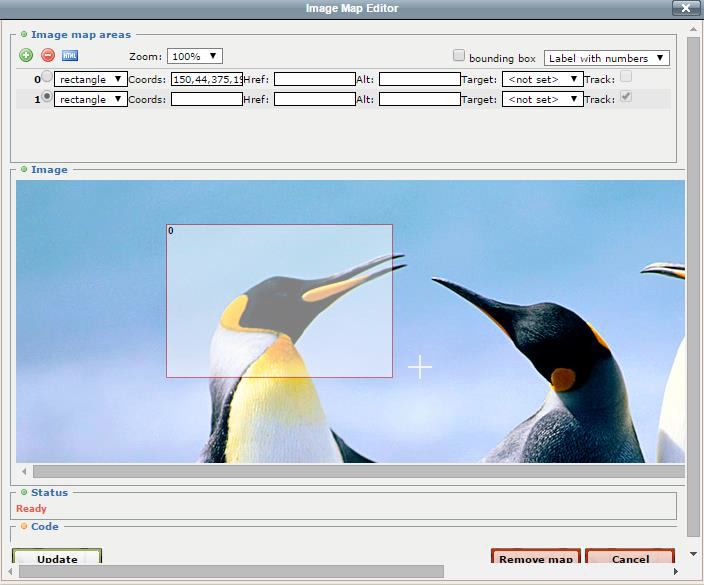
The editor is divided into three segments. In the Image map areas section at the top of the window, settings are made which define the appearance of the Image Map. The Image area displays the image inserted into the mappings. These clickable areas can also be defined with a mouse click. The Code section displays the clickable image’s entire HTML code.
New image maps can be created in the Image map areas section. To create a new map, click on the ![]() symbol, which creates a new row at the bottom of the table. You can specify what form these should have for the positioning of the image map. Rectangular, circular and polygonal shapes are available.
symbol, which creates a new row at the bottom of the table. You can specify what form these should have for the positioning of the image map. Rectangular, circular and polygonal shapes are available.
You can now either place an image map directly into the table by entering coordinates or placing it within the Editor’s image region. Once the linked area has been defined, the placement of the link follows. As an alternative to linking, you can move the mouse of the link in the completed distribution in order to specify what should be displayed in the mouse-over.
Under Target, you can also configure whether the link should open in a new browser window or the same one when it is clicked on. If this option is left undefined, the browser’s default value will be used.
If the Track all links option is not activated, you can specify which Image Maps should be included by clicking on the respective checkboxes.

You can delete an existing figure by clicking on the ![]() symbol. The bounding box option indicates whether there should be a closed frame around the map. This frame is not visible in later distributions. When all links have been placed inside the image, click on Update. The image maps are then inserted into the HTML Editor and the Image Map Editor is closed. If you want to delete all maps created in this image, click instead on Delete map.
symbol. The bounding box option indicates whether there should be a closed frame around the map. This frame is not visible in later distributions. When all links have been placed inside the image, click on Update. The image maps are then inserted into the HTML Editor and the Image Map Editor is closed. If you want to delete all maps created in this image, click instead on Delete map.
