
The Retarus Cloud Fax App for Salesforce lets you send fax campaigns and single faxes directly in Salesforce. Setup includes installing the package, activating the app, configuring authentication and credentials, assigning permissions, and setting up fax features for your users.
Prerequisites
Before you begin, make sure you have:
-
Salesforce administrator access
-
Retarus Fax-for-Applications API credentials, including Reporting WebPush OAuth credentials
-
Lightning Web Security (LWS) enabled in Salesforce
If LWS is not enabled, creating and sending faxes through the single fax component may not work. -
Translation Workbench enabled in Salesforce
-
Because the package includes translations, enable Translation Workbench before installing the package. In Salesforce, go to Setup, enter Translation Language Settings in the Quick Find box, and select Translation Language Settings. On the welcome page, click Enable.
-
If you want users to see a translated UI in another supported language, add and activate that language in Translation Language Settings. For example, to make the UI available in German, add German and mark it Active.
-
-
Verify that a cover page template is configured in EAS for each Customer ID and Salesforce organization before users send single faxes with cover pages. Cover pages are supported for single fax sending only.
Learn how to configure cover pages in EAS.
Salesforce Mobile App
The Retarus Cloud Fax App for Salesforce is supported on the Salesforce mobile app. All features available in the desktop experience are also available on mobile, including sending single faxes from record pages, viewing fax job history, and monitoring fax status.
.jpg?cb=44e26778cffc89010f6ab8ccfc53613b)
Installing the app
-
Open the installation link provided by Retarus.
-
Log in with your Salesforce credentials.
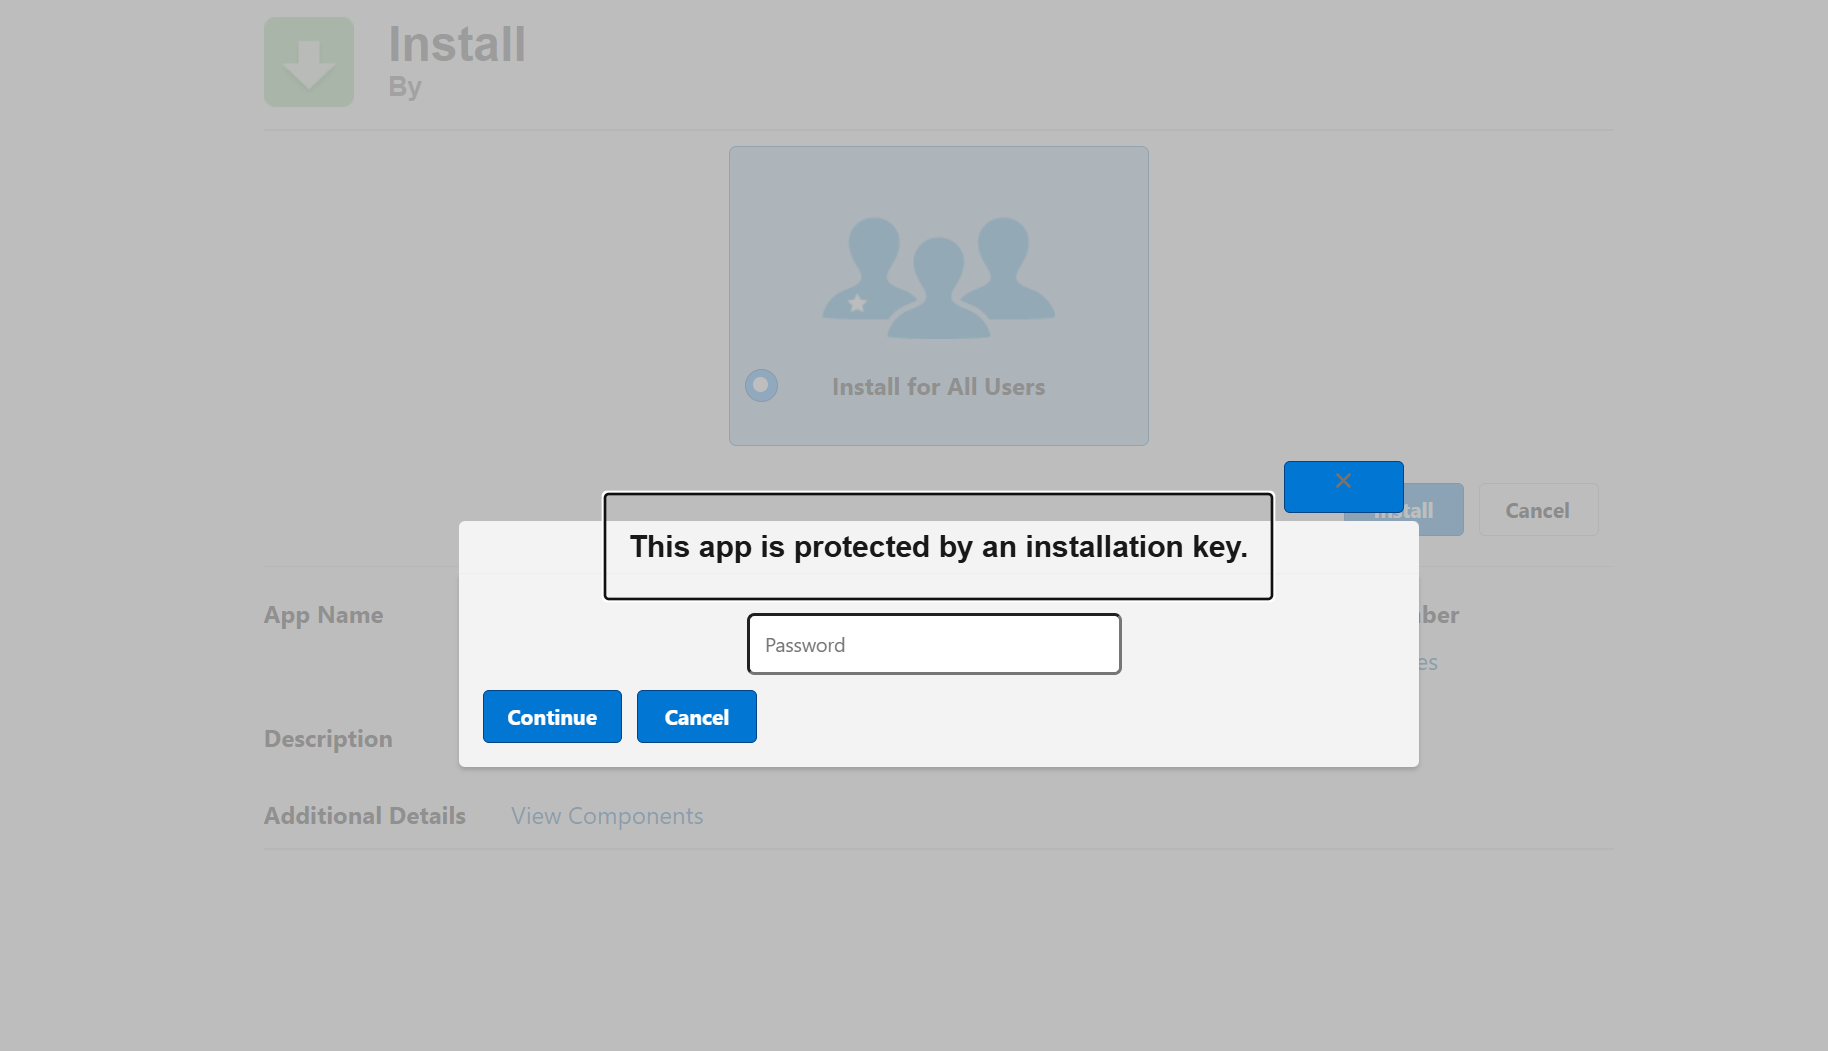
-
Choose the installation scope, such as Install for Admins Only or Install for All Users.
-
Select this option:
I acknowledge that I’m installing a Non-Salesforce Application that is not authorized for distribution as part of Salesforce’s AppExchange Partner Program.
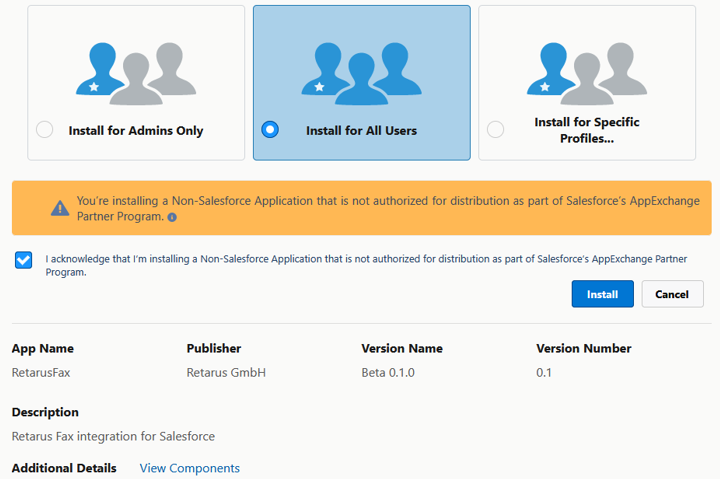
-
Complete the installation and wait for it to finish.
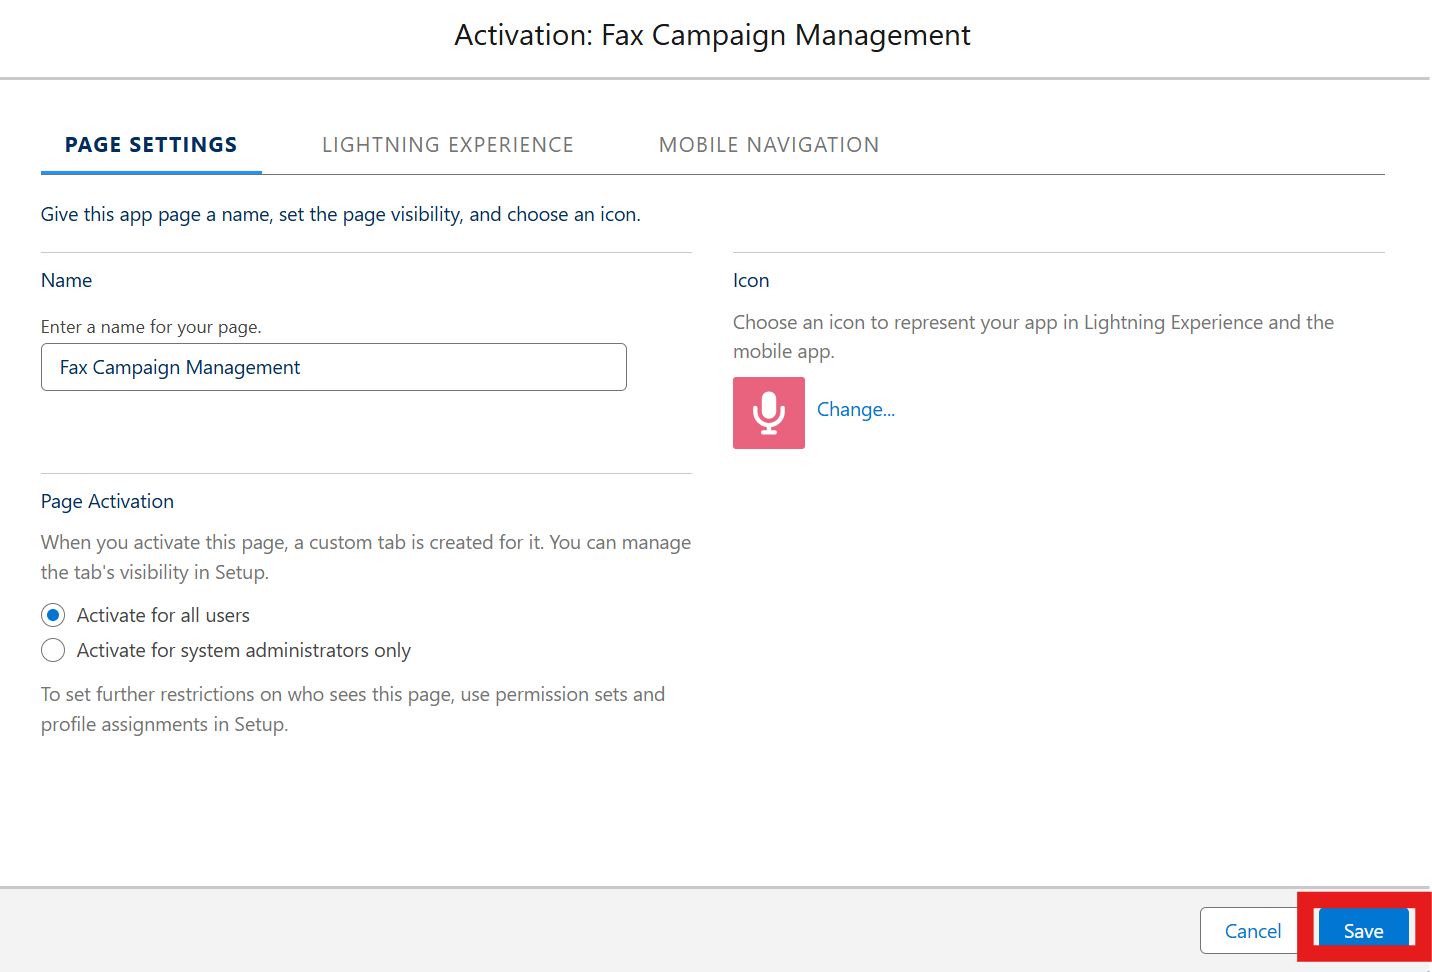
Activating the app
-
Go to Setup - Lightning App Builder.
-
Find Fax Campaign Management and click Edit.

-
Click Activation.
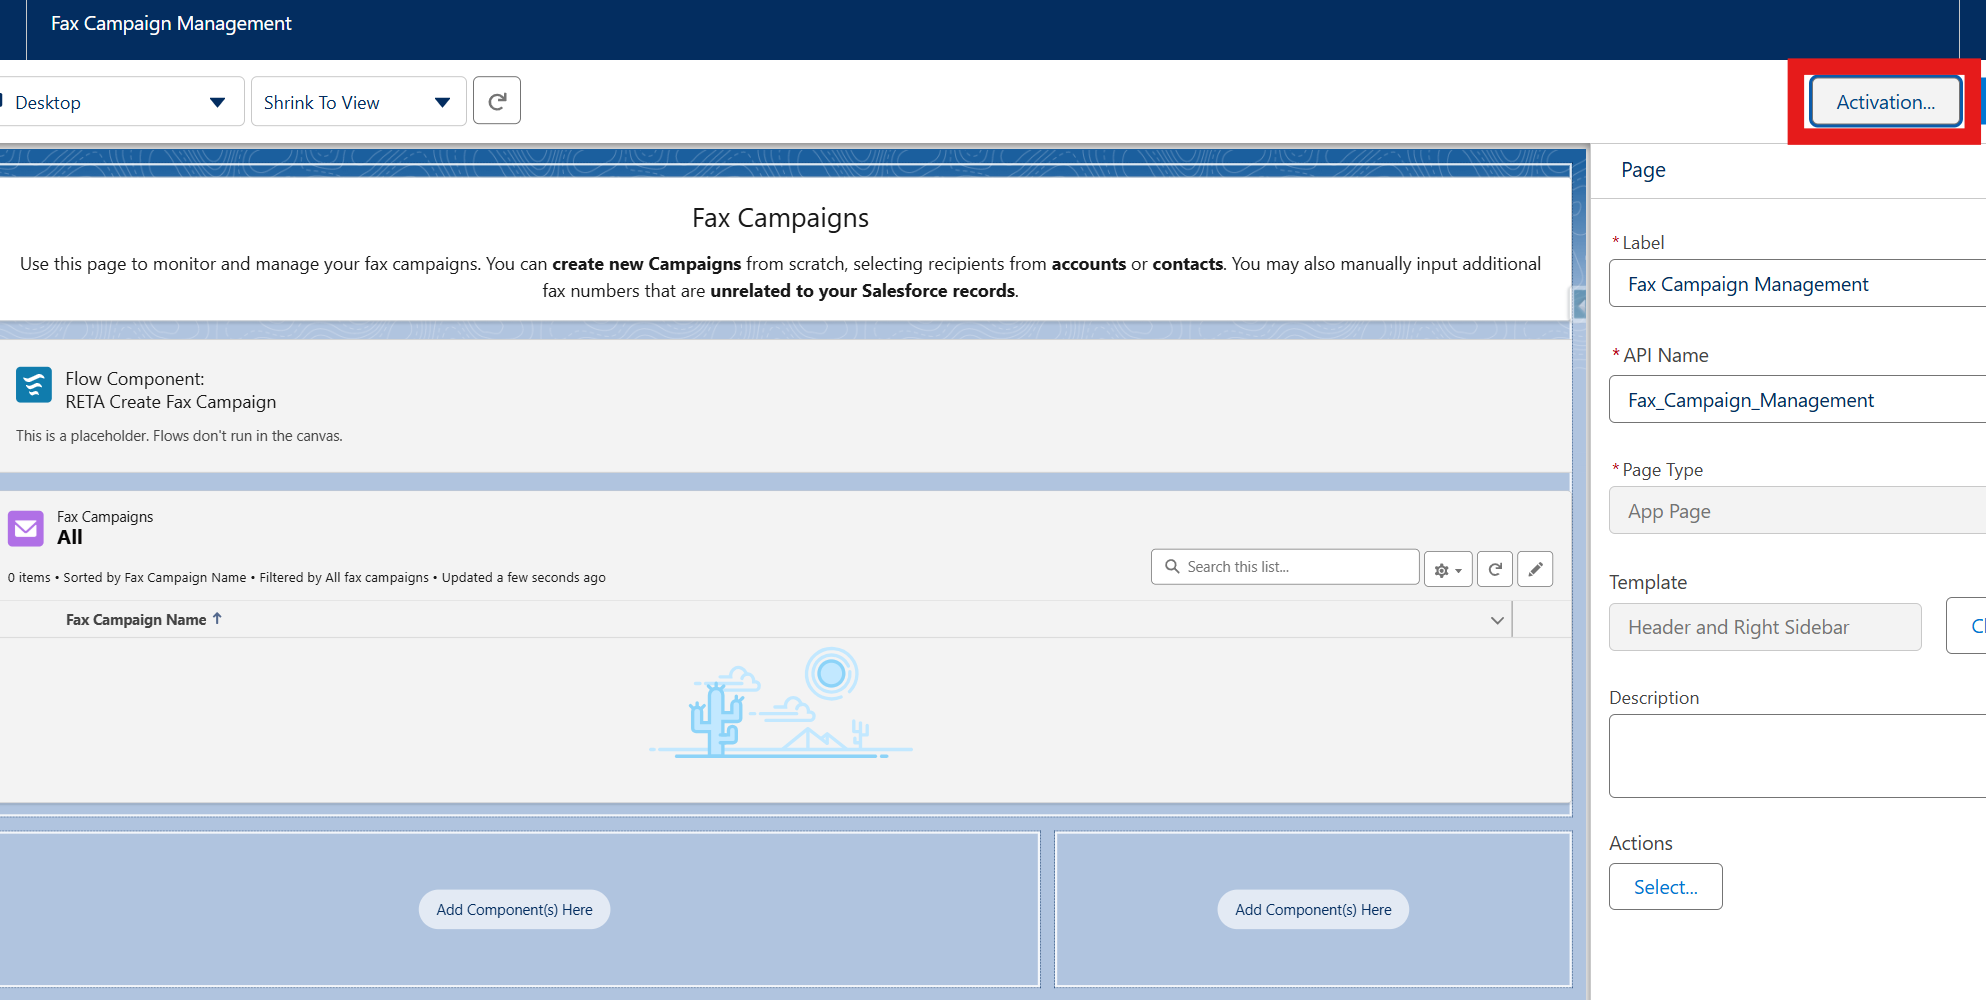
-
Choose whether to activate the app for administrators only or for all users, based on your rollout plan.
-
Save your changes.
-
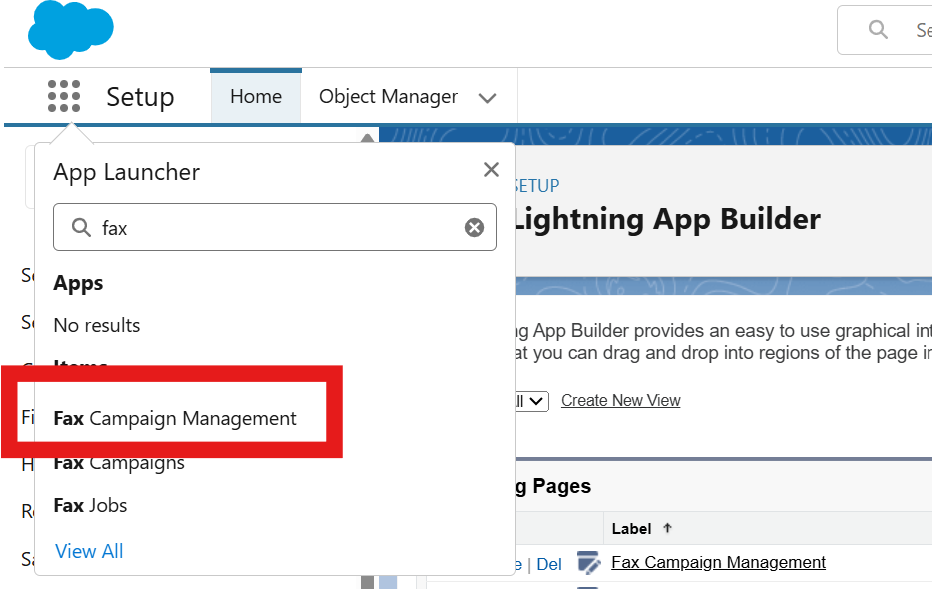
Verify that the app appears in the App Launcher.
Creating the External Client App
Create an External Client App in Salesforce so Retarus can send fax status updates back to your Salesforce organization.
During setup, assign an integration user to this app. Retarus uses this user identity when it updates fax jobs and fax campaigns in Salesforce. Assign the Cloud Fax Integration User permission set to the integration user before you continue.
Create and configure the app
-
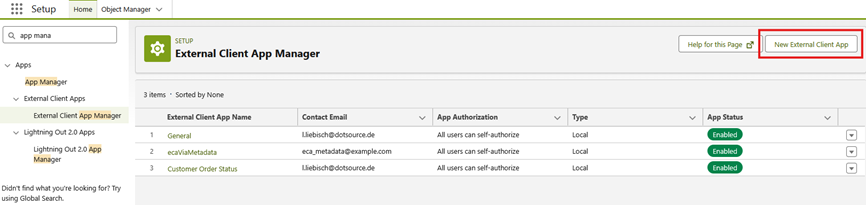
Go to Setup - External Client App Manager, then select New External Client App.
-
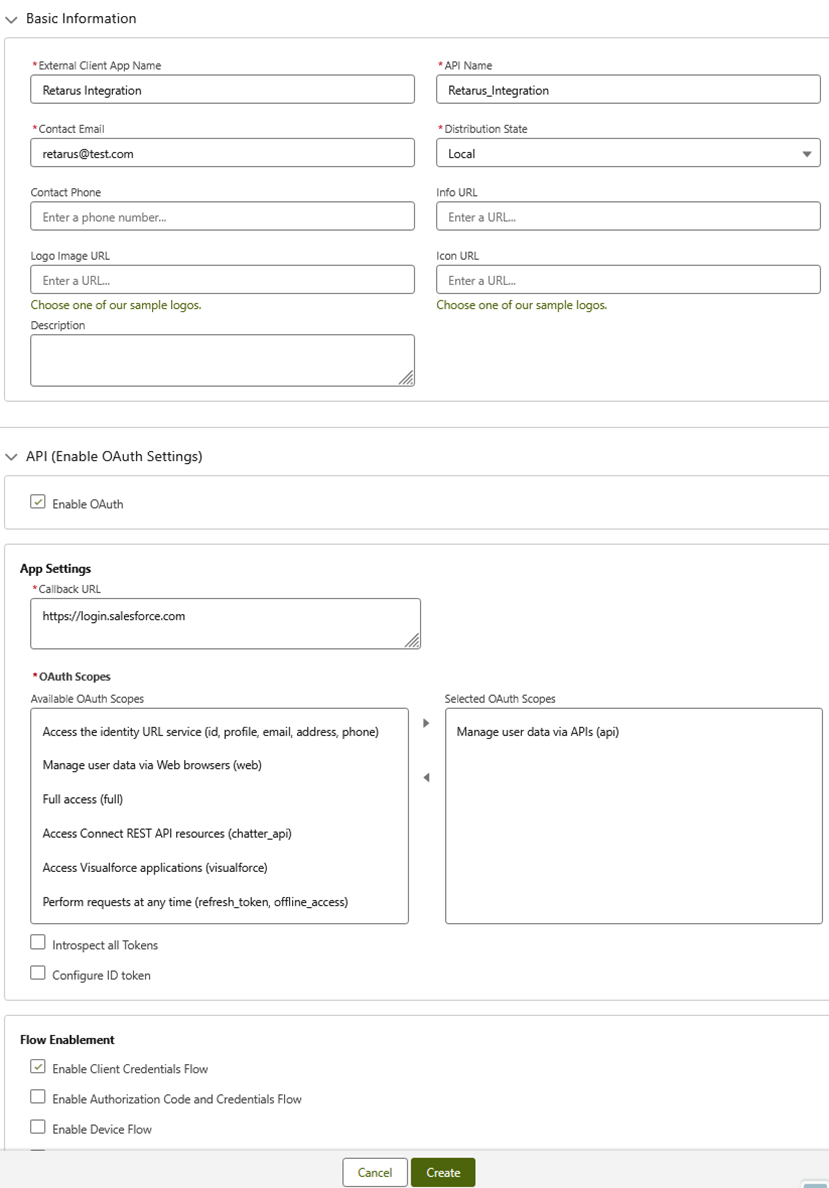
Enter the basic app details:
-
External Client App Name
Enter a name that helps you identify the app. -
API Name
Salesforce generates this automatically from the app name. -
Contact Email
Enter any valid email address. -
Distribution State
Select Local.
-
-
Leave the other basic fields unchanged unless your organization requires different values.
-
In API (Enable OAuth Settings), select Enable OAuth.
-
Enter a Callback URL that starts with
https://.Salesforce requires this value, but the Retarus integration does not use it.
-
In OAuth Scopes, select Manage user data via APIs (api).
-
In Flow Enablement, enable Client Credentials Flow and confirm the prompt.
-
Leave all remaining settings unchanged.
-
Select Create.
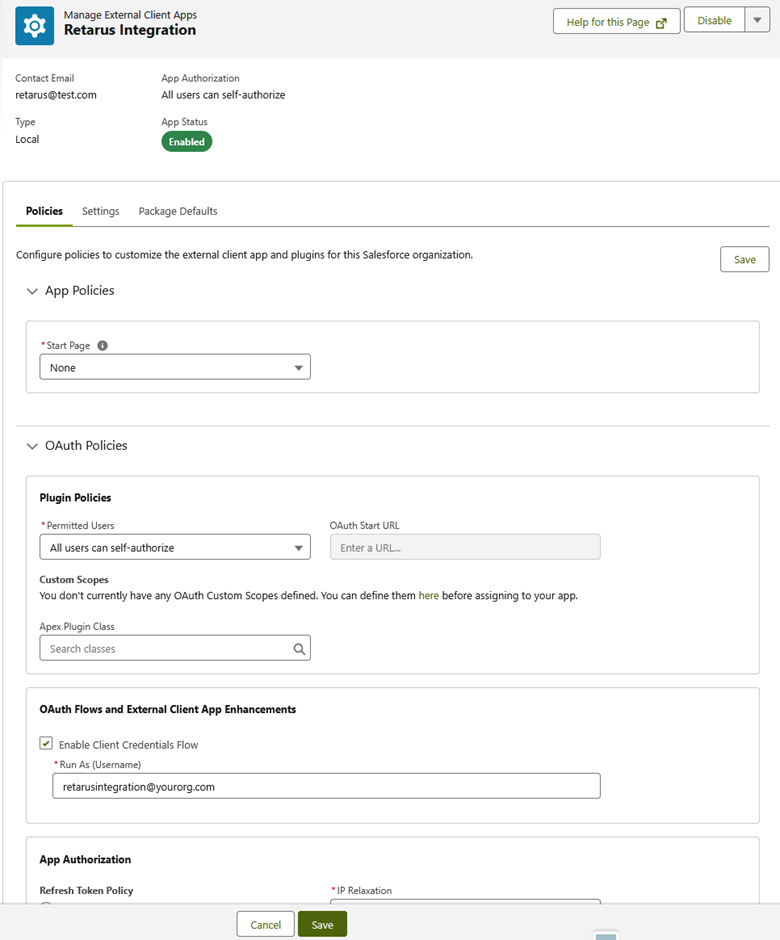
Assign the integration user
-
Open the Policies tab of the new app.
-
Select Edit.
-
Expand OAuth Policies.
-
Make sure Enable Client Credentials Flow is selected.
-
In Run As, enter the username of the integration user.
-
Save your changes.
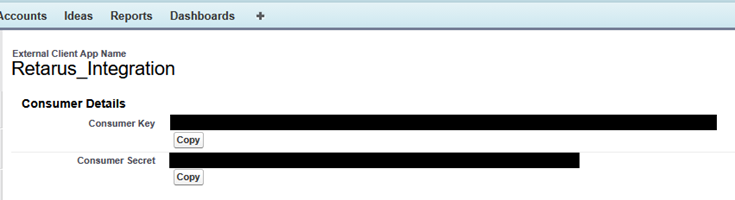
Get the client ID and client secret
-
Open the Settings tab.
-
Expand OAuth Settings.
-
Select Consumer Key and Secret.
-
Confirm your identity if prompted.
-> Salesforce then displays the Consumer Key and Consumer Secret, which you use later as the client ID and client secret.
Information to provide to Retarus
During implementation, provide the following information to the Retarus implementation team so they can set up Push Reporting for fax status updates.
|
Information |
Description |
|---|---|
|
Account / username |
The account identifier or username for the integration. |
|
OAuth server |
The OAuth authorization server for authentication. |
|
OAuth username |
The username to authenticate against the OAuth server. |
|
OAuth password |
The password to authenticate against the OAuth server. |
|
Webhook endpoint |
The Salesforce endpoint URL that receives Push Reporting webhooks. |
|
Optional scope |
An OAuth scope, if your OAuth configuration requires one. |
|
Optional headers |
Any additional HTTP headers that must be included in webhook requests. |
Configuring Retarus credentials
To allow Salesforce to send fax data to Retarus, store your Retarus Fax API credentials in Salesforce.
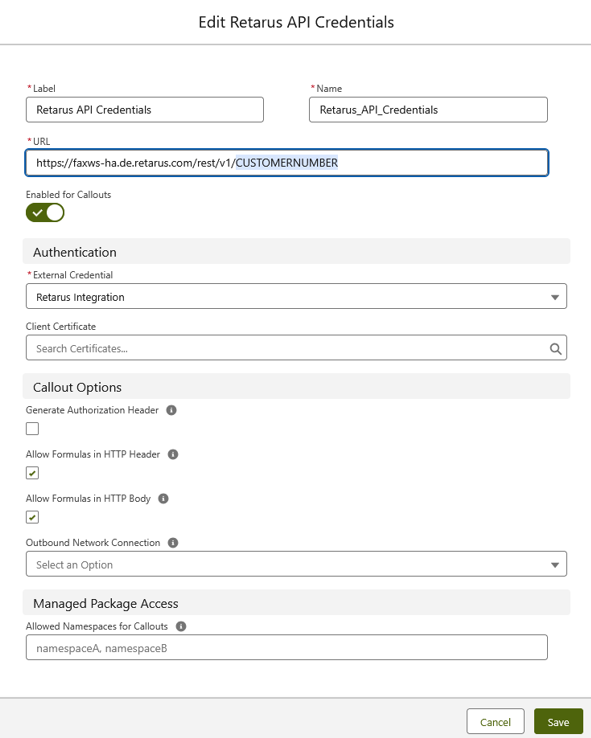
Update the named credential
-
Go to Setup - Named Credentials.
-
Open Retarus API Credentials and select Edit.
-
In the URL field, replace
CUSTOMERNUMBERwith your Retarus customer number.
-
Save your changes.
Update the external credential
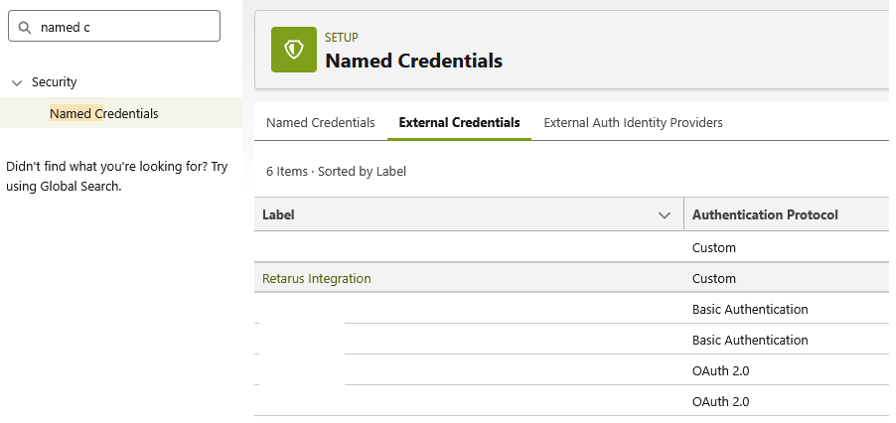
-
Go to Setup - Named Credentials - External Credentials.
-
Open Retarus Integration.
-
In the Principals list, open Auth and select Edit.
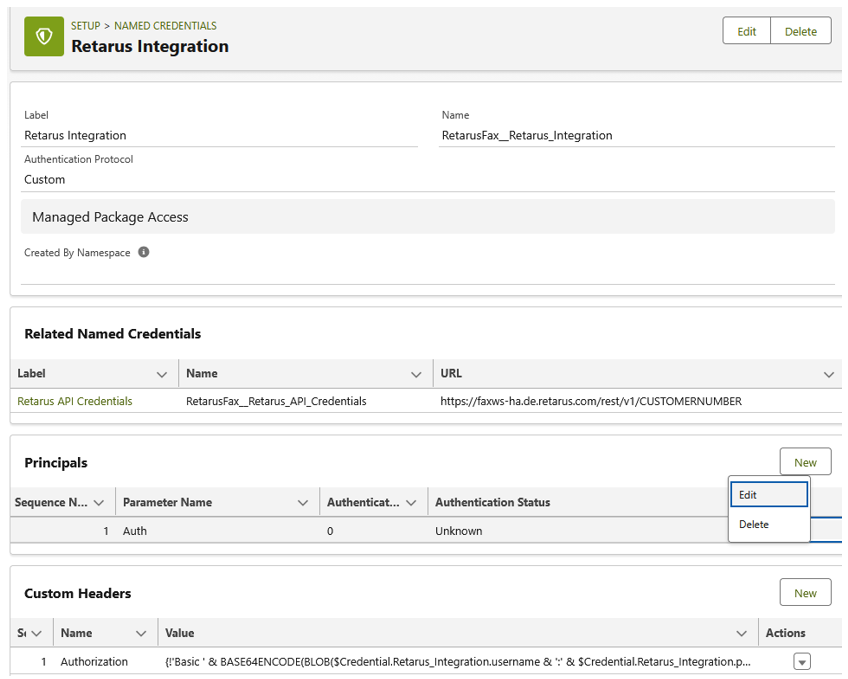
-
Add these parameters exactly as shown:
-
username
Your Retarus API username. -
password
Your Retarus API password. -
clientID
The client ID from the External Client App setup. -
clientSecret
The client secret from the External Client App setup.
-

-
Save your changes.
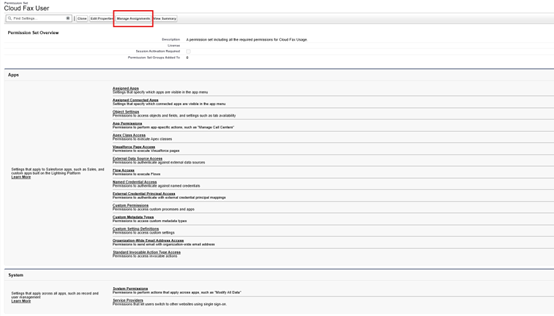
Assigning permissions to users
To use Cloud Fax features in Salesforce, assign the Cloud Fax User permission set to each user who should send fax campaigns or single faxes.
-
Go to Setup - Permission Sets.
-
Open Cloud Fax User.
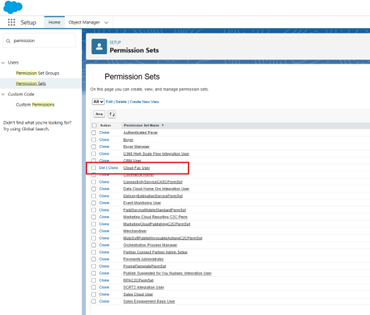
-
Select Manage Assignments.
-
Add the users who should use Cloud Fax features.
Additional permissions for fax campaigns
Users who send fax campaigns also need these additional Salesforce permissions. Salesforce does not allow managed packages to include these permissions in a packaged permission set.
|
Permission type |
Required access |
|---|---|
|
Standard objects |
Read access to Account, Contact, Lead, and Campaign |
|
Standard fields |
Read access to the Fax field on Account, Contact, and Lead |
|
App permissions |
Run Flows |
Without these permissions, fax campaign sending may not work as expected.
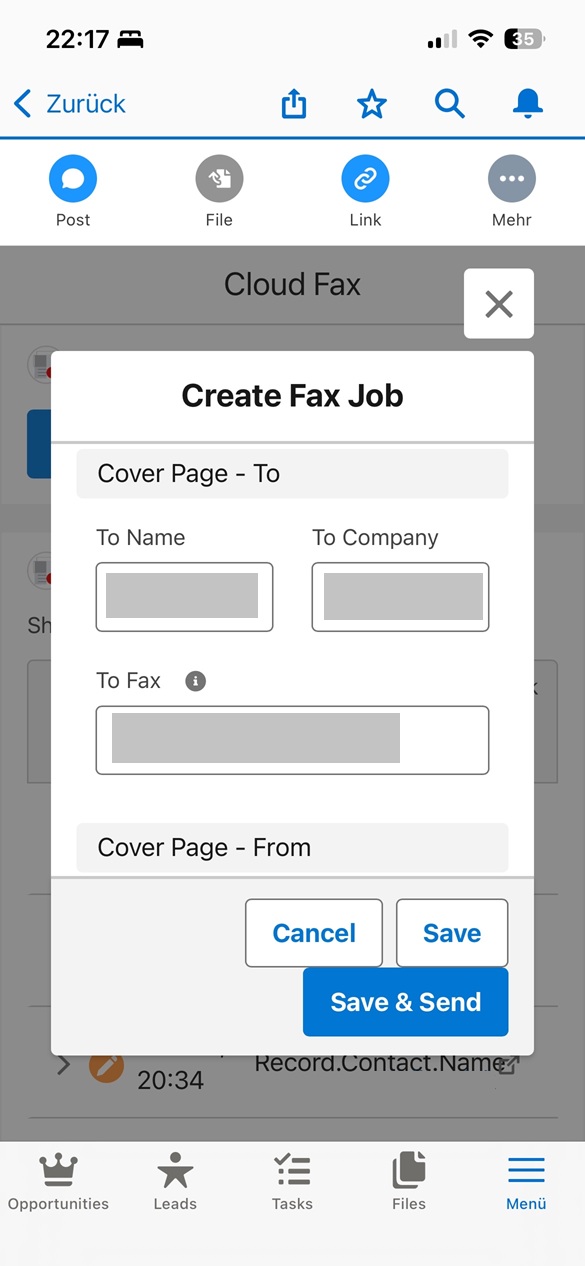
Single fax setup
You can use the single fax feature on any Lightning Record Page for standard or custom Salesforce objects.
Add the single fax component to a record page
-
Open a Lightning Record Page in Lightning App Builder.
-
In the component list, find Retarus Cloud Fax Management under Custom - Managed.
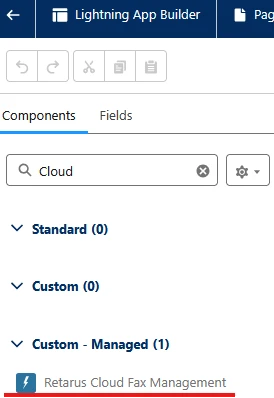
-
Drag the component to the page.
-
Save and activate the page as needed.
Configure default values
After you add the component, you can configure default values to simplify fax creation:
-
Whether a cover page is selected by default.
-
Which value prefills the recipient fax number.
-
Which values prefill the cover page fields.
Prefilling is optional.
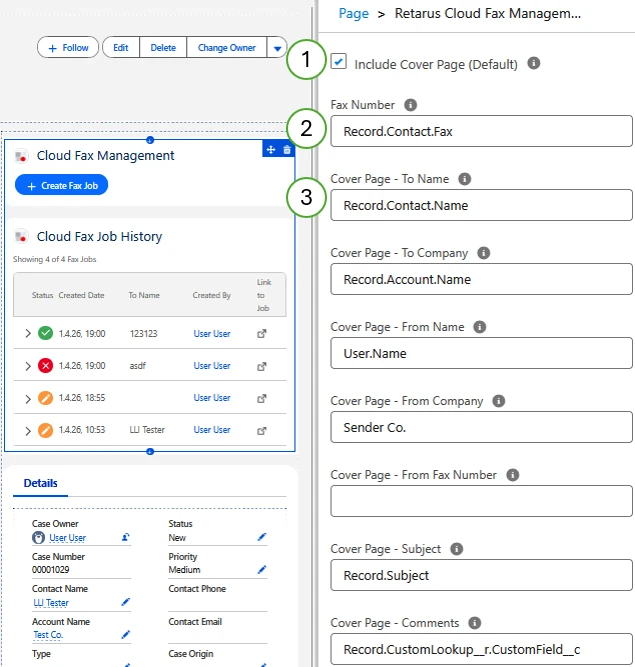
Supported prefill methods
You can prefill fields in these ways:
|
Method |
Format |
Example |
|---|---|---|
|
Static value |
Enter a fixed value |
Cover Page - From Company |
|
Current record field |
|
|
|
Parent record field |
|
|
|
Current user field |
|
|
You can also reference custom relationship fields. Use the relationship API name with __r where required.
Prefill behavior
-
The value used to prefill the recipient fax number also prefills Cover Page - To Fax.
-
If a user does not have access to a referenced field, Salesforce does not prefill it.
-
If a referenced field does not exist or the reference is entered incorrectly, Salesforce does not prefill it.
-
If you need more advanced logic, create a custom formula field and use that value for prefilling.
Related lists
Cloud Fax Job includes lookup fields for:
-
Account
-
Contact
-
Lead
-
Case
-
Opportunity
When you use the Retarus Cloud Fax Management component on a Lightning Record Page for one of these objects, Salesforce automatically fills the matching source lookup field when it creates a Cloud Fax Job. This lets you add related lists for Cloud Fax Jobs to those record pages.
Data model overview
The Retarus Cloud Fax App for Salesforce uses two custom objects:
|
Object |
Purpose |
|---|---|
|
Cloud Fax Campaign |
Stores the documents to send. |
|
Cloud Fax Job |
Stores recipient-specific data, such as fax number and cover page information. |
This data model applies to all faxes, including single faxes. For a single fax, the campaign usually includes only one related Cloud Fax Job.
When Salesforce sends fax data to Retarus:
-
It sends a Cloud Fax Campaign with attached documents.
-
It includes all related Cloud Fax Jobs in Draft status.
-
The status changes to In Progress after sending starts.
After sending, users should generally not change the related records. This helps prevent inconsistencies between Salesforce and Retarus. Validation rules protect Cloud Fax Jobs in particular.
Sending a Cloud Fax campaign using the invocable action
The Retarus Cloud Fax App includes an invocable action called Send Cloud Fax Campaign. An invocable action is a packaged Salesforce mechanism that can be called from multiple contexts. You can add it as an action element in Flow Builder (for example, in a Screen Flow or Scheduled Flow) or call it directly from Apex code.
To call the action from Apex:
Id cloudFaxCampaignId = 'a01000000000000000';

RetarusFax.RETA_ApexAction_SendFaxCampaignCallout.SendFaxCampaignRequest request =
    new RetarusFax.RETA_ApexAction_SendFaxCampaignCallout.SendFaxCampaignRequest();
request.campaignId = cloudFaxCampaignId;

List<RetarusFax.RETA_ApexAction_SendFaxCampaignCallout.SendFaxCampaignRequest> requests =
    new List<RetarusFax.RETA_ApexAction_SendFaxCampaignCallout.SendFaxCampaignRequest>();
requests.add(request);

List<RetarusFax.RETA_ApexAction_SendFaxCampaignCallout.SendFaxCampaignResult> results =
    RetarusFax.RETA_ApexAction_SendFaxCampaignCallout.sendFaxCampaign(requests);

String campaignId    = results.get(0).campaignId;
Boolean isSuccess    = results.get(0).isSuccess;
String errorMessage  = results.get(0).errorMessage;
String retarusJobId  = results.get(0).retarusJobId;
Input and output
|
Parameter |
Type |
Description |
|---|---|---|
|
Campaign ID |
Input |
Salesforce ID of the Cloud Fax Campaign. |
|
Campaign ID |
Output |
The same campaign ID passed in. |
|
Error Message |
Output |
Error message when sending fails. If a Salesforce-internal error occurs (for example, a validation failure), the exception message is returned. If the callout to the Retarus API fails, the Retarus API response is returned. |
|
Is Success |
Output |
Indicates whether sending succeeded. |
|
Retarus Job ID |
Output |
Retarus ID of the created fax job. |
What the action does
When Send Cloud Fax Campaign runs, Salesforce:
-
Validates the campaign data.
-
Builds and sends the request to the Retarus Fax API.
-
Updates statuses if successful, and stores the Retarus Job ID on the campaign record.
Validation rules
Before Salesforce sends a Cloud Fax Campaign to Retarus, these conditions must be met:
-
At least one supported document is attached.
-
At least one related Cloud Fax Job is in Draft status. Only Draft Cloud Fax Jobs are sent.
Supported file types:
DOCX
XLSX
TXT
HTML
TIFF
JPEG
JPG
PNG
Limitations
|
Limitation |
Description |
|---|---|
|
Document |
A fax campaign can include a maximum of 10 documents. Documents are sent in Base64, which increases memory usage and consumes additional Apex heap space. Recommended total document size:
|
|
Callout |
The invocable action performs a synchronous callout. This has the following consequences:
|
|
Bulk |
The action is not bulk-safe because the Retarus Fax API requires one callout per campaign. With multiple campaigns in a single transaction, the Salesforce limit of 100 callouts per transaction applies. Use one Cloud Fax Campaign per transaction. Do not call the action from triggers, including the asynchronous path of record-triggered flows. For multiple campaigns, distribute calls across transactions using Batchable Apex or Queueable Apex. |
Create records outside the user interface
If you create Cloud Fax Campaign or Cloud Fax Job records outside the packaged UI, make sure they follow the expected data model. This applies to custom Flows, Apex, data imports, and other custom integrations.
Required setup for new records
-
A Cloud Fax Campaign must have at least one supported document attached.
-
A Cloud Fax Job must be related to a parent Cloud Fax Campaign.
-
A Cloud Fax Job must contain the required recipient data.
-
New Cloud Fax Job records must be created with Draft status.
-
Attach the documents to the Cloud Fax Campaign before sending.
Cloud Fax Campaign fields
|
Label |
API name |
Description |
|---|---|---|
|
Campaign Status |
|
New fax campaigns should start in Draft. The app updates this field automatically during processing. |
|
Retarus Fax Job ID |
|
Stores the Retarus job ID created when the campaign is sent. Salesforce uses this value to match Retarus jobs to Cloud Fax Campaign records. |
|
Retarus ID History |
|
Stores previous Retarus job IDs. This field is used when a retry creates a new Retarus job ID for the same campaign. |
|
Send Cover Page |
|
Controls whether all fax jobs in the campaign are sent with a cover page. The cover page details are stored on the related Cloud Fax Job records. |
|
Source |
|
Identifies where the campaign was created. This value affects how related fax jobs appear in the single fax component history. |
Source values for Cloud Fax Campaign
|
Source value |
Behavior |
|---|---|
|
|
Only fax jobs with the status OK/Done appear in the single fax history. |
|
|
All fax jobs appear in the single fax history. Jobs in Draft can be edited and sent. Jobs in Failure can be retried. |
|
No value |
The fax jobs do not appear in the single fax history. |
Cloud Fax Job fields
|
Label |
API name |
Description |
|---|---|---|
|
Fax Campaign |
|
Master-detail relationship to the parent Cloud Fax Campaign. |
|
Fax Number |
|
The recipient fax number. This field is required. |
|
Original Fax Job |
|
References the earlier failed fax job when a retry creates a new job. |
|
Retarus Fax Job ID |
|
Stores the Retarus fax job ID for this specific Cloud Fax Job. This is useful because one Salesforce campaign can have multiple Retarus IDs over time, for example after retries. |
|
Sending Status |
|
New fax jobs must start in Draft. After sending begins, Retarus updates the status. |
|
Source ID |
|
Stores the Salesforce record ID that the fax job belongs to. Because this is a text field rather than a polymorphic lookup, populate it if you want the fax job to appear in the single fax history for that record. |
|
Cover page fields |
- |
Can usually contain any text values. Avoid HTML tags in these fields, because they can cause unexpected formatting on the generated cover page. |
|
Source lookup fields |
- |
Cloud Fax Job also includes lookup fields for Account, Contact, Lead, Case, and Opportunity. Use these fields when you want related Cloud Fax Jobs to appear in related lists on those standard object record pages. |
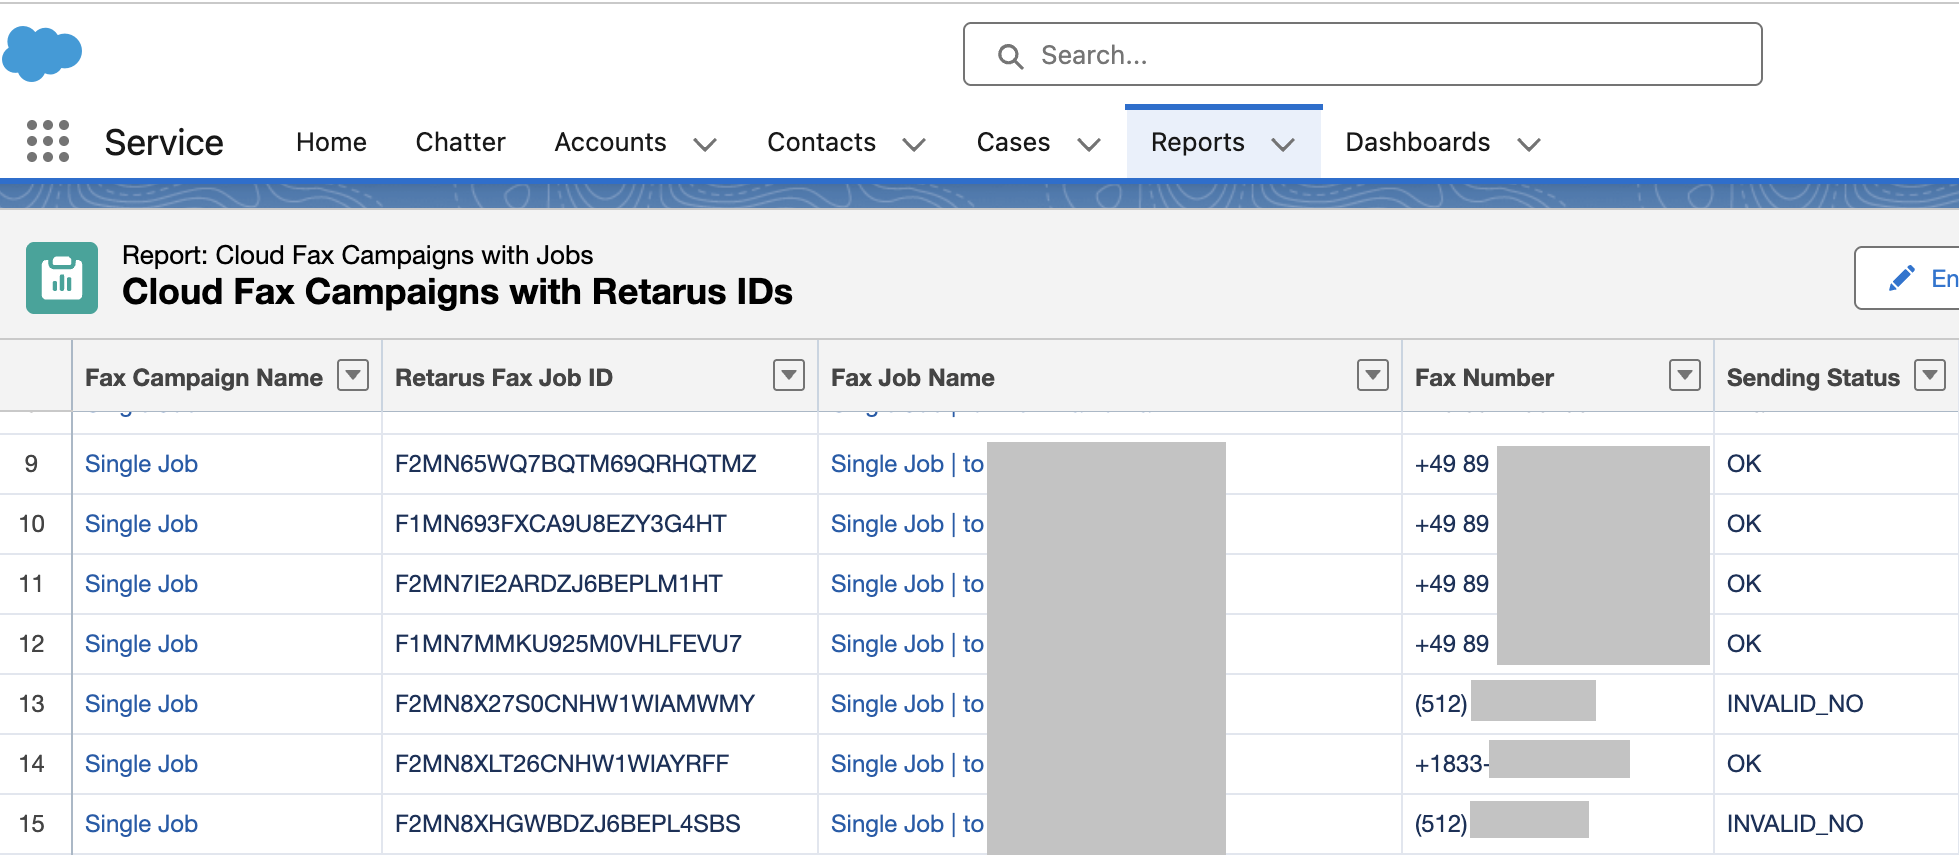
Reporting
Because Retarus sends fax status updates back to Salesforce, all Cloud Fax data is available through the standard Salesforce reporting engine. Salesforce administrators can build reports and dashboards directly on Cloud Fax Campaign and Cloud Fax Job records without any additional configuration.
Reports can include fields such as:
-
Fax Campaign Name
-
Retarus Fax Job ID
-
Fax Job Name
-
Fax Number
-
Sending Status
You can filter and group report data by user, team, or across the entire organization, and combine it with standard Salesforce dashboard features to track fax activity and delivery outcomes over time.
The example below shows a report that lists fax campaigns together with their associated Retarus job IDs, recipient fax numbers, and sending statuses.
Error handling when sending fax campaigns
If a fax campaign stays in In Progress for an extended period, an error likely occurred while Salesforce was sending data to Retarus.
Common causes
-
The user who selected Send Fax Jobs does not have the Cloud Fax User permission set.
-
Credentials in the Named Credential or External Credential are incorrect.
After you correct the issue, reset the campaign status to Draft before sending again.
Further troubleshooting
-
Open the Developer Console, or enable debug logs for the affected user.
-
Reset the fax campaign status to Draft and resend it.
-
Review logs in the Developer Console or under Setup → Debug Logs.
-
Look for entries related to the FutureHandler operation.