
User Import lets Tenant Admins create multiple users at once by uploading a CSV file. The import runs in the background, so you can leave the page while users are being created.
📌 Updating users in bulk is currently not supported. Update individual users through the Fax Portal.
Preparing the CSV file
Before uploading, download the CSV template from the User Import screen (Users - Create Users - Import). Using the template ensures your file has the correct column names and format.
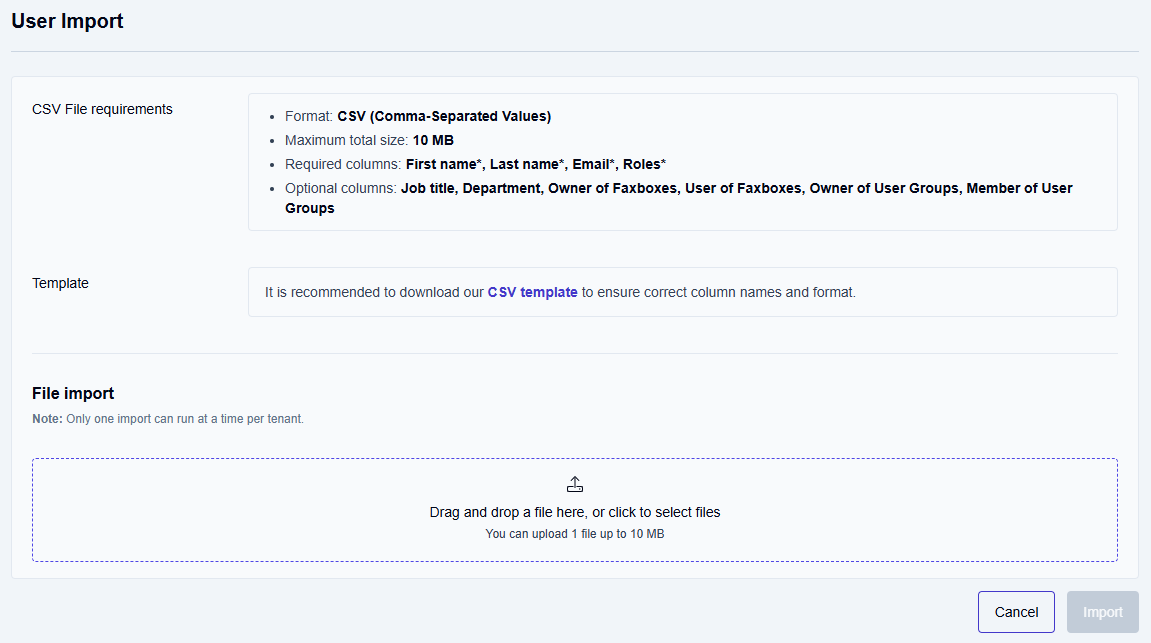
The file must use UTF-8 encoding, comma-separated values, and be no larger than 10 MB. Each row creates one new user.
|
Column |
Required |
Description |
|---|---|---|
|
First name |
Yes |
1 to 20 alphabetic characters |
|
Last name |
Yes |
1 to 20 alphabetic characters |
|
|
Yes |
Valid email address, up to 254 characters. Must be unique across all users. In an SSO-enabled tenant, the address must also match the address returned by your identity provider. |
|
Roles |
Yes |
At least one role required. Refer to the CSV template for valid values and format. |
|
Job title |
No |
Up to 50 characters |
|
Department |
No |
Up to 50 characters |
|
Owner of Faxboxes |
No |
Exact faxbox name.
|
|
User of Faxboxes |
No |
Exact faxbox name.
|
|
Owner of User Groups |
No |
Exact group name.
|
|
Member of User Groups |
No |
Exact group name.
|
Importing users
-
On the main Enterprise Fax Portal page, click Settings.
→ The Users page opens. -
Click the dropdown arrow next to Create User, then select Import.
→ The User Import screen is displayed. -
Drag and drop your CSV file onto the upload area, or click the area to select a file.
-
Click Import.
📌 Only one import can run at a time per tenant. If you start a second import while one is already in progress, it is queued and starts automatically when the first finishes. Manual user creation through the portal is not blocked while an import is running.
Reviewing import results
-
On the main Enterprise Fax Portal page, click Settings.
→ The Users page opens. -
Click the dropdown arrow next to Create User, then select Upload History.
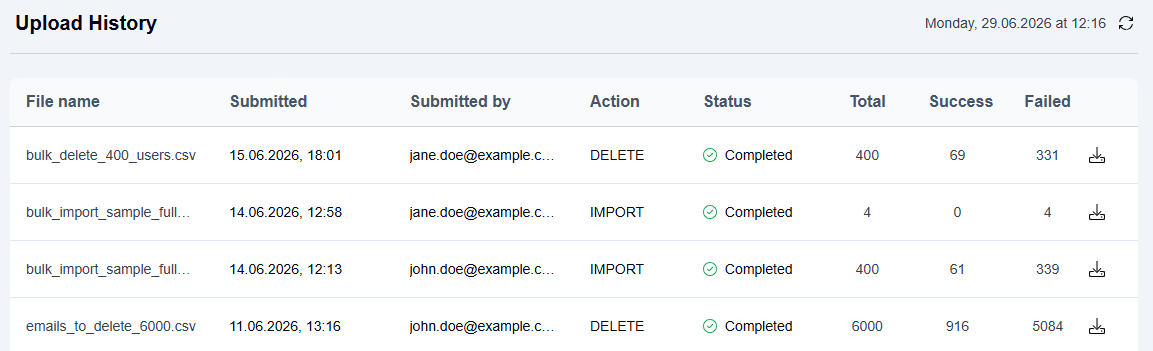
The Upload History screen lists all past bulk operations, showing the file name, submission date and time, who submitted it, the action type (IMPORT or DELETE), status, total rows, successful rows, and failed rows. Both user import and bulk deletion operations appear in this history.
To download the results for a completed import, click the download icon in that row. The download includes the original uploaded file. If any rows could not be imported, a separate error file is included listing those rows and the reason each one failed.
Individual row failures do not stop the import. The remaining rows continue to process. To retry failed rows, correct them and upload a new file. Rows with email addresses that are already in the system are automatically skipped on re-upload and do not cause errors.